


10
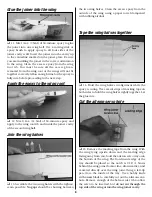
Apply the center tape
❏
21. Starting at the front of the aileron servo tray,
apply the 1/2" (12.5mm) white plastic center tape
completely around the wing over the joint. A small
amount of pressure should be applied to make a
smooth seam.
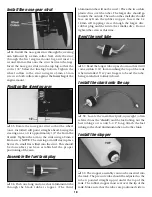
Check the aileron hinge
❏
22. Gently tug on each of the ailerons at each hinge
location. If any of the hinges are loose, reglue them as
described here. First, flex the surface all the way one
direction (DO NOT REMOVE THE AILERON). Apply 5
drops of thin CA onto each hinge. Use a paper towel
to absorb the excess glue. Wait a few minutes for the
glue to harden, then flex the
surface the other direction and
glue the other side of the hinges.
Finally, flex the back and forth
several times to free up
the aileron.
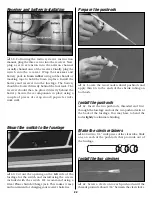
Install the aileron control horns
❏
23. Thread the white aileron control horns onto the
torque rods until there is 3/4" (19mm) of torque rod
between the wing and control horn.
Assemble the pushrods
❏
24. Locate two plastic
clevises
and two 8" (203mm)
aileron pushrods. Thread the clevises onto the
threaded end of the
pushrods
until the rod begins to
protrude from the inside of the clevis between
the forks.
Aileron Control Horn (2)
Actual Size


