


❏
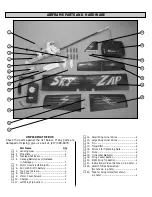
1. The above photo shows the components you will
need to assemble the stabilizer and fin. You will need
the horizontal stabilizer, the fin, two nuts, and the
special wrench for tightening the nuts.
❏
2. Note that the fin is installed on top of the horizontal
stabilizer. Make sure that the swept back edge is mounted
to the front of the model. Place the two fin mounting
bolts (already installed on the bottom of the fin) through
the top of the horizontal stabilizer, forming a single unit.
The top of the horizontal stabilizer is the side with the
decals applied.
❏
3. Place the mounting bolts of the assembly through
the holes from the top of the tail of the fuselage as
shown in the photo. Make sure that the tail skid is
pointing down.
❏
4. Place the two nuts on the mounting bolts that
extend through the bottom of the tail boom as shown in
the photo. Using the special wrench included with the
model, tighten the nuts firmly but do not overtighten.
You have now completed the assembly of the fin and
stabilizer.
❏
1. Turn the fuselage upside-down. Insert the landing
gear wire into the slot in the bottom of the fuselage as
shown in the previous photos.
INSTALL THE LANDING GEAR
INSTALL THE STABILIZER & FIN
4


