Hobbico Sky Zap Manual Download Page 10

❏ 

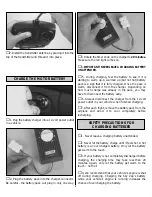
2. Open the battery hatch/canopy and plug the battery

pack into the plug in the fuselage.

❏ 

3. Reinstall the battery hatch cover/canopy.

❏ 

4. Move the power switch forward to the on position.

CAUTION: Stay clear of the propellers once the
battery pack is plugged in and the switch is turned on. 

❏ 

5. Have an assistant hold the SKY ZAP while you

move the left stick on the transmitter forward, or away
from you. Both motors will run. When flying, with the
motors running, the plane should climb at a 20 to 30
degree angle. Release the left stick and both motors will
stop. In flight, the SKY ZAP will start to glide and slowly
descend to the ground.

❏ 

6. Moving the right stick to the right, the left motor will

run. This will cause the plane to turn to the right in flight. 

❏ 

7. Moving the right stick to the left, the right motor will

run. This will cause the plane to turn to the left in flight.

The Sky Zap should be flown only when the wind speed
is 5 mph or less. 
If the wind is calm or very light, the Sky

CHOOSE A GOOD FLYING SITE

10

Summary of Contents for Sky Zap

Page 1: ...modification In no case shall Hobbico s liability exceed the original cost of the purchased kit Further Hobbico reserves the right to change or modify this warranty without notice In that Hobbico has...

Page 2: ...tions you will void your warranty 2 Test the operation of the model before each flight to insure that all equipment is operating properly and that the model remains structurally sound 3 Fly only on ca...

Page 3: ...Fuselage 1 5 Motor Covers Left Right 2 6 600 mAh NiMH Battery 1 7 Top Cover Screws 2 8 Top Cover 1 9 Motor Cover Screws 2 10 Charger 1 11 Left Wing Tip Section 1 12 Small Wing Joiner Wires 2 13 Large...

Page 4: ...horizontal stabilizer is the side with the decals applied 3 Place the mounting bolts of the assembly through the holes from the top of the tail of the fuselage as shown in the photo Make sure that th...

Page 5: ...g joiner wire and a small joiner wire as shown in the above photo 4 Insert the large wing joiner wire into the front plastic joiner insert and the small wing joiner wire in the rearward plastic joiner...

Page 6: ...r being sure not to overtighten them which could crush the wing 11 Note that the motor covers are marked Left and Right Make sure that they are installed correctly Place one of the motor covers into p...

Page 7: ...easy access to the battery in order to remove it for recharging 1 The transmitter that controls your airplane requires power in the form of eight AA batteries To install the batteries just turn over...

Page 8: ...ck you may have to disconnect the battery early 6 Always disconnect the charger from the 12 volt power outlet in your vehicle when finished charging 7 After each flight remove the battery pack from th...

Page 9: ...lanced will be unstable and possibly unflyable 1 After the battery pack is charged remove the battery hatch cover canopy Insert the battery pack inside the fuselage Do not plug the battery pack into t...

Page 10: ...tors will run When flying with the motors running the plane should climb at a 20 to 30 degree angle Release the left stick and both motors will stop In flight the SKY ZAP will start to glide and slowl...

Page 11: ...your airplane into the air 1 Have an assistant help with the launch Move the throttle stick forward so that the motors are running Have your assistant launch the plane into the wind It is not necessa...

Page 12: ...arts are available only as listed Replacement parts are not available from Product Support but can be purchased from hobby shops or mail order Internet order firms If you need assistance locating a de...

Reviews: