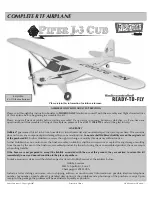


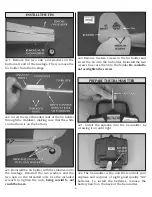


14
3. To land the Piper J-3 Cub, fl y down wind, past the
landing area. Gently turn into the wind and reduce
the throttle so that the airplane starts to come down.
Adjust the throttle as needed to reach the landing
area, but not fl y past it. Always land into the wind.
4. Just before landing, at about 1 foot above the
ground, apply a little up elevator to fl are (raise the
nose of the airplane). This will cause the airplane
to slow and settle to the ground.
Caution: If, during a rough landing, the propeller
on the Piper J-3 Cub should become jammed and
cannot rotate with the throttle in the run position,
the battery and speed control will become very
hot. Immediately move the throttle stick down to
stop the motor. If you fail to do this, the motor,
speed control and/or battery will be damaged.
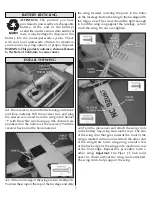
AFTER THE FLIGHT
Switch off the airplane. Then, switch the transmitter
off. Unplug the battery from the airplane and
remove the battery from the battery compartment.
Allow the motor and battery to cool before
recharging. Check the airplane over to make sure
nothing has come loose or may be damaged.
REPAIRS
Even the best R/C pilots in the world damage their
airplanes every now and then. In the unfortunate
event that you damage your airplane, repairs are
fairly simple to make yourself. If there are any
cracks in the wing or fuselage, apply 6-minute
epoxy or white glue to the broken areas and hold
together with clear packaging tape. Let the glue
cure, leaving the tape in place for added strength.
REPLACEMENT PARTS LIST
To order replacement parts for your Piper J-3
Cub, use the order numbers listed. Replacement
parts are available only as listed. Replacement
parts are not available from Product Support,
but can be purchased from hobby shops or mail
order/Internet order fi rms. If you need assistance
locating a dealer to purchase parts, contact:
Product Support
Phone: 217-398-0007 Fax: 217-398-7721
E-mail: [email protected]
Before starting to build, take an inventory of this
kit to make sure it is complete and inspect the
parts to make sure they are of acceptable quality.
If you need assistance with assembly, contact
Product Support. When reporting defective or
missing parts, use the part names exactly as they
are written in the parts list.
Stock # ........... Description
GPMP7700 ......NiMH 8.4V 1100mAh Red 2-Pin
HCAA3950 ......Main Wing
HCAQ3851 .....Prop Assembly
HCAA3951 ......Cowl Assembly
HCAA3952 ......Decal Set
HCAA3953 ......Struts (2)
HCAA3954 ......Motor Mount
HCAA3955 ......Main Landing Gear
HCAA3956 ......Tail Assembly
HCAA3957 ......Battery Hatch Door
HCAA3958 ......Fuselage w/Pushrods
HCAG1053 ......Motor 380
GPMM7700 .....12V Peak Charger 600-1100mAh 2-Pin
HCAQ3501 .....Propeller (2)
HCAA3959 ......Tail Wheel Assembly
HCAA3960 ......Firewall
HCAA3913 ......Control Horn Set
HCAA3961 ......Wing Screws
HCAA3962 ......Pushrod/Clevis
TACM0100 ......TSX100 Micro Servo
TACM5100 ......Servo Gear Set TSX100
TACM5101 ......Servo Arms TSX100
TACM4401 ......Antenna TX TTX400
TACM4402 ......Battery Door TX TTX400
TACL6036 ........TRX600 Receiver 72.510FM Channel 36
TACL6038 ........TRX600 Receiver 72.550FM Channel 38
TACL6042 ........TRX600 Receiver 72.630FM Channel 42
TACL6044 ........TRX600 Receiver 72.670FM Channel 44
TACL6046 ........TRX600 Receiver 72.710FM Channel 46
TACL6050 ........TRX600 Receiver 72.790FM Channel 50
TACJ14** .........TTX400 Transmitter
TACL4036 ........Transmitter Crystal 72.510FM Ch 36
TACL4038 ........Transmitter Crystal 72.550FM Ch 38
TACL4042 ........Transmitter Crystal 72.630FM Ch 42
TACL4044 ........Transmitter Crystal 72.670FM Ch 44
TACL4046 ........Transmitter Crystal 72.710FM Ch 46
TACL4050 ........Transmitter Crystal 72.790FM Ch 50
TACM4403 ......Transmitter Battery Holder
TACM6600 ......TSC600 Electronic Speed Control


