


❏
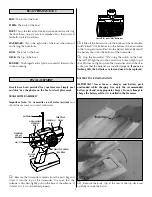
5.Peel the backing off of the supplied hook & loop material
and apply the “loop” side to your 6-cell battery pack. Place a
fully charged battery pack onto the battery tray as shown.
❏
6.Plug the battery pack into the boat’s ESC (Electronic Speed
Control) battery connector. Do not force them together; they
are designed to fit together only one way.
CHECK THE RADIO SYSTEM:
❏
7.Turn the power “ON” to the transmitter and receiver (in
that order).
❏
8. If the boat’s propeller begins to spin once power is turned
“ON”, make sure your your transmitter is “ON” and simply
rotate the throttle trim knob located atop the transmitter until
it stops.
❏
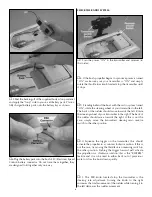
9. Standing behind the boat with the radio system turned
“ON”, rotate the steering wheel of your transmitter to the left.
The back of the rudder should move towards the left. Rotate
the steering wheel of your transmitter to the right. The back of
the rudder should move towards the right. If this is not the
case, simply move the transmitter’s steering servo reverse
switch to the other position.
❏
10. Squeeze the trigger on the transmitter; this should
activate the propeller in a counter-clockwise motion. If this is
not the case, try moving the throttle servo reversing switch to
the other position. Pushing the trigger forward will activate
the propeller in a clockwise rotation; this is the “REVERSE”
feature and it can be used to either back out of precarious
water or slow the boat down quickly.
❏
11. The D/R knob located atop the transmitter is the
steering rate adjustment. Turning the knob to the right
increases the total movement of the rudder while turning it to
the left decreases the rudder movement.
4


