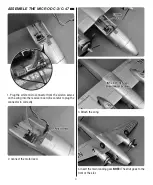
Hobbico Flyzone C-47 Skytrain Manual Download Page 8

8

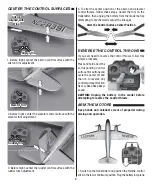
CENTER THE CONTROL SURFACES

Aileron Trim

Aileron Trim

Aileron

Aligned with

Wing

Aileron

Aligned with

Wing

1. Before flight, center the aileron control surface with the 

aileron trim adjustment.

Elevator Trim

Elevator Trim

2. Before flight, center the elevator control surface with the 

elevator trim adjustment.

Rudder Trim

Rudder Trim

3. Before flight, center the rudder control surface with the 

rudder trim adjustment.

4. To alter the center position of the aileron and elevator 

control throws, follow these steps. Center the trim on the 
transmitter, then unplug the battery from the model before 
attempting to mechanically adjust the linkages.

Alter the Control Surface Center Position

REVERSE THE CONTROL THROWS

If you ever need to reverse the control throws, follow this 
simple procedure.

Press and hold one of the 
corresponding control 
surface trim buttons and 
cycle the power off and 
then on to reverse any 
control surface direction. 
Hear a «Beep Beep Beep» 
sound.

CAUTION:


Unplug the battery in the model before 

attempting to reverse the control throws.
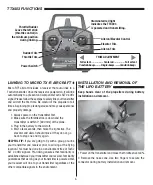
ARM THE MOTORS

Keep hands and onlookers clear of propeller during 
arming and operation.

1. Switch on the transmitter and position the throttle control 

stick in the low or minimum position. Plug the battery into plane.

Summary of Contents for Flyzone C-47 Skytrain

Page 1: ...f the purchased kit Further Hobbico Inc reserves the right to change or modify this warranty without notice In that Hobbico Inc has no control over the final assembly or material used for final assemb...

Page 2: ...If you make any modifications you void the warranty 2 Test the operation of the model before each flight to ensure that all equipment is operating properly and that the model remains structurally sou...

Page 3: ...he battery is damaged in the crash it could catch fire If the battery starts to swell quickly move the battery to a safe location preferably outside away from combustible material Place it in a bucket...

Page 4: ...ite micro connector from the aileron servos on the wing into the receiver board Be careful to plug the connector in correctly 2 Connect the motor lead 3 Attach the wing 4 Insert the main landing gear...

Page 5: ...ff CHARGE THE 3 7V 250mAh LiPo BATTERY Do not use the charge feature while flying the Micro DC 3 C 47 Push down and slide to open the charger cover Illuminated green light indicates charging It may be...

Page 6: ...00mm of the plane 3 Plug in the battery to the aircraft 4 Wait a few seconds then move the right stick The elevator and aileron should move If they do not go back to step one and try again HELPFUL TIP...

Page 7: ...yank or jerk the battery from the aircraft This could dislodge the RX board from the Micro DC 3 C 47 CHECK THE CONTROL SURFACE DIRECTION Right stick moves left left aileron moves up and right aileron...

Page 8: ...transmitter then unplug the battery from the model before attempting to mechanically adjust the linkages Alter the Control Surface Center Position REVERSE THE CONTROL THROWS If you ever need to rever...

Page 9: ...en grass field There should not be any vehicles buildings power lines trees large rocks or anything else that your model can crash into 100 ft 100 ft 100 ft 100 ft Control may be lost if the airplane...

Page 10: ...de going into a turn and the elevator will need to be returned to neutral when coming out of a turn to avoid gaining altitude It s recommended that you attempt to land before the motors lose power and...

Page 11: ...the aircraft must balance in order to fly properly Ailerons The flight control on the airplane that controls the ability of the airplane to bank left and right Elevator The flight control that contro...

Page 12: ...2403 Equipment class 1 Tactic TTX403 transmitter and Tactic TR1424 receiver The objects of the declaration described here are in conformity with the requirements of the specifications listed below fol...

Reviews: