Hobbico FlyZone Aero Voyager Assembly Instructions Manual Download Page 2

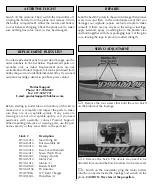
Your  Aero  Voyager  plane  is  not  a  toy,  but  rather  a
sophisticated, working model that functions very much
like  an  actual  airplane.  Because  of  its  realistic
performance, the model, if not assembled and operated
correctly,  could  possibly  cause  injury  to  yourself  and
spectators or damage property. 

We  highly  recommend  that  you  get  experienced,
knowledgeable  help  with  assembly  and  during  your
first  flights,  to  make  your  R/C  modeling  experience
totally  enjoyable.

You’ll  learn  faster  and  avoid  risking

your model before you’re truly ready to solo. Your local
hobby shop has information about flying clubs in your
area whose membership includes qualified instructors.
You  can  also  contact  the  national 

Academy  of  Model

Aeronautics

(AMA),  which  has  more  than  2,500

chartered  clubs  across  the  country.  Instructor  training
programs and insured newcomer training are available
through any one of these clubs.

Contact  the  AMA  at  the  address  or  toll-free  phone
number below.

Academy of Model Aeronautics

5151 East Memorial Drive

Muncie, IN 47302

(800) 435-9262

Fax: (765) 741-0057

or via the Internet at: http://www.modelaircraft.org

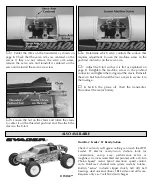
1. Assemble the plane 

according to the instructions. Do

not

alter  or  modify  the  model.  If  you  make  any

modifications, you will void your warranty.

2. 

Test

the operation of the model 

before each flight

to

insure that all equipment is operating properly, and that
the model remains structurally sound.

3. Fly only on calm days (with wind speeds less than 5
mph)  and  in  large  open  areas  free  of  trees,  people,
buildings or any other obstacles.

Remember: Take your time and follow the instructions
to end up with a well-built model that is durable and
easy to fly.

The  R/C  model  hobby  becomes  more  and  more
enjoyable  as  your  experience  grows. Your  chances  for
success and graduation to higher levels are very good if
you take your time and follow the assembly and flying
instructions  carefully  and  completely.  We  hope  you
enjoy flying your Aero Voyager plane.

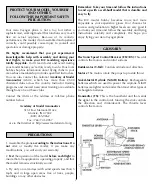
Electronic  Speed  Control/Receiver  (ESC/RX):

This  unit

controls the motors and control surfaces.

Ruddervator (V-Tail): 

Controls altitude and direction.

Motors:

The motors rotate the props to provide thrust.

Nickel-Metal  Hydride  (NiMH)  Battery:

Rechargeable

batteries which are used to power the airplane. NiMH
batteries are lighter and smaller than most other types of
rechargable batteries.

Transmitter  (TX):

This  is  the  hand-held  unit  that  sends

the signal to the control unit. Moving the stick controls
the  direction  and  climb/decent.  The  throttle  lever
controls the motors.

GLOSSARY

PRECAUTIONS

PROTECT YOUR MODEL, YOURSELF

AND OTHERS.

FOLLOW THIS IMPORTANT SAFETY

PRECAUTION

2

Summary of Contents for FlyZone Aero Voyager

Page 1: ...ity shall be assumed nor accepted for any damage resulting from the use by the user of the final user assembled product By the act of using the user assembled product the user accepts all resulting li...

Page 2: ...modifications you will void your warranty 2 Test the operation of the model before each flight to insure that all equipment is operating properly and that the model remains structurally sound 3 Fly o...

Page 3: ...g 1 5 V Tail 1 6 Transmitter 1 7 Wrench for Tightening Nuts 1 8 Nuts 2 9 Tail Skid 1 10 Rubber Bands 4 Spare Propellers Not Shown in Photo 2 Decal Not Shown in Photo 1 Instructional DVD Not Shown in P...

Page 4: ...n the mounting bolts that extend through the bottom of the tail boom as shown in the photo Using the included wrench tighten the nuts firmly but do not overtighten You have now completed the assembly...

Page 5: ...the contacts in the transmitter case Reinstall the battery hatch on the transmitter case and tighten the screw 4 Switch on the transmitter and check the LED on the front of the transmitter If the gre...

Page 6: ...e battery into the charger there is no way to know how much charge is left in the battery unless you have just completed a flight in which the battery was run all the way down or have fully discharged...

Page 7: ...k is charged open the battery hatch canopy Insert the battery pack inside the fuselage Do not plug the battery pack into the connector inside the fuselage Close the canopy 2 Place marks on the bottom...

Page 8: ...k is plugged in and the switch is turned on 1 Center the trim levers on the front of the transmitter 2 Place a straightedge across the bottom of the V tail It should be flat all the way across If it i...

Page 9: ...e the right stick on the transmitter to the left The left control surface will go down and the right control surface will go up The plane will turn to the left 8 To start the motors the throttle lever...

Page 10: ...d before turning 3 To turn the Aero Voyager move the right stick to the left or right slightly The more you move the stick the tighter the turn will be To stop the turn move the stick the opposite dir...

Page 11: ...defective or missing parts use the part names exactly as they are written in the parts list Stock Description HCAA3413 Main Wing Kit HCAA3414 Tail Assembly Kit HCAA3415 Decals HCAA3416 Fuse Set w Pus...

Page 12: ...8 Retighten the machine screw in the pushrod connector and tighten the nut against the clevis Reinstall the servo hatch and install the four screws to secure it to the fuselage 8 Switch the plane off...

Reviews: