3
2
WAVE: The ultimate speaker system for your iPad, iPhone, and iPod
Thank you for purchasing WAVE Speaker System for iPad, iPhone and iPod from HMDX Audio.
This product, along with the entire HMDX lineup, connects high-tech innovation with design to
provide you with years of dependability and enjoyment.
WAVE Speaker Dock Main Features
• Simple docking to charge and play your iPad/iPhone/iPod
• Superior speaker quality with integrated passive subwoofer for enhanced bass
• Motorized dock
• Video-out capability
• Remote Control for your convenience
Remote Control battery
The battery is already installed. Simply pull tab out to activate battery power. To replace remote
battery, open the battery door by pressing the two tabs together. Remove the old battery and
replace with a CR2025 battery.
Battery Precautions
• Use only the size and type of batteries specified.
• When installing batteries, observe /- polarities. Incorrect installation of battery may cause
damage to the unit.
• Do not mix different types of batteries together (e.g., alkaline with carbon-zinc or old batteries with
new ones).
• If the unit is not going to be used for a long period of time, remove batteries to prevent damage
due to possible battery leakage.
• Do not dispose of batteries in fire. Batteries may explode or leak.
This product contains small parts that may present a choking hazard for young
children.
Getting Started
Unpack the unit carefully. Remove all the accessories from the display carton. Do not remove
any labels or stickers on the rear of the unit and adaptor. Before setting up the unit, verify that the
following accessories are present:
• Instruction manual x 1
• AC power adaptor x 1
• Main unit x 1
• Remote control x 1
Power Source
This unit is supplied with an AC adaptor; take the following steps to connect the adaptor.
1. Unwind the power cord of the AC adaptor to its full length.
2. Connect the DC plug of the AC adaptor to the DC Jack (Fig. 1).
3. Plug the AC adaptor to the AC outlet (110v – 240v AC. 60 Hz). Connecting this system to any
other power source may cause damage to the system. For sufficient ventilation, keep other
VIDEO OUT
LINE IN
12V DC 2A
MODEL NO.: HX-A142
Adaptor: 12V 2A
Battery: CR2032 3V
Date Code: ABCD
This device complies with part
15 of the FCC Rules. Operation
is subject to the following two
conditions: 1. This device may
not cause harmful interference, and 2.
This device must accept any interference
received, including interference that may
cause undesired operation.
MADE IN CHINA
SOURCE
1
2
z
z
z
SOURCE
1
2
z
z
z
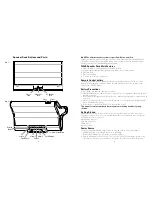
Speaker Dock Buttons and Parts:
Video Out
Jack
Snooze
Alarm 2
Clock Display
–/+ Volume/Time/Alarm
Alarm 1
Source
Docking
Drawer
Play/Pause
Line In
Jack
AC Adaptor
Jack
Power
Eject
(Fig. 1)
(Fig. 2)


