background image

HKC Technology Limited 


2.4G Cordless Telephone System configuration guide 

Page 56 

Multi-level Interactive Voice Response 

The Multi-level Interactive Voice Response IVR feature allows the caller to access a function 
via a series of key press selections. It can be a voice prompt of a product description, a 

message prepared by the system owner, a call transfer option to select a person, a voice 
mailbox, etc. 
With the Multi-level IVR feature, you can setup your system to provide a customer oriented 
voice service. Examples are: 
i. 

Customer service hot line 

ii. 

Company products or services introduction 

iii. 

Auto Attendant service with direct call transfer to a person or department 

iv. 

Voice announcement service with multi-language prompts 

v. 

Access to a mailbox directly upon unsuccessful call transfer or in night mode 

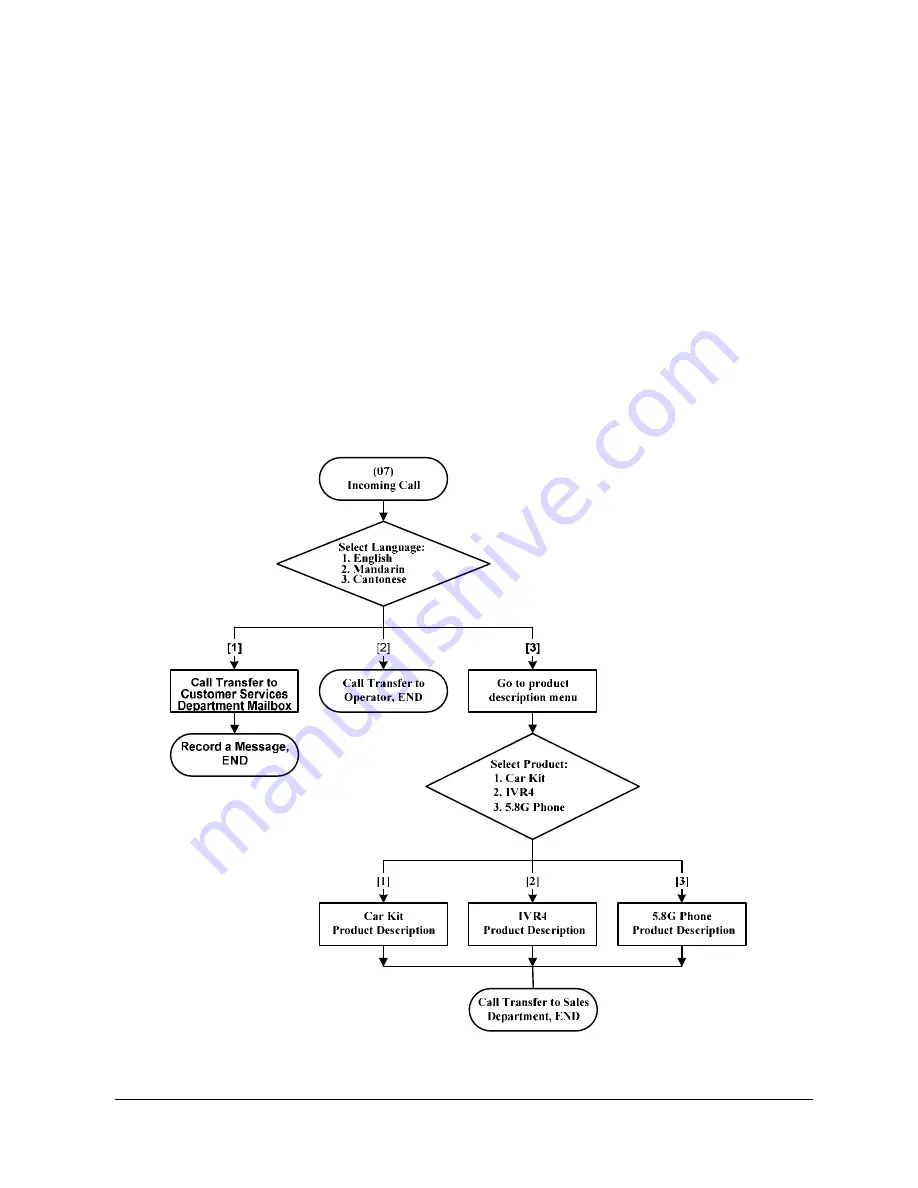
Here is an example of multi-level IVR call flow: 


Fig. 12: Multi-level IVR Call Flow Sample 

Summary of Contents for Circle

Page 1: ...HKC Technology Limited 2 4GHz Multi line and Multi handset Cordless Telephone System Configuration Guide Version 1 10 ...

Page 2: ...any form or by any means electronic mechanical magnetic optical chemical manual or otherwise any part of this publication without the express written permission of HKC Technology Limited Disclaimer HKC Technology Limited makes no representations or warranties regarding the content of this manual We reserve the right to revise the manual or make changes in the specifications of the product describe...

Page 3: ...IC RECALL 14 CALL FORWARD ALL CALLS 15 CALL FORWARD BUSY 15 CALL FORWARD BUSY OR NO ANSWER 15 CALL FORWARD NO ANSWER 15 CALL FORWARD TO EXTERNAL LINE 15 CALL FORWARD TO VOICE MAIL 16 CALL HOLD NORMAL 16 CALL HOLD EXCLUSIVE 16 CALL LOG 16 CALL PAGING 17 CALL PICKUP LINE 17 CALL PICKUP EXTENSION 17 CALL TRANSFER LINE CALL 17 CALL TRANSFER INTERCOM CALL 17 CONFERENCE 17 DIAL TYPE SELECTION 18 DIGITAL...

Page 4: ...5 3 1 VOICE MAIL 36 3 2 Auto Attendant 38 4 Handset Manage 39 4 1 Edit User Name 39 4 2 Delete User 39 5 Technical Setting 39 5 1 Restore Technical Default 40 5 2 Call Setting 40 5 3 Technical Setting 41 VOICE MAIL CONFIGURATION 45 INTRODUCTION 45 FEATURES 45 Voice Mail 45 Auto Attendant 45 Multi level Interactive Voice Response 45 VOICE MAIL 46 Related Setting by Computer See PC programming Guide...

Page 5: ...System configuration guide Page 5 Example of Multi level IVR Application 61 IMPORTANT SAFETY INSTRUCTION 65 SPECIFICATION 67 HARDWARE SPECIFICATION 67 OPERATING CONDITIONS 67 LIMITED WARRANTY 68 IMPORTANT CONSUMER INFORMATION 72 CUSTOMER SERVICE 74 ...

Page 6: ...lay on extension 0 2 From a standard PC via the RS232 port Configuration from the PC provides a simple Graphic User Interface while configuration from the Extension affords convenience There are four sections in this document Installation Procedures and Precaution Call Features All the various call features Configuration programming Configuration Procedures in detail Voice mail configuration Voice...

Page 7: ...ess for the extension registration 4 RESET System reset 5 Line 1 3 Telephone Line Ports 6 Phone 1 3 Single Line Telephone Port for Power Failure Transfer 7 Door 1 2 Option Connects to door phone 8 DC 9V 1 4A INPUT Connects AC switching power supply 9 TO COMPUTER RS232 PORT to computer 10 AUDIO IN Connects to a sound source 11 AUDIO OUT Connects to a PA system for voice announcement 12 BATTERY COVE...

Page 8: ...e equipment near a power outlet with easy access to a power switch 6 The equipment should not be placed on top of a metal surface as this can affect the RF signal transmission Installation of The Main Control Base 1 Insert the backup rechargeable battery a Open the battery cover b Install the battery c Close the battery cover Fig 2 Backup rechargeable battery 2 The Base should be placed at the cen...

Page 9: ...in the AC power mode The battery is for emergency backup only and should always be connected as shown above The battery will be fully charged within 24 hours of connection A fully charged battery can maintain the system for about 10 minutes after power is lost See the section under Connection of Single Line Phone for Power Failure Transfer Connection of Telephone Line 1 Telephone lines are connect...

Page 10: ...tion The specifications of paging Audio Output are Output level Approx 500mV at 47 k ohm load impedance Phone Jack 3 5mm mono or stereo jack You can connect the paging port in the Main Control Base to a PA system using an audio cable to make a voice announcement using the system s extensions Connection of Single Line Phone for Power Failure Transfer option A maximum of 3 sets of Corded phones can ...

Page 11: ... a Up to two electric locks can be connected to WMC door phone version b The maximum applied voltage should be 24 VDC or less c The maximum applied current should be 0 5A or less d The connection is made using a standard RJ11 connector with the pins assignment as per the following diagram a sample is provided as reference 3 Set up via Extension 0 MENU System Config door phone 1st Row E x t A n s w...

Page 12: ...C a l l i n g P A G E D P 1 D P 2 Pick up handset for WDE or Press the TALK key for WHE or Soft Key DP1 DP2 which will be automatically appear on the soft key bar Hang up for WDE or press the END Key for WHE to disconnect when call finished Note The line will automatically disconnected if no one picks up the call Only one door phone can be used at a time Door lock Control Upon answering the door p...

Page 13: ...equires an IBM Pentium 100M Personal Computer with Window 98 or above operating system Minimum Ram requirement is 128M Byte Software Installation Procedures 1 Boot up the PC in Window environment 2 Put the System Programming CDROM into the CDROM drive e g D drive 3 The CDROM will auto start or use the Window File Explore go to D and run setup exe or use Desktop Start then Run type D setup exe Wait...

Page 14: ... 2 User Guide s Feature Operation Automatic Call Distribution Description An incoming call can be distributed to ring the desired extensions in turn automatically The feature is very useful in Help Desk or Call Center operation Conditions For example if extension 0 2 and 5 are programmed to ring then the 1st incoming call will ring port 0 only the 2nd incoming call will ring port 2 only and so on ...

Page 15: ...ng calls will be forwarded to the desired extension Conditions When the extension is off hook incoming calls will be forwarded to the desired extension immediately When the extension is not answering for a preset time limit incoming calls will be forwarded to the desired extension Setting User Guide s Feature Operation Menu Call Setting Call Forward No Answer Description When the extension is not ...

Page 16: ...tions If a call on hold is not retrieved in a specified period the system will automatically recall the extension user Call Hold Exclusive Description By pressing the CONF button the call in progress can be put into the exclusive hold condition The call can only be picked up again at the same extension When time out occurs the exclusive hold condition will change to common hold condition and can b...

Page 17: ...ming call from an external line can be transferred from the first answering extension to another extension Conditions When an extension is on a line call first call the destination extension number and then go on hook and it will activate ring inward transfer automatically Operation See User Guide s Feature Operation for details Call Transfer Intercom Call Description An intercom call can be trans...

Page 18: ...es DIL Description The system directs incoming calls from line to one or more answering extensions Conditions When the Auto Attendant feature is activated incoming calls from line can also be directed to the voice mail system for auto attendant service Display Description On the extension the following information can be shown extension number and name dialed telephone number number or name of the...

Page 19: ...shing time of system can be programmed from 50 ms to 950 ms in step of 50 ms Conditions It is available at Desktop extension WDE ER Setting call features configuration 5 3 1 Hands free Operation Description With the hands free feature phone the user can make and receive calls with hands free operation Besides the user can turn the microphone on and off mute during hands free operation Headset Oper...

Page 20: ...em and it can be recalled by pressing the redial key Line Assignment Description A line port in the system can be enabled or disabled Setting call features configuration 2 2 Line or Extension Camp On Description An extension can camp on a busy line or busy extension Connection will be established once the called party and the calling party are idle Operation See User Guide s Feature Operation for ...

Page 21: ...s The phone must be in the conversation mode The memo recording is counted as a conference call Operation See User Guide s Feature Operation for details New Call indication Description When there is any new unanswered call the New Call indicator light will come on Conditions The indicator light is available on the Desktop Phone WDE ER only The light is off when the user browses the call history Ni...

Page 22: ...es configuration 5 3 2 Power Failure Transfer Description During power failure condition telephone lines 1 2 and 3 will be automatically connected to the corresponding single line phones option Condition A maximum of 3 sets of Corded phones can be connected to the Main Control Base Any of these can be used as a normal single line phone for emergency calls Real Time Clock Programming Description Th...

Page 23: ...in numbers e g Toll Call access codes Three sets of code can be set restricted The restricted extensions will require the input of a password as set for making calls in the Toll Restricted Codes on the list everytime the extension user wants to make such a call Setting call features configuration 2 5 1 2 5 2 Toll Call Security Code Description An extension can be permitted to Toll access as set by...

Page 24: ...to the extension 1st Row M A I N M E N U 2nd Row r e g i s t e r 3rd Row s y s t e m c o n f i g 4th Row B A C K S E L E C T Prompt for password if Password Enabled Press OK to confirm Password setting see system configuration 1 5 1st Row P a s s w o r d R e q u i r e 2nd Row 3rd Row p a s s w o r d 4th Row B A C K D E L O K 3 Set up the required application via the user friendly Main Menu its Sub...

Page 25: ...d Save new settings Then the new setting will upload to the Main Control Base The screen will return to normal when it completes Menu Hierarchy 1 Basic Setup 1 1 Time 1 1 1 Set Time Date 1 1 2 Set Time Format 1 1 3 Set Date Format 1 1 4 Set Daylight Saving 1 1 5 Set CID update 1 2 Outgoing Call 1 3 Incoming Call 1 4 Tone Pulse Dialing 1 5 Password Set Password Enable Disable Set System Password 2 ...

Page 26: ... 5 1 Restricted Extension 2 5 2 Restricted Numbers 2 5 3 Toll Enabled Password 3 Voice Mail 3 1 Voice Mail Setting 3 1 1 Password Change 3 1 2 Max Recording Time 3 1 3 Max Message No 3 1 4 Greeting Time 3 1 5 Sound Level 3 1 6 Silence Detect 3 1 7 Route to AA 3 1 8 Min Duration 3 2 Auto Attendant Setting 3 2 1 Afternoon Mode 3 2 2 AA Timeout 3 2 3 Supervisor Password 4 Handset Management 4 1 Edit ...

Page 27: ...ng Gain 5 3 11 PCM Outgoing Gain 5 4 Restore Factory Default System Configuration Menu Main Menu 1st Row S y s t e m C o n f i g b a s i c s e t u p a d v a n c e d s e t u p v o i c e m a i l a a h a n d s e t m a n a g e 2nd 3rd Row t e c h n i c a l 4th Row B A C K S E L E C T Press up down arrow to select and press Select to confirm 1 Basic Setup 1st Row B a s i c S e t u p t i m e s e t t i n...

Page 28: ... e k T u e 4th Row B A C K N E X T O K Press NEXT to change the current field Press up down to change value Press OK to confirm all settings 1 1 2 Set Time Format 1st Row S e t T i m e F o r m a t 2nd Row 1 1 2 h o u r 3rd Row 2 2 4 h o u r 4th Row B A C K S E L E C T show the current status Press up down to select and press SELECT to confirm 1 1 3 Set Date Format 1st Row S e t D a t e F o r m a t...

Page 29: ...utomatically update the time and date of system clock 1 2 Outgoing Call 1st Row E x t c a n m a k e 2nd Row c a l l o n a l l l i n e 3rd Row E x t 0 1 2 3 4 5 6 7 8 9 4th Row B A C K O K Press 0 to 9 to toggle the extension Press OK to confirm all settings Default all extensions can make outgoing call 1 3 Incoming Call 1st Row E x t w i l l r i n g 2nd Row o n a l l l i n e 3rd Row E x t 0 1 3 4 ...

Page 30: ...sword 1st Row P a s s w o r d 2nd Row e n a b l e d i s a b l e 3rd Row c h a n g e p a s s w o r d 4th Row B A C K S E L E C T Press up down arrow to select and press Select to confirm 1 5 1 Enable Disable Password 1st Row E n a b l e D i s a b l e 2nd Row 1 o f f 3rd Row 2 o n 4th Row B A C K S E L E C T show the current status Press up down to select and press SELECT to confirm Default Password...

Page 31: ... m a u t o m a t i o n 4th Row B A C K S E L E C T Press up down arrow to select and press Select to confirm 2 1 1 Enable night mode 1st Row E n a b l e N M 2nd Row 1 o f f 3rd Row 2 o n 4th Row B A C K S E L E C T If on is selected you can set Day Night mode manually according to your selection in the Menu Call Setting Day Night Mode via the extension 0 or if night mode automation on is also sele...

Page 32: ...ollowing selection 2 2 2 Line Mode Selection 1st Row M o d e S e l e C t i o n n o r m a l m o d E l i n e o u t o N l y c a l l d i s t r I b u t e 2nd 3rd Row l i n e d i s a b L e d 4th Row B A C K S E L E C T Press up down arrow to select and press Select to confirm 2 2 2 1 Normal mode 1st Row E x t w i l l r I n g 2nd Row o n l i n e 1 3rd Row D a y 0 1 2 3 4 5 6 7 8 9 4th Row B A C K O K The...

Page 33: ... Row E x t 0 1 2 3 4 5 6 7 8 9 4th Row B A C K O K Press 1 to 9 to toggle extension selection Press OK to confirm Repeat same procedure for settings until you complete all lines you selected 2 2 2 3 Call Distribute 1st Row E x t w i l l r I n g 2nd Row o n A C D l i n E 3rd Row D a y 0 1 2 3 4 5 6 7 8 9 4th Row B A C K O K If night mode is enabled then extension selection for both day night modes ...

Page 34: ...ow B A C K D E L O K Prompt for number and max allowed 32 digits Press DEL for backspace Press OK to confirm 2 4 ACD Options 1st Row A C D B y 2nd Row 1 l o n g e s t i d l e 3rd Row 2 c i r c u l a r 4th Row B A C K S E L E C T show the current status Press up down to select and press SELECT to confirm Default longest idle 2 5 Toll Restriction 1st Row T o l l R e s t r i c t r e s t r i c t e d e...

Page 35: ...call 2 5 2 Restricted Number 1st Row R e s t r i c t e d C o d e S e t 1 S e t 2 2nd 3rd Row S e t 3 4th Row B A C K D E L O K Three sets of code e g Toll Call Access code can be set restricted Press up down to select which set to be entered Input a number of digit not greater than 4 Press DEL for backspace 2 5 3 Enable password 1st Row T o l l E n a b l e 2nd Row P a s s w o r d 3rd Row P a s s w...

Page 36: ...Row p a s s w o r d 4th Row B A C K D E L O K Press up down arrow to select extension 0 9 Input edit a number of 4 digit password 0000 is reserved for the system Press OK to confirm There is no default password in Ex factory setting 3 1 2 Max Recording 1st Row M a x R e c o r d i n g 2nd Row T i m e 3rd Row V a l u e 6 0 s e c 4th Row B A C K O K Press up down arrow to select setting Press OK to c...

Page 37: ...13 Step size 1 3 1 6 Silence detect 1st Row S i l e n c e d e t e c t 2nd Row 1 o f f 3rd Row 2 o n 4th Row B A C K O K Press up down arrow to select setting Press OK to confirm When on is selected recording will be stopped when 6 seconds of silence is detected 3 1 7 Route to AA 1st Row R o u t e t o A A 2nd Row 1 o f f 3rd Row 2 o n 4th Row B A C K O K Press up down arrow to select setting Press ...

Page 38: ...ess OK to confirm If you have enabled this function the afternoon greeting will be activated automatically at 12 00 Note an afternoon greeting should be recorded for this feature 3 2 2 Announcement Silent Timeout 1st Row A n n O u c e m e n t 2nd Row S i l E n t T i m e o u t 3rd Row V a l U e 5 s e c 4th Row B A C K O K Press up down arrow to select setting Press OK to confirm Range 1 10 sec Defa...

Page 39: ... User Name 1st Row E d i T U s e r N a m e 2nd Row E x t E n s i o n 0 3rd Row B O 4th Row B A C K D E L O K Press up down arrow to select the extension Input name by using dial keypad Press DEL to delete the last word Press OK to confirm when all selected extensions are completed The name is a maximum of 12 alpha numeric characters 4 2 Delete User 1st Row D e l E t e U s e r 2nd Row E x t E n s i...

Page 40: ...all Setting 1st Row C a l L S e t t i n g h o l D r e c a l l a u t O c a l l t x f r 2nd 3rd Row d i s A b l e m o h 4th Row B A C K S E L E C T Press up down to select different menu 5 2 1 Hold Recall Timer After the call time out the extension putting a call on hold or transferring a call to a no answer extension will be recall 1st Row H o l d R e c a l l 2nd Row H i t u p d o w n k e y 3rd Row...

Page 41: ...c On Hold Off or On 5 3 Technical Setting 1st Row T e c H S e t t i n g f l a s H d u r a t i o n p a u s E d u r a t i o n v m r I n g c o u n t a a r I n g c o u n t t r u n K f w d l i m i t r i n g s t o p t i m e d t m f l e v e l l o w d t m f l e v e l h i g h p u l s E s p e e d p u l s E m a k e o u t g O i n g g a i n 2nd 3rd Row i n c o M i n g g a i n 4th Row B A C K S E L E C T Press ...

Page 42: ... p d o w n k e y 3rd Row V a l u e 5 R i n g 4th Row B A C K O K Press up down arrow to change value It is same for AA ring count setting vm ring count Range 1 17 Default 13 Step size 1 aa ring count Range 1 17 Default 9 Step size 1 5 3 4 Line to Line forward time limit 1st Row L I N E T O L I N E 2nd Row F W D T i m e L i m i t 3rd Row V a l u e 2 5 0 S e c 4th Row B A C K O K Press up down arrow...

Page 43: ...l H i g h 2nd Row H i t u p d o w n k e y 3rd Row V a l u e 3 1 4th Row B A C K O K Press up down arrow to change value Range 0 31 sec Default 31 Step size 1 5 3 8 Pulse Dial Speed 1st Row P u l s e S p e e d 2nd Row H i t u p d o w n k e y 3rd Row V a l u e 1 0 P P S 4th Row B A C K O K Press up down arrow to change value Range 10 or 20 pps Default 10 5 3 9 Pulse make ratio 1st Row P u l s e M a ...

Page 44: ... k e y 3rd Row V a l u e 8 4th Row B A C K O K Press up down arrow to change value Range 0 15 sec Default 8 Step size 1 5 4 Restore Factory Default 1st Row R e s t o r e S e t t i n g s 2nd Row T o F a c t o r y 3rd Row D e f a u l t 4th Row B A C K O K When OK is pressed the following screen shall be appeared to remind all user configuration will be erased and restore factory default However the ...

Page 45: ...oday s SOHO communications The system uses digital recording and non volatile memory making it advanced innovative and reliable equipment Features Voice Mail Personal Greeting Time Stamp Message Waiting Notification Remote access to mailbox Menu browse and selection of voice mail Incoming Call Direct Transfer to Mailbox Auto Attendant Operator Backup Day Night Mode Automatic switch Day Night Mode ...

Page 46: ...e in addition to leaving a message he she can press 0 key to go back to Auto Attendant for calling other extensions or operator Setting See call feature configuration 3 1 8 Minimum Message Duration To prevent message recorded with only a busy tone e g the caller hangs up the line immediately after greeting or silence any message less than 3 seconds default will not be stored Nor will the message w...

Page 47: ...ed A system greeting will be played if no personal greeting or name is recorded Setting use the extension to call into the system directly by pressing the Voice Mail key on the WDE ER or the soft key VM on the WHE ER when the voice mail indicator is off see fig 17 Mailbox Greeting Recording flow for details Message Playback Function When there is a new message or a memo in a mailbox the voice mail...

Page 48: ... feature of that mailbox is disabled for security Verification of Voice Mail Setup Leave a Message 1 To test the operation of leaving a message by a guest in voice mail service use another extension or external line to call to a busy or no answer extension For example extension X is the owner of mailbox X 2 Let the call being forwarded to system from extension X i e keep extension X busy or no ans...

Page 49: ...ternal line in voice mail service first record a message See the section Leave a Message 2 Afterwards use an external line to call inside the system 3 Now the system should answer the incoming call 4 Press when a welcome greeting is playing the system will ask the caller for a mailbox number and password Enter X plus the correct password and then the system will open the user menu of mailbox X 5 L...

Page 50: ...ssage Quit and Disconnect 2 Repeat Current Message Message Playback Select Operation 2 Repeat this message 3 Listen to next message 6 Copy current message to another mailbox 00 Delete this message 88 Delete all old messages 6 Copy current message to another mailbox 2 3 00 88 or no new message Input a mailbox number Fig 7 Retrieve Messages Mailbox Greeting Recording Fig 8 Personal Greeting and Name...

Page 51: ...e Copy Fig 9 Set Message Copy Administration by Phone There are 2 levels of administration provided by system user level and administrator level By a phone call provided the system is in Auto Attendant mode user or administrator can change some parameters in the system User Level Fig 10 User s Menu ...

Page 52: ...ked for a password and then the user menu will be opened directly Administrator Level The Administrator Menu is designed for both the system installer and the system administrator The Administrator can enter this menu by a phone call and do some global modifications on system parameters For example make a change to the Auto Attendant greeting and recording To enter the administrator menu the calle...

Page 53: ...ave enabled this function the afternoon greeting will be activated automatically at 12 00 noontime For example Good morning will be played before 12 00 noontime and Good afternoon will be played after 12 00 noontime Setting see call features configuration 3 2 1 Note the afternoon greeting should be recorded for this feature Time of Silence after Announcement If the caller does not enter an extensi...

Page 54: ...Number Description Message Example 1 Day Greeting and Instruction Message Good morning This is ABC company Please dial an extension or leave a message after the tone 2 Night Greeting and Instruction Message Thank you for calling ABC Company we are closed now please call again tomorrow 5 Afternoon Greeting Message Good afternoon This is ABC company Please dial an extension or leave a message after ...

Page 55: ...tures memory Reset This can be accessed by system programming see call features configuration 5 4 All the Auto Attendant features settings will return to their default values without erasing the announcement Note When factory default setting is restored the Auto Attendant features memory is also reset ...

Page 56: ...transfer option to select a person a voice mailbox etc With the Multi level IVR feature you can setup your system to provide a customer oriented voice service Examples are i Customer service hot line ii Company products or services introduction iii Auto Attendant service with direct call transfer to a person or department iv Voice announcement service with multi language prompts v Access to a mail...

Page 57: ...ding in System Configuration Bar Fig 13 Configuration Window There are 3 portions in this Window announcement selection functions of announcement and announcement recording Announcement Selection The announcements represent the boxes of the call flow There are 50 announcements 00 to 49 You need to put an announcement to each box in your call flow but you don t need to have all announcements record...

Page 58: ...x 0 9 Transfer the listener to a predefined extension Go to day night greeting Move the listener to auto attendant operation Open the desired mailbox with personal greeting Open a mailbox for the listener and start with personal greeting Open the desired mailbox without personal greeting Open a mailbox for the listener and start with beep Transfer to voice mail user login of language ID 0 Ask the ...

Page 59: ... and Configuration Example Here we repeat the previous call flow diagram with announcement numbers input Fig 14 Multi level IVR Call Flow Sample with Announcement Numbers When an announcement is executed it plays the pre recorded message and waits for the input from the user The waiting time is also defined here If there is no input from the listener when the waiting time expires the announcement ...

Page 60: ...n this example announcement 07 is the starting point of the call flow You don t need any function here You may record a message Welcome to ABC Company and then move the listener to next level This level has announcement 08 It is a language selection box You need to ask the listener to select a language and then move to next level If the listener doesn t press a selection after 10 seconds the call ...

Page 61: ... reset on the system To terminate a call flow branch you can use these functions Functions Open a desired mailbox with a personal greeting Open a desired mailbox without a personal greeting Transfer to voice mail for user login Open mailbox x with a personal greeting Open mailbox x without a personal greeting Disconnect Play goodbye message with language ID 0 and disconnect Example of Multi level ...

Page 62: ...HKC Technology Limited 2 4G Cordless Telephone System configuration guide Page 62 Fig 17 Single Digit Menu ...

Page 63: ...4G Cordless Telephone System configuration guide Page 63 Fig 18 Configuration Window for Single Digit Menu 07 Box Fig 19 Configuration Window for Single Digit Menu 08 Box Fig 20 Configuration Window for Single Digit Menu 09 Box ...

Page 64: ...sages for the boxes Box number Voice Message Content 07 Welcome to ABC company 08 Please select a department press 1 for the sales department 2 for accounts department 3 for customer service press 4 for general information press 0 for the operator 09 Please input the extension number or press 0 for the operator 10 Invalid extension number please input again 11 Invalid department selection please s...

Page 65: ...e telephone wires or terminals unless the telephone line has been disconnected 9 Use only the power source marked on the unit If you are not sure of the type of power supplied to your home consult your dealer or local power company 10 Do not place objects on the power cord Install the unit where no one can step or trip on the cord 11 Do not overload wall outlets and extension cords This can result...

Page 66: ...e and may cause burns or injury to the eyes or skin The electrolyte may be toxic if swallowed 4 Exercise care in handling batteries in order not to short the battery to conductive materials such as rings bracelets and keys The battery may overheat and cause burns 5 Charge the battery ies provided with or identified for use with this product only in accordance with the instructions in this instruct...

Page 67: ...odule 4 line LCD Alpha Numeric Display Display Date and Time Display Caller ID with Call Waiting Type 1 FSK Type II Voice Mail Message Recording 1 hour Maximum Distance open space line at sight 1300 ft WMC ER Weight 1 2 kg Color Dark Grey Silver WMC ER Dimension WxDxH 323 x 250 x 470 mm WMC ER Power Adaptor DC 9V 1 4A Back Up Battery rechargeable 7 2V Operating Conditions Temperature 0 to 45 Humid...

Page 68: ... does not cover defects in appearance cosmetic decorative or structural items including framing and any non operative parts HKCT s limit of liability under the limited warranty shall be the actual cash value of the Product at the time the Consumer returns the Product for repair determined by the price paid by the Consumer for the Product less a reasonable amount for usage HKCT shall not be liable ...

Page 69: ...ill be billed for any parts or labor charges not covered by this limited warranty The Customer will be responsible for any expenses related to reinstallation of the Product d HKCT will repair or authorize the repair of the Product under the limited warranty within 30 days after receipt of the Product by HKCT or any HKCT authorized service center If HKCT cannot perform repair covered under this lim...

Page 70: ...y lasts so the above one year warranty limitation may not apply to you the Consumer Some states do not allow the exclusion or limitation of incidental and consequential damages so certain of the above limitations or exclusions may not apply to you the Consumer This limited warranty gives the Customer specific legal rights and the Customer may also have other rights which vary from state to state 1...

Page 71: ...lephone System configuration guide Page 71 HKC Technology USA Inc E mail cs circleproducts com 17 The limited warranty period for HKCT supplied attachments and accessories is specifically defined within their own warranty cards and packaging ...

Page 72: ...If this equipment does cause harmful interference to radio or television reception which can be determined by turning the equipment off and on the user is encouraged to try to correct the interference by one or more of the following measures Reorient or relocate the receiving antenna Increase the separation between the equipment and receiver Connect the equipment into an outlet on a circuit differ...

Page 73: ...continuance of service may be required But if advance notice isn t practical the telephone company will notify the customer as soon as possible Also you will be advised of your right to file a complaint with the FCC if you believe it is necessary 7 The telephone company may make changes in its facilities equipment operations or procedures that could affect the operation of the equipment If this ha...

Page 74: ...sulting from lightning strikes are very destructive to telephone equipment connected to AC power sources To minimize damage from these types of surges a surge arrestor is recommended Customer Service For customer support for any questions or help in installing or using your new Circle Cordless Telephone HKC Technology Limited E mail hkct hkctech com Website www hkctech com Address 25 F Oxford Hous...

Reviews: