Hitachi VTFX240EUK User Manual Download Page 18

17

EN

You can make copies of videotapes made by friends or relatives for your own enjoyment.

WARNING: Unauthorized recordings of copyrighted video tapes may be an infringement of copyright laws.

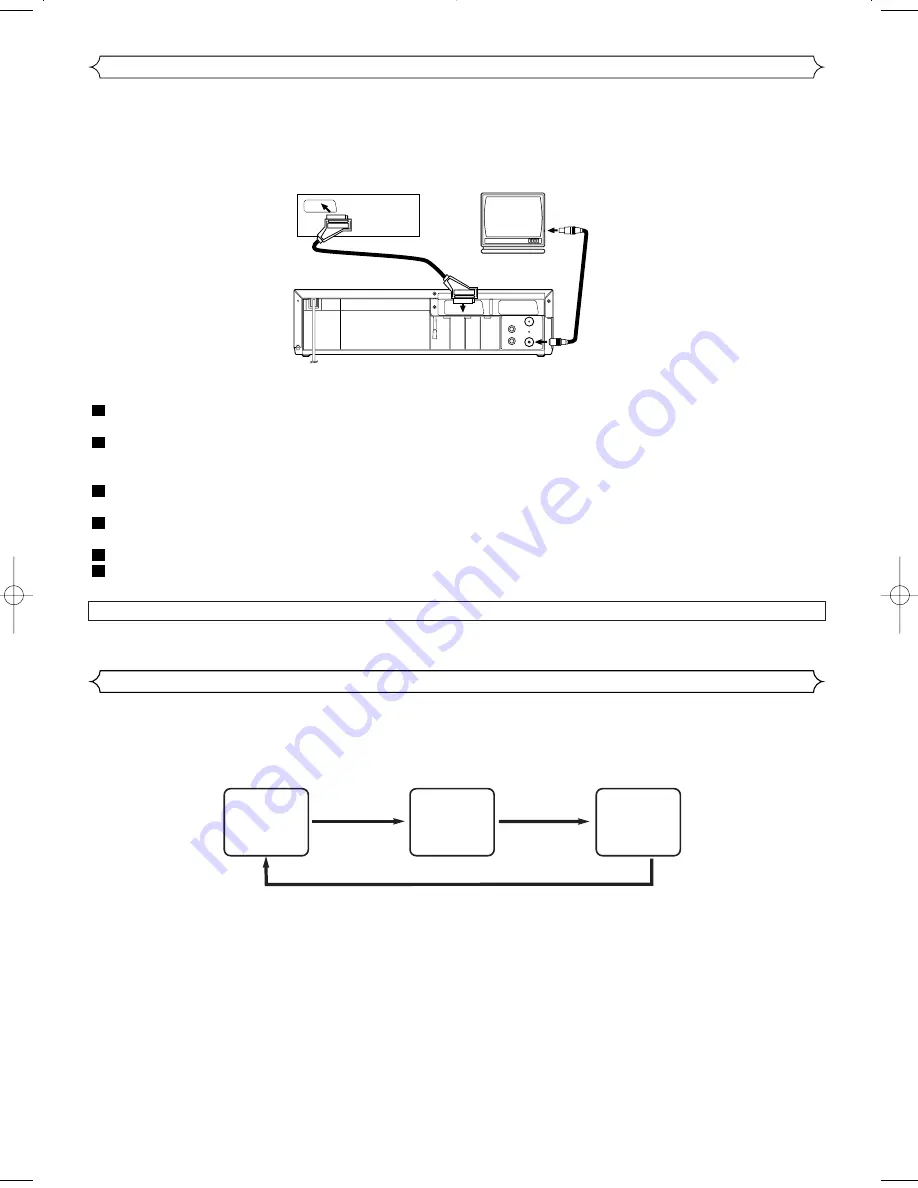
Connect the recording VCR (this unit), playing VCR (another VCR) and your TV as outline in the following diagram.

Turn on the TV and select the video channel on the TV.

To Monitor The  Recording

RF OUT

AV2 (DECODER)

AV1 (TV)

AERIAL

to RF OUT

to aerial

socket

[Source (Playing) VCR <Monaural>]

(another VCR)

to 21-Pin
Scart Jack

[TV set]

(Use for monitoring)

[Editing (Recording) VCR]

(this unit)

Coaxial cable (supplied)

L

R

AUDIO

OUTPUT

Copying a Video Tape

Insert a pre-recorded video cassette into the playing
VCR.
Insert a blank video cassette, or one you want to record
over, into the cassette compartment of the recording
VCR.
Press 

SPEED

on the remote control to select the desired

recording speed (SP/LP).
Select “AV2” position on the recording VCR. See “Other
Connections”.
Press 

REC

on the recording VCR.

Begin playback of the tape in the playback VCR.

6

5

4

3

2

1

NOTES:

• For best results during dubbing, use the VCR’s front panel

controls whenever possible. The remote control might
affect the playback VCR's operation.

• Always use video-quality shielded cables with RCA-type

connectors. Standard audio cables are not recommended.

• If video or colour fades in and out, you may be copying a

copy guarded video tape.

• To check the Counter, or Clock & Channel number,

press 

DISPLAY

. Each time you press 

DISPLAY

, TV screen will change

as illustrated:
When you select the channel using the remote control number buttons, select the desired channel (position number).

SP

0:12:34

SP

17:40

P02

<CLOCK and CHANNEL

NUMBER mode>   

<COUNTER mode>

Press once.

Press once.

Press once.

<OFF mode>   

A Status Display

Summary of Contents for VTFX240EUK

Page 1: ...USERS GUIDE VTFX240EUK ...

Page 2: ...able copyright laws We do not take responsibility for the unauthorised duplication use or other acts which infringe upon the rights of copyright own ers This appliance has a serial number located on the rear panel Please note down the model number and serial number and remain for your records Model number Serial number WARNING DANGEROUS VOLTAGE INSIDE WARNING TO PREVENT FIRE OR SHOCK HAZARD DO NOT...

Page 3: ...hannel Setting 8 Setting the Clock 8 TUNING 9 Automatic Tuning 9 Manual Tuning 9 To Skip a Preset Channel 10 Channel Order 10 BASIC OPERATION 11 Playback 11 Recording 11 ADVANCED OPERATIONS 12 Counter Memory 12 OTR One Touch Recording 12 Auto Repeat Playback 12 Picture Select 13 Automatic Operations 13 Real Time Tape Counter 13 Timer Recording 13 Auto Return 15 Parents Lock 15 Copying a Video Tape...

Page 4: ...ot be used until a replacement available from the appli ance manufacturer is obtained It is important that the colour of the replacement fuse cover corresponds with the rating marking on the base of the plug If the plug has to be changed because it is not suitable for your socket or becomes damaged it should be cut off and an appro priate plug fitted following the wiring instructions below The plu...

Page 5: ...or See below 10 y STANDBY button 11 PWR Power indicator 12 TAPE IN indicator 13 REC indicator 14 Timer indicator 15 CLOCK indicator PWR REC 11 12 15 13 14 16 Power cord 17 AV2 DECODER socket 18 AV1 TV socket 19 RF OUT socket 20 AERIAL socket 21 AUDIO OUTPUT L R jacks Indicator Rear Panel RF OUT AERIAL AV2 DECODER AV1 TV L R AUDIO OUTPUT 18 17 19 20 21 16 DESCRIPTION OF CONTROLS Front Panel ...

Page 6: ... button 20 CHANNEL o p buttons 21 EJECT button 22 AUDIO SELECT button Video output level 1Vp p Video output impedance 75Ω unbalanced Audio output level 6dBv Video input level 0 5 2 0Vp p Audio input level 10dBv Video S N ratio STANDARD 45dB Audio S N ratio STANDARD 41dB Power requirement 220 240V 50Hz Power consumption 20 Watts Stand by 3 3 watts Dimensions W 360mm H 92mm D 226mm Weight 2 6 Kg app...

Page 7: ...ty NICAM stereo sound is only achieved when using a SCART lead If your TV has Scart sockets you may connect your VCR s AV1 TV scart socket to the Scart socket on the back of your TV Please see the instruction manual for your TV The second Scart socket AV2 DECODER is designated for other external devices e g decoder another VCR video camera and so on NOTE If you want to connect a TV with Scart sock...

Page 8: ...Audio Hi Fi R Audio Hi Fi L Audio Hi Fi L Audio Hi Fi R Audio Hi Fi R Audio Normal Audio Normal Audio L R L R L R L R AUDIO OUTPUT NOTES If you play non Hi Fi tapes the VCR will play automatical ly in monaural even if you select any mode If the stereo signal becomes weak the broadcast is auto matically recorded in monaural Hi Fi Stereo Sound System This VCR will record and playback Hi Fi stereo so...

Page 9: ...ART cable there is no need to have the RF converter operating so it can be switched off and avoid the possibility of interfer ence To switch off the RF converter follow the instruc tions for Video Channel Setting to step 6 then select channel 22 first and then press STOP L L so that appears next to RF OUT CH on the TV screen and final ly press MENU to finish 8 7 3 7 6 5 4 3 3 8 2 1 MENU TIMER SET ...

Page 10: ...d channel by using CHANNEL o o p p or directly pressing NUMBER on the remote control Enter a channel numbers as a two digit number for the quickest results For example to select channel 6 press 0 and 6 If you only press 6 channel 6 will be selected after a brief delay You can only select channels 1 99 Manual Tuning Use the remote control for this procedure Press MENU Press PLAY o o or STOP L L to ...

Page 11: ...hannel Order Your TV stations will not necessarily be stored in the usual order BBC1 BBC2 ITV CH4 and CH5 You can arrange the channels in any order you want as fol lows Use the remote control for this procedure Press MENU Press PLAY o o or STOP L L to select INITIAL then press F FWD B Press PLAY o o or STOP L L to select CH TUNING then press F FWD B Press PLAY o o or STOP L L repeatedly to select ...

Page 12: ...l to be recorded Press REC or PAUSE STILL The recording will begin Press STOP when recording is completed 6 5 4 3 2 1 Select the video channel on the TV Recording one Programme while viewing another To Monitor the progress of your Recording Assemble Function Skipping unwanted Programme material during Recording Recording Viewing and Recording the same Programme Insert a cassette tape with its eras...

Page 13: ...eted Press REW or F FWD The VCR will automatically stop when the counter returns to 0 00 00 approx TO EXIT THE COUNTER MEMORY Press COUNTER MEMORY so that the M disappears from the TV screen NOTE When you set the Auto Repeat mode to ON while the Counter Memory mode is ON the VCR exits the Counter Memory mode automatically 5 4 3 2 1 OTR One Touch Recording MENU TIMER SET UP INITIAL SET UP AUTO REPE...

Page 14: ...k yet CLOCK setting menu appears If so follow the steps outlined in the Setting the Clock section Then set the timer When you press F FWD B after pressing the PLAY o o or STOP L L during steps to the input mode will move to the next step If you do not press F FWD B within 5 seconds of setting an item the input mode will move to the next step Press REW s to go back one step from the current setting...

Page 15: ...n the timer record mode The VCR will only perform a timer recording after it has been placed into standby mode You can programme the timer using the PlusCode numbers that are printed in TV guide magazine You can set seven programmes to record Use the remote control for the this procedure Insert a cassette tape with its erase prevention tab in place If necessary rewind or fast forward the tape to t...

Page 16: ...ll appear next to AUTO RETURN Press MENU WATCH THE RECORDED TIMER PROGRAMME Press STANDBY to turn on the VCR then press PLAY o o 4 3 2 1 Parents Lock Parents Lock prevents use of the VCR by making the VCR feature buttons on the VCR and the remote control inopera tive The PWR indicator on the display comes on Press and hold down STANDBY on the remote control for 5 seconds until PL appears on the di...

Page 17: ...rs Press REW s or F FWD B The VCR begins rewinding or fast forwarding to the beginning of desired programme When the preset programme is reached the VCR will start playback automatically NOTES Index Search can be set up to 20 This function will not operate in the Recording mode Operations must be followed up within 30 seconds from steps to Otherwise the Index Search mode will be cancelled To exit ...

Page 18: ...artment of the recording VCR Press SPEED on the remote control to select the desired recording speed SP LP Select AV2 position on the recording VCR See Other Connections Press REC on the recording VCR Begin playback of the tape in the playback VCR 6 5 4 3 2 1 NOTES For best results during dubbing use the VCR s front panel controls whenever possible The remote control might affect the playback VCR ...

Page 19: ...sette that bears the VHS mark For best results we recommend the use of high quali ty tapes Do not use poor quality or damaged tapes You can prevent accidental erasing of a recording by breaking off the erase prevention tab on the back edge of the cassette If you decide to record on the tape again cover the hole with plastic tape Tab Different countries use different television colour systems Tapes...

Page 20: ...EC We HITACHI EUROPE LTD Dukes Meadow Millboard Road Bourne End Buckinghamshire SL8 5XF declare that the Video Cassette Recorder VT FX240EUK are in compliance with following norms EN 55013 2000 EN 55020 2000 EN 61000 3 2 1995 A1 1998 A2 1998 A4 2000 EN 61000 3 3 1995 EN 60065 1998 19 ...

Page 21: ...r is not removed or altered This guarantee does not apply to products acquired second hand or for commercial or communal use This guarantee does not extend to user control adjustments battery replacement and aerial adjustment Any parts replaced under guarantee shall become the property of HITACHI EUROPE LTD Please note that evidence of the date of purchase will be required before service under gua...

Page 22: ... ITALY Tel 39 02 487861 Tel 39 02 38073415 Servizio Clienti Fax 39 02 48786381 2 Email customerservice italy hitachi eu com HITACHI Europe AB Box 77 S 164 94 Kista SWEDEN Tel 46 0 8 562 711 00 Fax 46 0 8 562 711 13 Email csgswe hitachi eu com HITACHI EUROPE S A S Lyon Office B P 45 69671 BRON CEDEX FRANCE Tel 04 72 14 29 70 Fax 04 72 14 29 99 Email france consommateur hitachi eu com HITACHI EUROPE...

Reviews: