Hitachi VT-MX410E Owner'S Manual Download Page 14

EN

Turn on the TV and select the video channel on the TV.

To Monitor the Recording

• To check the Counter, or Clock & Channel number,

press the DISPLAY button. Each time you press the DIS-
PLAY button, TV screen will change as illustrated:
When you select the channel using the remote control
NUMBER buttons, select the desired channel 
(position number).

SP

0:12:34

SP

17:40

P02

<CLOCK and CHANNEL

NUMBER mode>   

<COUNTER mode>

Press once.

Press once.

Press once.

<OFF mode>   

A Status Display

This VCR will operate with any cassette that bears the VHS
mark. For best results, we recommend the use of high-quali-
ty tapes. Do not use poor quality or
damaged tapes.

• You can prevent accidental erasing of

a recording by breaking off the erase-
prevention tab on the back edge of
the cassette.

• If you decide to record on the tape again, cover the hole

with plastic tape.

Tab

Different countries use different television colour systems.
Tapes recorded in the PAL or NTSC system can be played
back on this unit. Usually, the picture on the TV screen will
be in black and white when you play back a tape that is
recorded in a different colour system.
• Tapes recorded in the NTSC system can be played back

on this unit and a PAL system TV set. This feature is only
available in the SP mode. When playing back such tapes,
the picture may roll up or down, shrink vertically and black
bars may appear both at the top and bottom of the screen.
Adjust the vertical hold control on your TV, if the TV fea-
tures this control.

Two Different Tape Speeds

Before recording, select the tape speed : SP mode
(Standard Play) or LP mode (Long Play).

The table below shows the maximum recording/playback
time using E-60, E-120, E-180 or E-240 tapes in each
mode.

Video Cassette Tape

TV Colour System

T

YPE OF TAPE

R

ECORDING

/P

LAYBACK

T

IME

T

APE

S

PEED

SP M

ODE

LP M

ODE

E-60

HOUR

HOURS

E-120

HOURS

HOURS

E-180

HOURS

HOURS

E-240

HOURS

HOURS


14

You can make copies of videotapes made by friends or rela-
tives for your own enjoyment.

WARNING: Unauthorized recordings of copyrighted
video tapes may be an infringement of copyright laws.

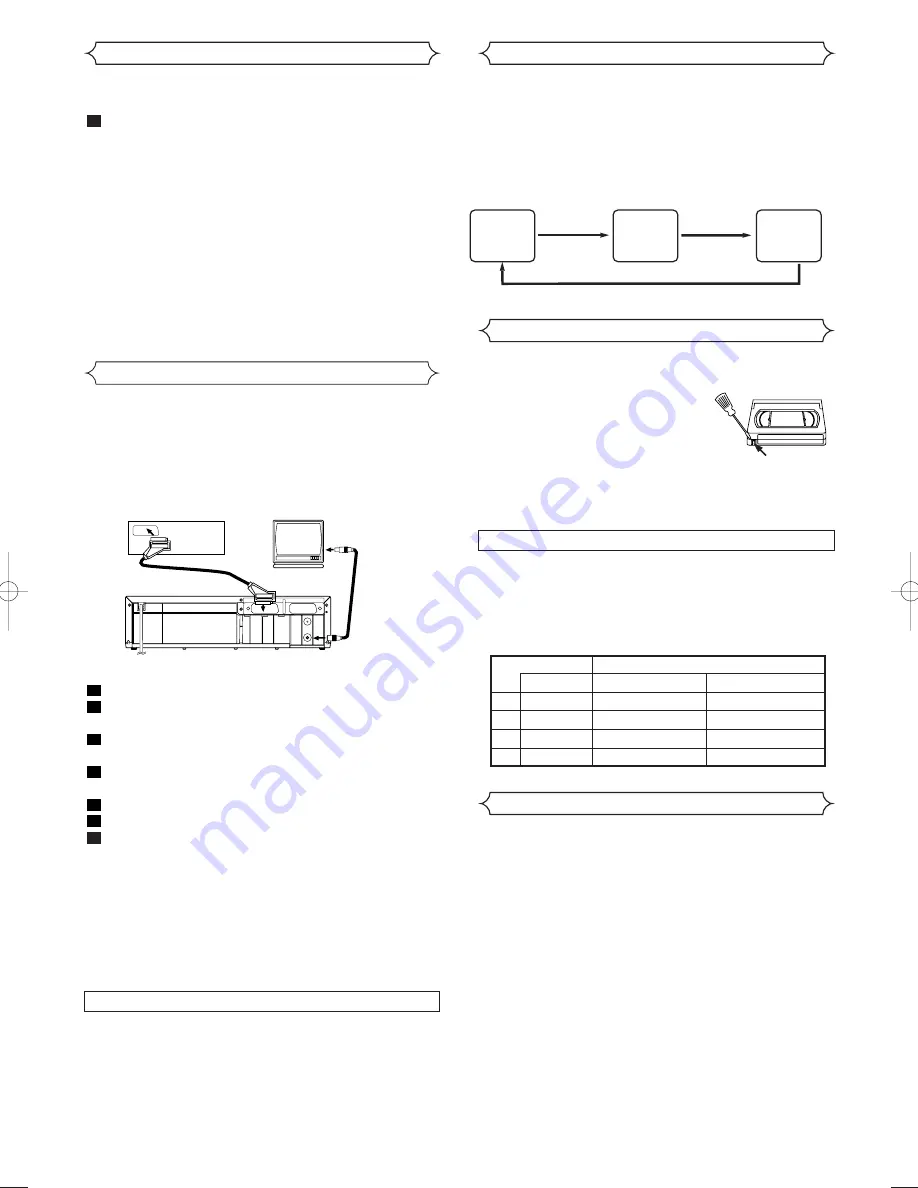
Connect the recording VCR (this unit), playing VCR (another
VCR) and your TV as outline in the following diagram.

RF OUT

AERIAL

AV2(DECODER)

AV1(TV)

to RF OUT

to aerial

socket

[Source (Playing) VCR <Monaural>]

(another VCR)

to 21-Pin
Scart Jack

[TV set]

(Use for monitoring)

[Editing (Recording) VCR]

(this unit)

Coaxial cable (supplied)

Copying a Video Tape

Insert a pre-recorded video cassette into the playing VCR.
Insert a blank video cassette, or one you want to record
over, into the cassette compartment of the recording VCR.
Press the SPEED button on the remote control to select
the desired recording speed (SP/LP).
Select “AV2” position on the recording VCR. See “Other
Connections”.
Press the 

I

(REC/OTR) button on the recording VCR.

Begin playback of the tape in the playback VCR.
To stop recording, press the 

C A

(STOP/EJECT) button

on the recording VCR, then stop playback of the tape in
the playing VCR.

7

6

5

4

3

2

1

NOTES:

• For best results during dubbing, use the VCR’s front panel

controls whenever possible. The remote control might
affect the playback VCR’s operation.

• If video or colour fades in and out, you may be copying a

copy guarded video tape.

Parents Lock

Parents Lock prevents use of the VCR by making the VCR fea-
ture buttons on the VCR and the remote control inoperative.
• The “PWR.” indicator on the display comes on.

Press and hold down the OPERATE button on the remote
control for 5 seconds until “PL” appears on the display.
The Parents Lock is activated.
When you want to cancel it, press and hold the OPERATE
button on the remote control again for 5 seconds.

When Parents Lock is activated:

• The time will appear on the display. “P.L.” will appear on the

display for two seconds every minute.

• You may insert a tape. However, the VCR power will

remain off.

• You may press the EJECT button to remove the tape

(unless a timer recording is programmed or has finished.)

• Timer recording will take place as scheduled, even if

Parents Lock is activated. “P.L.” will appear steadily on the
TV screen during the timer recording.

1

HG260BD.QX4  04.3.8  7:37 PM  Page 14

Summary of Contents for VT-MX410E

Page 1: ...yrighted material may violate applicable copyright laws We do not take responsibility for the unauthorised duplication use or other acts which infringe upon the rights of copyright own ers This appliance has a serial number located on the rear panel Please note down the model number and serial number and retain the imformation for your records Model number Serial number WARNING DANGEROUS VOLTAGE I...

Page 2: ... 7 TUNING 8 Automatic Tuning 8 Manual Tuning 8 To Skip a Preset Channel 9 Channel Order 9 BASIC OPERATION 10 Playback 10 Recording 10 ADVANCED OPERATIONS 11 Counter Memory 11 OTR One Touch Recording 11 Auto Repeat Playback 11 Picture Select 11 Automatic Operations 12 Real Time Tape Counter 12 Timer Recording 12 PDC Programme Delivery Control 13 Auto Return 13 Parents Lock 14 Copying a Video Tape 1...

Page 3: ...ot be used until a replacement available from the appli ance manufacturer is obtained It is important that the colour of the replacement fuse cover corresponds with the rating marking on the base of the plug If the plug has to be changed because it is not suitable for your socket or becomes damaged it should be cut off and an appro priate plug fitted following the wiring instructions below The plu...

Page 4: ... below 8 PROGRAM o p TRACKING buttons 9 y OPERATE button 10 PWR Power indicator 11 TAPE IN indicator 12 REC indicator 13 Timer indicator 14 CLOCK indicator PWR REC 10 11 14 12 13 15 Power cord 16 AV2 DECODER socket 17 AV1 TV socket 18 RF OUT socket 19 AERIAL socket Indicator Rear Panel RF OUT AERIAL AV2 DECODER AV1 TV 17 16 18 19 15 DESCRIPTION OF CONTROLS Front Panel ...

Page 5: ... p buttons 17 EJECT button Video output level 1Vp p Video output impedance 75Ω unbalanced Audio output level 6dBv Video input level 0 5 2 0Vp p Audio input level 10dBv Video S N ratio STANDARD 45dB Audio S N ratio STANDARD 41dB Power requirement 220 240V 50Hz Power consumption 25 Watts Stand by 3 5 watts Dimensions W 360mm H 92mm D 226mm Weight 2 6 Kg approx General Specifications Electrical Speci...

Page 6: ...gital terrestrial decoders Freeview cable decoders NTL Telewest or camcorders and games consoles We recommend using SCART connections to obtain the best quality picture and sound If your TV has Scart sockets you may connect your VCR s AV1 TV scart socket to the Scart socket on the back of your TV Please see the instruction manual for your TV The second Scart socket AV2 DECODER is designated for ot...

Page 7: ...WD B button then the MENU button to finish 6 6 3 9 2 8 7 6 5 4 3 3 9 2 1 MENU TIMER SET UP INITIAL RF OUT CH 35 INITIAL CH TUNING CLOCK RF OUT Setting the Clock MENU TIMER SET UP INITIAL INITIAL CH TUNING CLOCK RF OUT CLOCK YEAR 2 0 0 4 MONTH 0 1 DAY 0 7 WE HOUR _ _ MINUTE _ _ This VCR incorporates a 24 hour clock The clock must be set for the Timer Recording function to operate correctly Use the ...

Page 8: ...TO MANUAL MOVE scanning To Select a Desired Channel You can select a desired channel by using the PROGRAM o p buttons or directly pressing the NUMBER buttons on the remote control Enter a channel numbers as a two digit number for the quickest results For example to select channel 6 press 0 and 6 If you only press 6 channel 6 will be selected after a brief delay You can only select channels 1 99 Ma...

Page 9: ...annel Order The TV stations will normally be stored in the following order BBC1 BBC2 ITV CH4 and CH5 You can rearrange the order as follows Use the remote control for this procedure Press the MENU button Press the PLAY o or STOP L button to select INITIAL then press the F FWD B button Press the PLAY o or STOP L button to select CH TUN ING then press the F FWD B button Press the PLAY o or STOP L bu...

Page 10: ...t a pre recorded tape Press the PLAY button to start playback Press the PAUSE STILL button at the desired point on the tape Press the REC OTR button The VCR will be the Recording Pause mode Press the PROGRAM o p buttons to select the chan nel to be recorded Press the REC OTR or PAUSE STILL button The recording will begin Press the STOP button when recording is completed 6 5 4 3 2 1 Select the vide...

Page 11: ...ounter Memory mode automatically 5 4 3 2 1 OTR One Touch Recording MENU TIMER SET UP INITIAL SET UP AUTO REPEAT ON PICTURE NORMAL AUTO RETURN ON Auto Repeat Playback MENU TIMER SET UP INITIAL NOTES Once you select the Auto Repeat mode it stays in effect even after you turn off VCR COUNTER MEMORY does not function if the Auto Repeat mode is set to ON When you set the Auto Repeat mode to ON while th...

Page 12: ...ars If so follow the steps outlined in the Setting the Clock section Then set the timer When you press the F FWD B button after pressing the PLAY oor STOP L button during steps to the input mode will move to the next step If you do not press the F FWD B button within 5 seconds of setting an item the input mode will move to the next step Press the REW s button to go back one step from the cur rent ...

Page 13: ...om Monday to Friday Press the DAILY WEEKLY button repeatedly to select DAILY MO FR then press the VIDEO Plus button FOR EVERYDAY RECORDING To record a TV programme at the same time on the same channel every day Press the DAILY WEEKLY button repeatedly to select DAILY MO SU then press the VIDEO Plus button FOR WEEKLY RECORDING To record a TV programme at the same time on the same channel every week...

Page 14: ...riends or rela tives for your own enjoyment WARNING Unauthorized recordings of copyrighted video tapes may be an infringement of copyright laws Connect the recording VCR this unit playing VCR another VCR and your TV as outline in the following diagram RF OUT AERIAL AV2 DECODER AV1 TV to RF OUT to aerial socket Source Playing VCR Monaural another VCR to 21 Pin Scart Jack TV set Use for monitoring E...

Page 15: ... necessary consult the nearest Authorized Service Centre Playback picture is partially noisy Adjust tracking control for a better picture by using the PROGRAM o p buttons On the air TV programmes cannot be seen Re check the AERIAL and RF OUT connections Set your TV to the TV channel correctly No operation by infrared Remote Control Check the batteries in the remote control Video or colour fades in...

Page 16: ...16 EN ...

Page 17: ...ent switched on when it is unattended unless it is specifically stated that it is designed for unattended operation or has a standby mode Switch off using the switch on the equipment and make sure that your family know how to do this Special arrangements may need to be made for infirm or handicapped people DON T use equipment such as personal stereos or radios so that you are distracted from the r...

Page 18: ...18 EN MEMO ...

Page 19: ...19 EN MEMO ...

Page 20: ...lied with the product 2 The product has not been repaired maintained or modified by any person other than our authorised Engineer 3 The product serial number is not removed or altered This guarantee does not apply to products acquired second hand or for commercial or communal use This guarantee does not extend to user control adjustments battery replacement and aerial adjustment Any parts replaced...

Page 21: ...47 Milano Italia ITALY Tel 39 02 487861 Tel 39 02 38073415 Servizio Clienti Fax 39 02 48786381 2 Email customerservice italy hitachi eu com HITACHI Europe AB Box 77 S 164 94 Kista SWEDEN Tel 46 0 8 562 711 00 Fax 46 0 8 562 711 13 Email csgswe hitachi eu com HITACHI EUROPE S A S Lyon Office B P 45 69671 BRON CEDEX FRANCE Tel 33 04 72 14 29 70 Fax 33 04 72 14 29 99 Email france consommateur hitachi...

Reviews: