background image

Getting Started 

- 11 - 

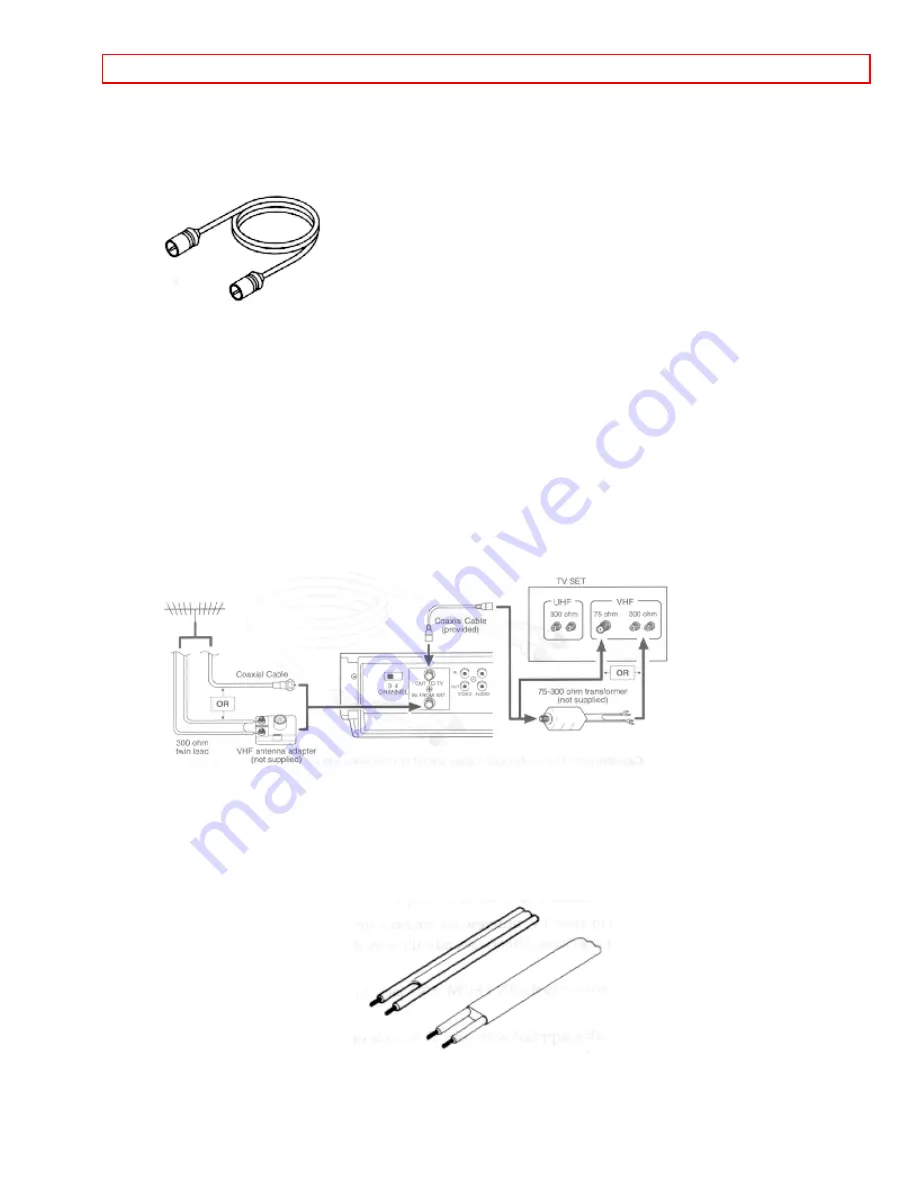
Simple Antenna/Cable 75 Ohm Hookup 

This is an easy hookup that you can use if your cable or antenna has a 75 ohm round 
wire connector.  You will need the 75 ohm cable supplied with your VCR.  It looks like 
this: 


(Refer to page 11 for 300 ohm UHF connection to the TV and antenna.) 
If you have been watching the TV in your home before getting the VCR, you will already 
have a round wire attached to your TV.  Otherwise, look for a cable connection coming 
in through the wall from outside.  (If you find this connection, remember to call your local 
cable company to start the service.) 
1. If still hooked up to your TV, unscrew the round wire from the 75 ohm connector on 
your television.  Otherwise, take the wire that comes in from the wall. 
2. Screw this round wire into the IN FROM ANT lower jack on the back of your VCR. 
3. Using the 75 ohm cable supplied with your VCR, slide on either end to the OUT TO 
TV upper jack on the back of the VCR. 
4. Connect the other end of the same cable onto the 75 ohm antenna input on your TV 
(where you first disconnected the TV in step 1.) 
5. Connect accordingly when you are using 300 ohm connection. (Refer below.) 


Capabilities:

 With this hookup, you should now be able to perform all the basic 

functions provided by this equipment. 

External or Internal 300 Ohm Antenna 

If you have either an external or internal (rabbit ears) antenna rather than cable, you 
may have 300 ohm connectors like these. 


In this case, you will need special adapters (not provided with VCR) to make the 75 ohm 
round wire connections shown below. (You may already have one on your TV.) 
1. Remove the antenna line from the back of your TV if it is already connected there, or 

Summary of Contents for VT-M181A

Page 1: ...ith your VCR TV and cable converter All basic playback functions on the VCR On screen graphic programming guide Front Audio and Video Jacks Auto Head Cleaning Hitachi Home Electronics America Inc HITACHI HSC CANADA INC 3890 Steve Reynolds Blvd Norcross GA 30093 3300 Trans Canada Highway Pointe Claire Tel 770 279 5600 Quebec H9R 1B1 CANADA Tel 514 697 9150 HITACHI SALES CORPORATION OF HAWAII INC 32...

Page 2: ...cators 17 Meet Your On Screen Guide 17 Getting Started Initial Setup 18 Setup for First Time Operation 18 Setup Options 18 Setting the Clock 19 More About Channel Selections 20 Getting Started Videotapes 21 About Videocassette Tapes 21 Types 21 Safety Tabs Prevent Erasure 22 Loading and Ejecting 22 Tape Storage 23 Basic Operations 23 Viewing a Videocassette 23 To Play Back a Recorded Tape 23 To Fi...

Page 3: ...ing 39 Head Cleaning 39 Periodic Maintenance 40 If the VCR Doesn t Work Right 40 Don t Attempt Repairs Yourself 40 Care and Servicing Problems 40 Often Encountered Problems 40 Hitachi Service Hotline 42 Specification 42 Technical Specifications 42 Must Read Sections for First Time Operation Introduction FOR YOUR SAFETY POWER SUPPLY AC 120V 60 Hz ONLY The POWER switch turns the VCR on and off leavi...

Page 4: ... This digital apparatus does not exceed the Class B limits for radio noise emissions from digital apparatus set out in the Radio Interference regulations of the Canadian Department of Communications Caution to user Changes or modifications not expressly approved by the party responsible for compliance could void the user s authority to operate the equipment Note to CATV system installer This remin...

Page 5: ...the controls set up for first time operation using on screens menus Videocassette tapes Let s get started IMPORTANT SAFEGUARDS In addition to the careful attention devoted to quality standards in the manufacture of your video product safety is a major factor in the design of every instrument But safety is your responsibility too This page lists important information that will help to assure your e...

Page 6: ...maged or cracked wire insulation and broken plugs They may result in shock or fire hazard Periodically examine the cord and have it replaced by your service technician if appearance indicates damage or deteriorated insulation 7 Power Cord Protection Power supply cords should be routed so that they are not likely to be walked on or pinched by items placed upon or against them paying particular atte...

Page 7: ...oduct be sure the antenna or cable system is grounded so as to provide some protection against voltage surges and built up static charges Section 810 of the National Electrical Code ANSI NFPA No 70 provides information with respect to proper grounding of the mast and supporting structure grounding of the lead in wire to an antenna discharge unit size of grounding conductors location of antenna dis...

Page 8: ...to rain or water d If the video product does not operate normally by following the operating instructions Adjust only those controls that are covered by the operating instructions Improper adjustment of other controls may result in damage and will often require extensive work by a qualified technician to restore the video product to its normal operation e If the video product has been dropped or t...

Page 9: ...ew a prerecorded videotape on the VCR this two line hookup is the only one you need 2 The radio frequency RF signal from a cable or antenna Make this hookup if you also want to record programs or if you have no audio video connectors on your TV We will show you the simplest hookups first and then present several variations to suit specific needs Be aware that you may need to purchase additional co...

Page 10: ... will also let you play videos in a picture in picture feature if your TV has it Then connect the white AUDIO OUT jack on the VCR to the AUDIO IN jack on the TV This audio hookup will give you better sound than the RF signal hookup because the electronic signal won t have to go through a conversion process Capabilities The audio and video signal connections are all you need to play back a prerecor...

Page 11: ... the wall 2 Screw this round wire into the IN FROM ANT lower jack on the back of your VCR 3 Using the 75 ohm cable supplied with your VCR slide on either end to the OUT TO TV upper jack on the back of the VCR 4 Connect the other end of the same cable onto the 75 ohm antenna input on your TV where you first disconnected the TV in step 1 5 Connect accordingly when you are using 300 ohm connection Re...

Page 12: ...tenna on top of your TV you will need an additional adapter and 75 ohm extension to make your leads reach from the antenna to the VCR This connection will work only if you have a strong clear picture on the TV indicating a strong signal Connect the antenna to the adapter and use the cable extension to go from the adapter to the VCR Use the supplied 75 ohm cable to connect the VCR to the TV Now con...

Page 13: ...trol requires two fresh AA batteries On the back of the remote a plastic cover slides off in the direction shown by the arrow Remove this cover and install the batteries matching the plus end of each battery with the plus mark on the remote 7 Set the RF or Video Channel Switch When the VCR is on its video signal can come into your TV on either channel 3 or channel 4 You need to select the appropri...

Page 14: ...m the remote control but there are some controls on the VCR that will come in handy too When you re familiar with these basic controls proceed to Setup page 19 We ll show you how to program your local channels and set the clock to make your VCR fully functional How the Remote Control Works Pressing a button on the remote control transmits an invisible beam of light infrared to a receiver at the ri...

Page 15: ... videocassette from playing recording pausing rewinding or anything it is doing GUIDE Brings up an on screen setup and programming guide the Easy Graphic Menu TAPE SPEED Switches between standard play SP and extended play EP AVX Used for recording from an auxiliary input such as a stereo system INDEX Used for marking and searching for specific tape locations LAST CHANNEL TO CONTROL TV Switches to ...

Page 16: ...ery If the remote is not working even at close range try putting in two fresh AA batteries Objects in the Way There may be objects between the remote and the VCR for instance a stack of books on the coffee table your 2 year old child or the dog Hold the remote so that it points at the VCR with nothing in the way Set to Wrong Device It may be set to VCR2 when you re trying to control VCR1 To confir...

Page 17: ... videotape s rewind motion VIDEO IN Receives video signal from a video camera or another VCR AUDIO IN Receives audio signal from a video camera stereo system or another VCR Display Indicators Watch for these signs and symbols that let you know that the VCR is responding to your instructions Meet Your On Screen Guide Your Hitachi VCR has as a special feature called the Easy Guide Menu This feature ...

Page 18: ...e the Easy Guide Menu simply press GUIDE several times This will back you out to the normal TV viewing screen If you don t press any button for a while the VCR will switch you back to an earlier screen or to regular TV viewing Getting Started Initial Setup Setup for First Time Operation Before you use your VCR to watch or record from your TV you need to tell the VCR whether your TV uses cable or a...

Page 19: ...elect the type of receiving setup you have ANT Internal or external antenna CATV1 Ordinary cable CATV2 Alternate cable if CATV1 doesn t give you the channels you expect 2 CODE Press 2 to enable the remote control to control a second VCR Options are VCR1 and VCR2 3 MOVIE RETURN Press 3 to select whether you want prerecorded movies safety tab removed to play automatically when loaded and then rewind...

Page 20: ...ical number If you press the wrong digit exit the screen by pressing GUIDE and recall the screen to enter the correct setup The day of the week is set automatically More About Channel Selections Your VCR is capable of receiving 68 broadcast TV channels VHF 2 13 UHF 14 69 and 125 cable channels CATV 1 125 When you press 4 on the Setup screen the tuner automatically cycles through all available chan...

Page 21: ...hen press 4 to bring up the Setup screen Item 5 in setup screen lets you add or delete channels Use the number buttons to enter the channel you want to change then press STOP to delete it or press PLAY to add it Caution After a Power Failure If a power failure lasting for more than 1 minute occurs reset the clock and perform the AUTO CHANNEL SET found in the SET UP menu Getting Started Videotapes ...

Page 22: ...y Notice this tab is already removed on prerecorded tapes you buy or rent Insert the tip of a screwdriver or similar kind into the space behind the tab to break it off Don t worry you can change your mind and record on this tape even after the tab is broken off simply cover the hole with cellophane tape Loading and Ejecting When you load a videocassette into the VCR there is only one right way Mos...

Page 23: ...it through see how it automatically rewinds Get a blank tape and try recording a TV show Then you ll know how to use the VCR when you need to or where in the manual to find the instructions you forgot Let s go Viewing a Videocassette To Play Back a Recorded Tape 1 Insert the cassette arrow side forward into the slot at the front of the VCR The power comes on automatically and the tape indicator li...

Page 24: ...then REW The VCR rewinds the tape all the way to the beginning then stops Press STOP EJECT on the VCR to release the tape Automatic Rewind MOVIE RETURN When the tape reaches the end during playback or normal recording it will automatically rewinds and comes to the beginning of the tape or memory stop position If your videocassette has the safety tab removed and you set the MOVIE RETURN function to...

Page 25: ...still playback and press VCR 1 then press either of the TRACKING buttons or to minimize vertical shaking Then set the VCR in slow playback and press VCR1 or VCR2 then press TRACKING buttons to minimize visual noise bands on the screen in EP mode But noise in SP mode can not be minimized by tracking After 5 minutes in slow motion playback the VCR will stop the tape automatically to prevent damage t...

Page 26: ...Y twice to show the counter on the TV screen Begin recording or playing back a tape Notice the counter remains on the screen At the point that you want to go back to press CLEAR on the remote control This resets the counter to 0 00 00 Press STOP when you are done recording or playing back the tape Press DISPLAY again and M will display below the counter on the TV screen This indicates that the cou...

Page 27: ...page 30 This VCR s indexing system is based on the VHS Standard Indexing System VISS The new system may not recognize index marks on tapes recorded on older VCRs If the VCR is in PLAY mode press STOP Press INDEX on the remote control This brings up Set Go To Time Index screen Press REW or F FWD to begin the index search The tape rewinds or fast forwards until an index mark is detected When the VCR...

Page 28: ...d up with a direct audio video cable set the TV to AUX or VIDEO 3 Press TAPE SPEED on the remote control to select SP standard play for the best picture quality or EP extended play for longest recording time on a single tape An indicator on the VCR s display shows which speed is active 4 Set the VCR to the channel you want to record from Use the up and down CHANNEL buttons to flip through the chan...

Page 29: ...tally switching the station while recording Change the channel to the one you prefer Press PAUSE to continue recording If you want to leave an index mark where you began recording a different show you need to press STOP instead of PAUSE Then switch stations and press REC and PLAY on the remote control at the same time to resume recording To Leave Index Marks on the Tape This feature is useful when...

Page 30: ...isure time so you can learn how it works That way when an important show is going to be on that you really want to record you ll be confident that your timed recording setup will work Types of Delayed Recordings ONE TIME Records one show at a particular date and time DAILY Records a show at the same time every day of the week Monday through Friday WEEKLY Records a show at the same day and time eve...

Page 31: ...GUIDE to return to the regular TV screen Don t forget to load a videocassette to record on Your delayed recording settings take effect when you turn off the power on the VCR When the power is off the delayed recording indicator will display on the VCR This tells you that the VCR will automatically record at the times and dates you have programmed To Stop a Delayed Recording in Progress Press POWER...

Page 32: ... preset To remove a program press CLEAR The screen will display the next program if there are more or it will switch back to the main menu Programming Priorities When you have set up several timed recordings it may occur that some of their times overlap For example this can happen if your VCR are set up to record shows on a daily or weekly basis and a special show comes on that you try to record d...

Page 33: ...ng it Once you have programmed the remote you won t have to do it again until you change the batteries This Hitachi remote control can be used with your TV as well as the VCR as long as your TV comes with a remote control This feature comes in handy you don t have to juggle two remotes The remote control is compatible with the fourteen makes of TVs listed next page but don t be alarmed if yours is...

Page 34: ...ork for you If the TV channel still doesn t change after going through all the button combinations listed it is likely that you will not be able to program this remote control for your TV TV Brands Press TV and This Number Hitachi 1 Zenith 2 Sony 3 Magnavox 4 Sanyo 5 Gold Star 1 6 Toshiba 7 Gold Star 2 8 NEC 9 RCA 0 Panasonic CHANNEL up arrow Mitsubishi CHANNEL down arrow JVC 100 ENT Sharp LAST CH...

Page 35: ...combination Your cable company can tell you more about this After each hookup power up the VCR and the TV Use the Initial Setup screen page 19 to select option CATV1 or CATV2 Then check out the system using these questions as a guide Does the TV receive the same number of channels as before the installation Does the VCR record all channels Do the VCR and TV remote control functions work Can I reco...

Page 36: ...ine from the back of the cable box that goes to your TV Connect it to the IN FRONT ANT lower jack on the back of the VCR 2 Using the 75 ohm coaxial cable supplied with the VCR connect either end to the VCR s OUT TO TV upper jack 3 Connect the other end of the 75 ohm cable to the TV in the same place where you removed the cable line Note You will end up with an extra cable that originally went from...

Page 37: ...ctions If you still don t get the functions you want proceed with Option 4 Option 4 If none of the preceding hookups work check with your cable company You may need to purchase a video switching system from your local electronics or video retailer This will easily handle most hookup problems Remote Control of the Cable Converter If you have a cable converter you will probably want to program your ...

Page 38: ...a single jack on each end and An audio cord with a single jack on each end or A two way cord that has both audio and video jacks Study the back of VCR2 VT M181A to find the two color coded jacks that are labeled IN The yellow jack is for video and white is for audio Locate similar jacks on VCR1 Then with the power off Connect VIDEO OUT on VCR2 to the yellow VIDEO IN on VCR1 Connect the AUDIO OUT j...

Page 39: ... it Connect the camcorder s AV output cable to your VCR See diagram below Copying Tapes From A Camcorder Hookup Illustration Press the AVX button on the VCRs remote control so that the L Line indicator appears in the VCR display L2 Front A V IN L1 Rear A V IN Press REC IRT on the VCR to start recording Press PLAY on your camcorder to start copying your tape VCR Care and Servicing You are advised t...

Page 40: ...on your location how you use the VCR and the age of the machine If the VCR Doesn t Work Right Many operational problems are easily remedied by reviewing the instructions in this manual and trying out some different controls and settings The chart on the facing page covers the more common problems that new VCR owners encounter If none of these troubleshooting aids help you solve the problem then se...

Page 41: ...ve a direct video hookup Is TV correctly tuned Fine tune the TV Static lines through the Press the tracking control picture buttons to adjust tracking Noisy picture despite Have video heads cleaned by all previous adjustments a qualified service technician even when playing different cassettes No picture during TV set to the correct Set TV to channel 3 or 4 playback video viewing channel TV cannot...

Page 42: ...OUVER 604 526 8566 Specification Technical Specifications Recording Rotary two head helical scan azimuth recording Video NTSC color EIA standard Cassette VHS type Heads 2 video heads for SP and EP 1 full track audio video erase head 1 combination head for control track audio erase and audio record play 3 heads single housing Tape Speed 33 35mm sec SP 16 67mm sec LP playback only 11 12mm sec EP Tap...

Page 43: ... Input AC120V 60Hz Power Consumption 24W nominal Cabinet Size 14 15 16 W x 3 1 4 H x 12 11 16 D 38 0cm W x 8 2cm H x 32 3cm D Weight 11 7 lbs 5 3 kg Accessories 1 coaxial cable Part No 5861141 1 remote control unit Part No 5616491 2 AA batteries Accessory part numbers shown are for USA only For information about how to obtain these accessories please call TOLL FREE 1 800 448 2244 for your nearest ...

Reviews: