background image

Basic Operations 


26

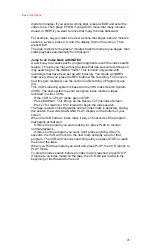
digits for minutes. If you enter a wrong digit, press CLEAR and enter the 
correct one. Then press F.FWD if you want to move that many minutes 
ahead, or REW if you want to move that many minutes backward. 

For example, say you want to review a scene that began about 2 minutes 
earlier in a video, press 0, 0 and 2 to display 0:02 on the screen. Then 
press REW. 
The tape rewinds to the place 2 minutes back from where you began, then 
starts playback automatically from that spot. 

Jump to an Index Mark with INDEX 

A quick way to access specific program segments is with the index search 
feature. This lets you move through a tape that has several recordings on 
it by searching for the INDEX "mark." This function only works with 
recordings that have been set up with indexing. You create an INDEX 
mark every time you press the REC button while recording. For more on 
how this gets recorded, see the section on Recording a Program (page 
33). 
This VCR's indexing system is based on the VHS Index Search System 
(VISS). The new system may not recognize index marks on tapes 
recorded on older VCRs. 

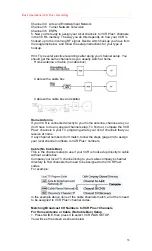
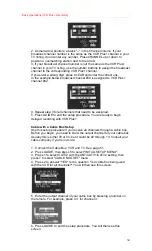
 If the VCR is in PLAY mode, press STOP. 
 Press DISPLAY. This brings up the Set Go-To Time/Index Screen. 
 Press 7 for rewind or 9 for forward to begin the index search. 

The tape rewinds or fast-forwards until an index mark is detected. During 
this search, the words SCAN AND PLAY display on the bottom of your 
screen.  
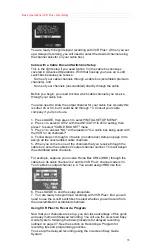
When the VCR finds an index mark, it plays 15 seconds of the program 
that begins at that spot.  

 If this is the program you were looking for, press PLAY to resume 

normal playback. 

 If this is not the program you want, don't press anything. After 15 

seconds, the VCR will move to the next mark and play a part of that 
program. The VCR will continue searching until you press STOP or reach 
the end of the tape. 
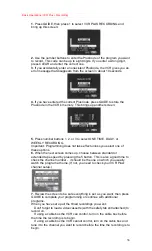
When you find the program you want and press PLAY, the VCR returns to 
PLAY mode. 
To stop the index search before an index mark is reached, press STOP. 
If there are no index marks on the tape, the VCR will just rewind to the 
beginning or fast forward to the end. 

Summary of Contents for VT-F381A

Page 1: ...R and TV and cable converter On screen programming guide Multi channel TV sound MTS VCR Plus for easy timed recording VCR Plus and PlusCode are trademarks of Gemstar Development Corp VCR Plus system is manufactured under license from Gemstar Development Corporation HITACHI HOME HITACHI SALES HITACHI HSC ELECTRONICS CORPORATION CANADA INC AMERICA INC OF HAWAII INC 3300 Trans Canada Hwy 3890 Steve R...

Page 2: ...reo vs Mono Sound 19 Hi Fi Sound 19 Getting Started Videotapes 21 About Videocassette Tapes 21 Types 21 Safety Tabs Prevent Erasure 21 Loading and Ejecting 21 Tape Storage 22 Basic Operations 23 Viewing a Videocassette 23 To play Back a Recorded Tape 23 To Fine Tune the Picture 23 Rewinding the Tape 24 Special Playback Effects 24 To Find Specific Sections on a Tape 24 Basic Operations Recording 27...

Page 3: ...lock timer unaffected If the unit is to be left unattended for a long period it is recommended that the unit be completely switched off and unplugged Illustrated below is the label on the back of your unit This symbol warns the user that uninsulated voltage within the unit may have sufficient magnitude to cause electric shock Therefore it is dangerous to make any kind of contact with any inside pa...

Page 4: ...se take time to become familiar with this manual and how it is set up Keep it handy for future reference too To guide you we ve concluded Must read sections containing important cautions for your family s safety as well as the basic facts you need to use the VCR These sections are highlighted like this in the table of contents Information on the advanced features of your Hitachi VCR We hope you ll...

Page 5: ...f you are unable to insert the plug fully into the outlet try reversing the plug If the plug should still fail to fit contact your electrician to replace your obsolete outlet To prevent electric shock do not use this polarized plug with an extension cord receptacle or other outlet unless the blades can be fully inserted without blade exposure If you need an extension use a polarized cord 5 Power S...

Page 6: ...like 11 Accessories Do not place this video product on an unstable card stand tripod bracket or table The video product may fall causing serious injury to a child or adult and serious damage to the appliance Use only with a cart stand tripod bracket or table recommended by the manufacturer or sold with the video product Any mounting of the product should follow the manufacturer s instructions and ...

Page 7: ...he video product due to lightning and power line surges SERVICE 17 Servicing Do not attempt to service this video product yourself as opening or removing covers may expose you to dangerous voltage or other hazards Refer all servicing to qualified service personnel 18 Conditions Requiring Service Unplug this video product from the wall outlet and refer servicing to qualified service personnel under...

Page 8: ...t the replacements he uses have the same safety characteristics as the original parts Use of replacements specified by the video product manufacturer can prevent fire electric shock or other hazards 20 Safety Check Upon completion of any service or repairs to this video product ask the service technician to perform safety checks recommended by the manufacturer to determine that the video product i...

Page 9: ... this three line hookup is the only one you need 2 The radio frequency RF signal from a cable or antenna Make this hookup if you also want to record programs or if you have no audio video connectors on your TV We will show you the simplest hookups first and then present several variations to suit specific needs Be aware that you may need to purchase additional connectors to make the desired hookup...

Page 10: ... will give you better sound than the RF signal hookup because the electronic signal won t have to go through a conversion process Plus your VCR has a stereo decoder which your TV might not For big speaker sound you can also use these jacks to connect the VCR to your stereo system page 54 Capabilities The audio and video signal connections are all you need to play back a prerecorded tape If you do ...

Page 11: ...VCR 4 Connect the other end of the same cable onto the 75 ohm antenna input on your TV where you first disconnected the TV in step 1 Capabilities With this hookup you should now be able to perform all the basic functions provided by this equipment External or Internal 300 Ohm Antenna If you have either an external or internal rabbit ears antenna rather than cable you may have 300 ohm connectors li...

Page 12: ... the VCR 2 Using the 75 ohm cable supplied with your VCR connect either end to the OUT TO TV jack on the back of the VCR 3 Use a second adapter to attach the other end of the 75 ohm connector back into the TV where you first disconnected the antenna Capabilities With this hookup you should now be able to perform all basic functions provided by this equipment 5 Attach the TV and VCR to the Power Su...

Page 13: ...to both the TV and the VCR and look for a switch on the back of the VCR Set the switch to 3 or 4 whichever is not a commercial channel in your area Your basic hookup is now complete When you re ready to try hooking up a second VCR or a video camera for a complete home entertainment system see Advanced Operations Now turn the TV and VCR back around facing you and begin your quick tour of the contro...

Page 14: ...Control Works Pressing a button on the remote control transmits an invisible beam of light infrared to a receiver at the right front of the VCR When using the remote aim the front end toward the VCR and make sure nothing such as a coffee table or your dog is blocking the path of the infrared beam Remote Control Buttons Remote Control Illustration POWER Turns the VCR on and off GUIDE Brings up an o...

Page 15: ...w Battery If the remote is not working even at close range try putting in two fresh AA batteries When replacing the batteries remove the old batteries and press the POWER button on the remote and hold it for about 10 seconds then insert two fresh batteries Objects in the Way There may be objects between the remote and the VCR for instance a stack of books on the coffee table your 2 year old the do...

Page 16: ...the TV and VCR turned on press GUIDE on the remote control You will see this screen You may view all the on screen instructions in English French or Spanish When you first set up your VCR it will be set to English Press number 8 or 9 for the other language options Now you will do most of your programming and setup by pressing numbers on the remote control which correspond to options presented in t...

Page 17: ...has the same number as that item This will cycle you through several options When everything is set up as you want press GUIDE again to back out of the Easy Guide System If you do not use the cable box you need to set items 1 and 8 the first time you set up your VCR If you receive all channels from the cable box you need to set item 1 and item 7 the first time you set your VCR See page 44 The rest...

Page 18: ... buttons on the remote control to set the current time two digits for the hour and two for the minutes Then press 1 or 2 for AM or PM respectively For example if it is now 2 15 PM press 0 2 1 and 5 for hours and minutes and press 2 for PM Continue pressing buttons to set the date For example if today is July 8 1995 press 0 7 0 8 9 and 5 to get 07 08 95 When you re done press GUIDE twice to return ...

Page 19: ... Occasionally the auto programming may skip an active channel because the antenna was pointed in the wrong direction or the channel had a weak signal or was off the air at the time of programming Or you may change your mind about a channel you removed from memory To Add or Erase Channels Press GUIDE then press 5 to bring up the Initial Setup screen Item 9 lets you add or delete channels Use the nu...

Page 20: ...reo or monaural broadcasts with the highest quality possible Linear sound on the other hand will record monaural sound using the same format as a non hi fi VCR Stereo programs are recorded in hi fi on both the left and right channels and also recorded on the linear track as monaural ...

Page 21: ...also an LP speed You Hitachi VCR does not record at this speed but it can play cassettes that were recorded in LP mode No special setting is required for playback Safety Tabs Prevent Erasure A safety tab is located on the front left edge of every videotape next to the label Break this tab off if you want to keep a special tape from being erased accidentally Notice this tab is already removed on pr...

Page 22: ...e and a second time to eject it Now you can take the cassette out and put it away Tape Storage Store your videocassettes in their jackets and in an upright position like books in a bookshelf away from any magnetic sources Resist the temptation to leave them lying flat on top of the VCR Tapes will last longer and so will your VCR if you store them properly Remember dust dirt and liquids are enemies...

Page 23: ...iary video input feature and if the TV and VCR have a direct video to video hookup If this is the case do not select channel 3 or 4 Instead Press the AUX or VIDEO button on the TV s remote control to select the proper input channel for playback To Fine Tune the Picture Auto Tracking Pressing PLAY starts the auto tracking feature which adjusts the tuning to eliminate static lines that may appear on...

Page 24: ...tes in PAUSE mode the VCR automatically switches to STOP mode to protect the tape If noise bars appear on the TV screen during PAUSE mode first set the VCR to SLOW mode and then press the 1 or 4 button on the remote control to minimize the noise bars If the screen jitters during PAUSE press either 1 or 4 button to minimize it To resume play press PLAY or PAUSE again Frame Advance While in PAUSE mo...

Page 25: ... when the tape is ejected Marking with the Time Counter If there is one part of the video that you know you are going to want to return to you can set the time counter to memorize that spot Begin in either STOP or PLAY mode Press DISPLAY twice to show the counter on the TV screen Begin recording or playing back a tape Notice the counter remains on the screen At the point that you want to go back t...

Page 26: ...ogram page 33 This VCR s indexing system is based on the VHS Index Search System VISS The new system may not recognize index marks on tapes recorded on older VCRs If the VCR is in PLAY mode press STOP Press DISPLAY This brings up the Set Go To Time Index Screen Press 7 for rewind or 9 for forward to begin the index search The tape rewinds or fast forwards until an index mark is detected During thi...

Page 27: ...n a single tape An indicator on the VCR s display shows which speed is active 4 Set the VCR to the channel you want to record from Use the up and down CHANNEL buttons to flip through the channels or use the number buttons to go directly to the channel you want 5 To begin recording press REC on the remote control or REC IRT on the VCR Recording will start unless the cassette is protected with the s...

Page 28: ...tween shows simply press STOP at the end of each show then press REC to record the next show Pressing PAUSE during recording does not leave an index mark During timed recordings the VCR automatically inserts an index mark at the beginning of the recording To Record a Second Audio Program SAP Some stations transmit a Second Audio Program such as in a second language If a station broadcasts in SAP t...

Page 29: ...week Monday through Friday WEEKLY Records a show at the same day and time every week Your VCR can record up to 8 programs at different days and times or up to 8 programs on the same day Before You Begin Assemble the information you need for timed recording Be sure that the clock is set to the correct time Date and day of the program Starting time Ending time Channel to be recorded Blank or erasabl...

Page 30: ... 0 for 6 o clock Then press 2 for PM Enter the end time half past six as 06 30 The VCR automatically selects PM for you The screen shows today s date so no changes are needed on that line Press 5 to switch to SP because you want the best quality picture for this recording Everything is as you want it so press GUIDE to set the program in memory Insert a videocassette and power off the VCR Check for...

Page 31: ...rams start at the same time the VCR records in order that they were programmed If the shows are all scheduled to start at 7 AM the VCR starts with the first program at 7 AM and switches to what remains of the second program when the first program is done recording and so on Shows with Different Starting Times If the programs start at different times the VCR records the show scheduled to start earl...

Page 32: ...We ll give you step by step instructions Then you will be ready to begin VCR Plus recording also using the on screen Easy Guide System VCR Plus TM and PlusCodeTM are trademarks of Gemstar Development Corp Channel Setup Before You Begin Channel setup is easy if you take care of these things first 1 Make sure you have programmed the local TV channels into your VCR following the instructions in Initi...

Page 33: ...tly to your home antenna chances are you don t have to do any special channel setup To find out compare the VCR Plus channels in your TV program guide to your list of channels that you receive at home If any channel numbers don t match follow the steps page 43 to assign your local channel numbers to VCR Plus numbers Cable No Cable Box This is the channel setup to use if your VCR is hooked up direc...

Page 34: ...DE to end the setup procedure You are ready to begin delayed recording with VCR Plus Cable with a Cable Box Setup Use this setup procedure if you receive all channels through a cable box Before you begin you need to know the output channel for your cable box Usually this is either 03 or 04 but it could be 02 through 13 Consult your cable company if you re not sure 1 Connect the Cable Box VCR and T...

Page 35: ...o answer NO to the question Is a cable box being used with the VCR for all channels 4 Follow steps 1 through 4 of Cable no cable box Setup on page 43 to assign all the unscrambled cable channels 5 When you come to one of the channels that you receive through the cable box enter the cable box s output channel number This will assign the scrambled cable channels For example suppose you receive Home ...

Page 36: ...ot take effect unless you select one of these options 6 When the next screen comes up choose between standard or extended tape speed by pressing the 5 button This is also a good time to check the channel number it should be the one on which you usually watch the program at home If not you need to check your VCR Plus channel setup 7 Review the screen to be sure everything is set as you want then pr...

Page 37: ...ording settings take effect when you turn off the power on the VCR Caution on the VCR Plus recording After entering a VCR Plus number check the information displayed with the PROGRAM REVIEW if there is are any unnecessary program s please cancel or correct it them ...

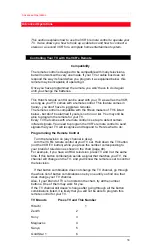
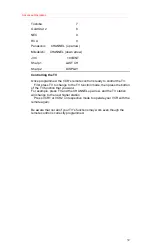
Page 38: ...comes with a remote control is set up to detect certain infrared signals You need to program the VCR s remote control to send signals that your TV will recognize and respond to Here s what to do Programming the Remote Control Turn the television on any channel is okay Aim the VCR s remote control at your TV set Hold down the TV button not the VCR TV button while you press the number corresponding ...

Page 39: ...s ready to control the TV First press TV to change to the TV function mode then press the button of the TV function that you want For example press TV and the CHANNEL up arrow and the TV station will change to the next higher station Press VCR1 or VCR2 on respective mode to operate your VCR with the remote again Be aware that not all of your TV s functions may work even though the remote control i...

Page 40: ...a guide Does the TV receive the same number of channels as before the installation Does the VCR record all channels Do the VCR and TV remote control functions work Can I record on one pay channel while watching another Do I receive my pay channels and do all special cable features work If any function does not work or works in an unexpected way hook up everything the way it was when you started an...

Page 41: ...ption 3 Option 3 Some Channels Scrambled This hookup requires three coaxial jumpers with connectors a 1 into 2 splitter and an A or B switch box 1 Disconnect the cable from the cable box and attach it to the input line of the 1 into 2 splitter 2 Using a coaxial jumper reconnect one of the splitter outputs to the cable box s input that you just freed up 3 Using a second coaxial jumper connect the o...

Page 42: ...l the button combinations until you find the one that works best Cable Converters Press CATV and This Number Jerrold 1 1 Jerrold 2 2 Jerrold 3 3 Hamlin 4 Zenith 5 Scientific Atlanta 6 Pioneer 7 Philips 8 To operate the cable box once the remote is programmed for it Press CATV and then the button of the function you want Press VCR to operate your VCR with the remote again Advanced Operations Stereo...

Page 43: ...he Easy Guide System Press DISPLAY then press 5 on the remote control to select SP or EP The EP setting gives you reasonable quality and a longer tape program Press AVX on the remote control to turn the LINE L1 indicator on Press REC IRT on the VCR and start the stereo playing To stop recording press STOP To play back the recording rewind the tape and press PLAY Advanced Operations Second VCR Inte...

Page 44: ... the picture being recorded Copying Tapes From a Camcorder If you would like to copy a video tape shot in your camcorder onto your VCR here s how to do it Connect the camcorder s AV output cable to your VCR see diagram below Camcorder Hookup Illustration Press the AVX button on the VCRs remote control so that the L2 Line indicator appears in the VCR display Press REC IRT on the VCR to start record...

Page 45: ...ture problems persist the heads may need to be cleaned professionally Consult your VCR dealer for the name of trained service technician near you Periodic Maintenance Your Hitachi VCR is a precision electro mechanical device which requires professional maintenance after a period of normal use Usually no maintenance other than head cleaning is required during the warranty period unless the VCR is u...

Page 46: ...z Power Consumption 22W nominal Cabinet Size 14 15 16 W x 3 11 16 H x 12 5 8 D 38 0cm W x 9 3cm H x 32 0cm D Weight 9 9 lbs 4 5kg Storage Temperature 4º F to 131º F Operating Temperature 41º F to 104º F Accessories 1 coaxial cable Part No 5857952 1 remote control unit Part No HL10213 2 AA batteries Check your cable company s compatibility requirements For information about how to obtain these acce...

Page 47: ...LITY TV CHANNEL SELECTOR ON THE PROPER CHANNNEL SET TV TO CHANNEL 3 OR 4 AS CORRECT FOR YOUR AREA IS TV CORRECTLY TUNED FINE TUNE THE TV STATIC LINES THROUGH THE PICTURE PRESS 1 OR 4 BUTTON TO ADJUST TRACKING NOISY PICTURE DESPITE ALL PREVIOUS ADJUSTMENTS EVEN WHEN PLAYING DIFFERENT CASSETTES HAVE VIDEO HEADS CLEANED BY A QUALIFIED SERVICE TECHNICIAN NO PICTURE DURING PLAYBACk TV SET TO THE CORREC...

Page 48: ... US and Canada For the location nearest you call the Hitachi Service Hotline at one of these numbers In the continental U S A DIAL TOLL FREE 7 days a week 24 hours a day 1 800 HITACHI 1 800 448 2244 You must state your zip code when calling In Canada QUEBEC 418 681 7719 MONTREAL 514 697 9150 TORONTO 416 821 4545 VANCOUVER 604 526 7881 ...

Reviews: