3 - 2
2. Before Starting Adjustment
2.1
Connections for Adjustment
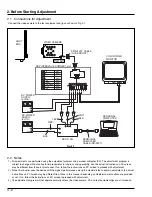
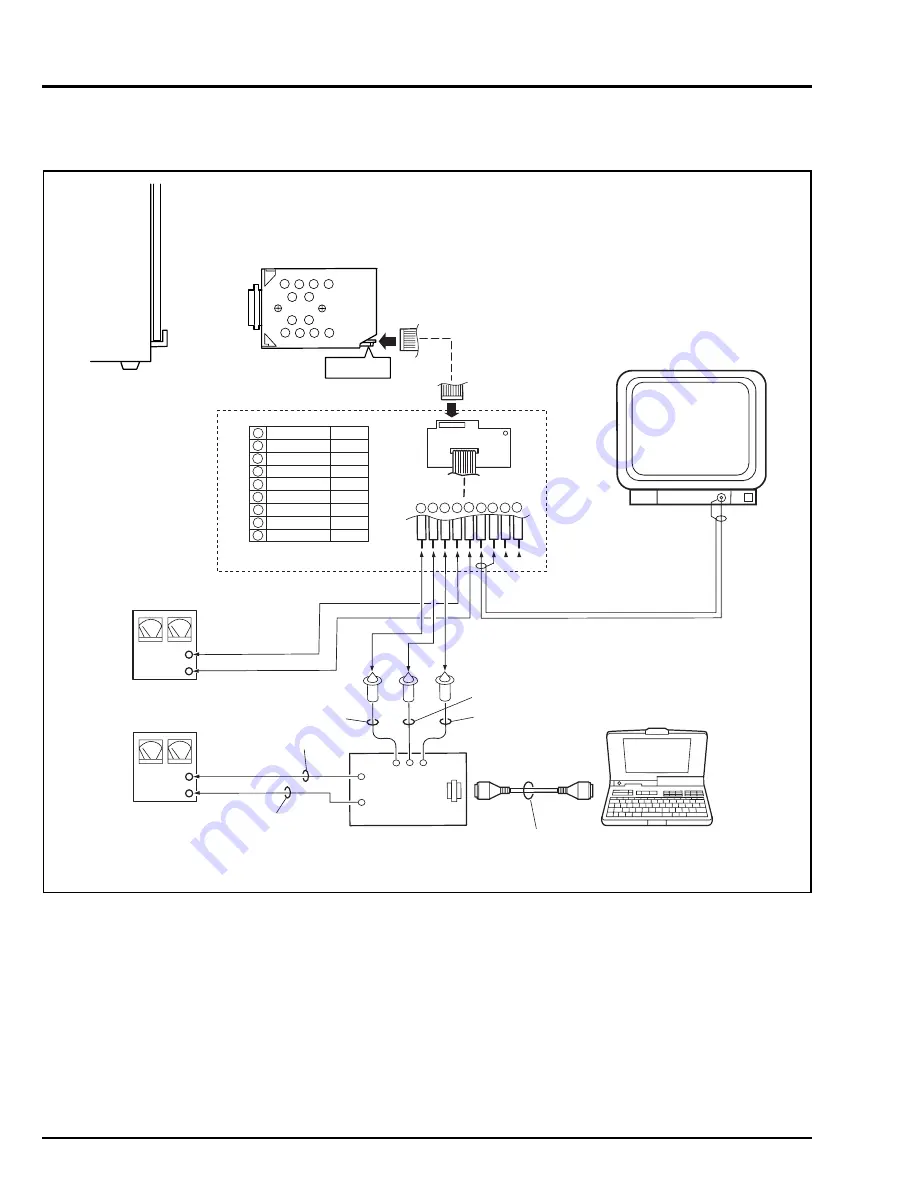
Connect the video camera to the test equipment and jigs as shown in Fig. 2-1.
Fig. 2-1
PG1601
VIDEO CAMERA
LIGHT
BOX
9PIN FLAT CABLE
(ACCESSORY)
COLOR VIDEO
MONITOR
VIDEO IN
1
9
DSP INTERFACE CONNECT JIG
1 2 3 4 5 6 7 8 9
RD
WHT
SD
BRW
GND
BRW
+B
BRW
GND
BRW
VIDEO
BRW
GND(VIDEO) BRW
EX. FV
BRW
GND
BRW
1
2
3
4
5
6
7
8
9
+
DC POWER
SUPPLY
(9V/3A)
GND
+
DC POWER
SUPPLY
(5V/1A)
GND
PERSONAL
COMPUTER
PERSONAL
COMPUTER
CABLE (RS-232C)
DSP-R JIG
BLK
RED
BLK
WHT
YEL
2.2
Notes
1) All adjustments are performed using the adjustment program and personal computer (PC). The adjustment program is
subject to change without notice for improvements in functions and operability, and the actual instructions on PC screen
may be different from those in this manual: If so, follow the instructions on PC screen to proceed with adjustment.
2) Since this chapter uses the device with the highest performance among the models listed to explain adjustment, the actual
instructions on PC screen may be different from those in this manual, depending on whether some functions are provided
or not: If so, follow the instructions on PC screen to proceed with adjustment.
3) The adjustment program will not operate normally unless the video camera, PC and test equipment/jigs are all turned on.


