3 - 9
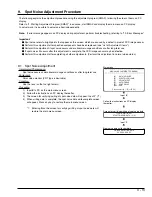
Procedure:
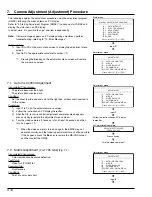
1)
Input 2 to PC on the adjustment menu screen.
2)
The matrix adjustment screen will appear.
3)
Press the D key to minimize the yellow (YEL) level.
Press the U key so the ratio between yellow (YEL) and blue (BLU) levels
is 1:4.
Press the Ctrl key and hold it down, then press the U and D keys so the
ratio between yellow (YEL) and blue (BLU) levels is 1:4.
4)
Press the Enter key: The PC display will switch from the matrix data write
screen to matrix adjustment complete screen.
5)
Press any key to restore the adjustment menu screen.
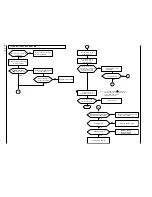
<< ADJUSTMENT OF BLUE MATRIX >>
ROUGH ADJUSTMENT
FINE ADJUSTMENT
[Crt] + [U]
UP
[Crt] + [D]
DOWN
[ENTER]
SAVE & RETURN TO MENU
[ESC]
QUIT
[U]
UP
[D]
DOWN
Matrix adjustment
Matrix data write
Set the ratio between yellow (YEL) and blue
(BLU) levels is 1:4.
Matrix adjustment complete
Press Enter key.
Press any key.
<< ADJUSTMENT OF BLUE MATRIX >>
DATA WRITING INTO EEPROM
<< ADJUSTMENT OF BLUE MATRIX >>
ADJUSTMENT FINISHED
PRESS ANY KEY
7.3
White Balance Adjustment
[For TYPE S/SE]
Incompleted Phenomenon:
Color of the subject is different from that of the picture.
A white subject is not seen as white.
Equipment/Jig:
C12 light balance filter
Conditions:
Attach a C12 light balance filter to lens.
Set the zoom to wide end, and point at a gray scale chart.
Procedure:
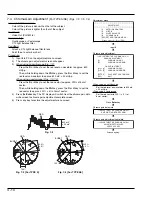
1)
Input 3 to PC on the adjustment menu screen.
2)
Follow the instructions on PC display thereafter.
3)
After the white balance adjustment complete screen appears, press any
key to restore the adjustment menu screen.
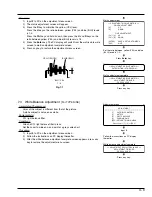
Fig. 7-1
BLUE (BLU)
YELLOW (YEL)
BLU : YEL
1 : 4
***********************************************************
ADJUSTMENT
***********************************************************
[1]
AUTO IRIS CONTROL
[2]
MATRIX
[3]
WHITE BALANCE
[4]
CHROMA GAIN
[ESC] RETURN TO MAIN MENU
Please select [1] - [3] or [ESC]
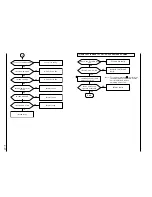
Adjustment menu
Input 3.
Follow the instructions on PC display
thereafter.
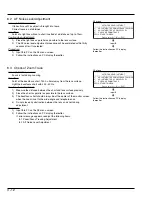
<< ADJUSTMENT OF WHITE BALANCE >>
ADJUSTMENT FINISHED
PRESS ANY KEY
White balance adjustment complete
Press any key.

