


7
ENGLISH
Before use
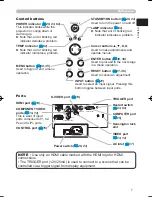
Control buttons
POWER indicator (
20, 23, 62
)
This indicator blinks while the
projector is cooling down or
warming up
► Note that a lit or blinking red
indicator denotes a problem.
TEMP indicator (
62
)
► Note that a lit or blinking red
indicator indicates a problem.
MENU button (
30, 35
)
Used to begin or end a menu
operation.
STANDBY/ON button (
20, 23
)
Used to turn the power on and off.
LAMP indicator (
62
)
► Note that a lit or blinking red
indicator indicates a problem.
Cursor buttons ▲,▼,◄,►
Used to make adjustments and
operate menus.
ENTER button (
30, 35
)
Used to proceed to the next stage
in a menu operation.
RESET button (
31, 36
)
Used to cancel an adjustment.
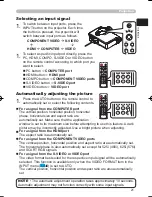
INPUT button (
21
)
Used to select an input signal. Pressing this
button toggles between input ports.
HDMI port (
14
)
Ports
COMPONENT VIDEO
ports (
13, 14
)
This is a set of input
ports composed of Y, C
B
/
P
B
and C
R
/P
R
ports.
CONTROL port (
15
)
S-VIDEO port (
13
)
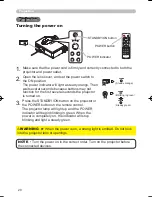
Power switch (
20, 23
)
TRIGGER port
Restart switch
(
23, 64
)
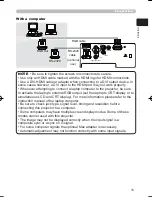
COMPUTER port
(
15
)
Kensington lock
slot
VIDEO port
(
13, 14
)
AC inlet (
17
)
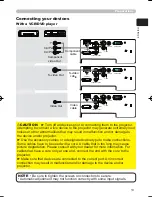
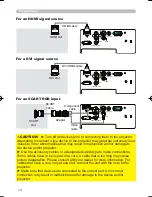
• Use only an HDMI cable marked with the HDMI logo for HDMI
connections.
• The TRIGGER port (12V/25mA) is used to connect to a screen that can be
controlled via a trigger signal from display equipment.
NOTE
POWER
MENU
ENTER
LAMP
TEMP
STANDBY/ON
INPUT
RESET
Y
C
B
/P
B
C
R
/P
R
COMPONENT VIDEO
S-VIDEO
VIDEO
COMPUTER
CONTROL
HDMI
TRIGGER
AC IN
I O


