background image

— 6 —

English

SAFETY 

— Continued

26. DISCONNECT AIR HOSE FROM NAILER WHEN:

1) doing maintenance and inspection;
2) clearing a jam;
3) it is not in use;
4) leaving work area;
5) moving it to another location; and
6) handing it to another person.

Never attempt to clear a jam or repair the Nailer
unless you have disconnected air hose from the Nailer
and removed all remaining fasteners from the Nailer.
The Nailer should never be left unattended since
people who are not familiar with the Nailer might
handle it and injure the themselves.

27. STAY ALERT.

Watch what you are doing. Use common sense.
Do not operate the Nailer when you are tired.
The Nailer should never be used by you if you are
under the influence of alcohol, drugs or medication
that makes you drowsy.

28. HANDLE NAILER CORRECTLY.

Operate the Nailer according to this Manual.
Never allow the Nailer to be operated by children,
individuals unfamiliar with its operation or unauthorized
personnel.

29. NEVER USE NAILER FOR APPLICATIONS OTHER

THAN THOSE SPECIFIED IN THIS MANUAL.

30. HANDLE NAILER CAREFULLY

Because of high air pressure in the Nailer, cracks in
the surface are dangerous.
To avoid this, do not drop the Nailer or strike the
Nailer against hard surfaces; and do not scratch or
engrave signs on the Nailer. Handle the Nailer
carefully.

31. MAINTAIN NAILER WITH CARE.

Keep the Nailer clean and lubricated for better and
safer performance.

32. USE ONLY PARTS, ACCESSORIES OR

FASTENERS SUPPLIED OR RECOMMENDED BY
HITACHI.

Unauthorized parts, accessories, or fasteners may
void your warranty and can lead to malfunction and
resulting injuries.
Only service personnel trained by Hitachi, distributor
or employer shall repair the Nailer.
Never modify or alter a nailer. Doing so may cause it
to malfunction and personal injuries may result.

EMPLOYER’S RESPONSIBILITIES

1. Ensure that this MANUAL is available to operators and

personnel performing maintenance.

2. Ensure that Nailers are used only when operators and

others in work area are wearing EYE PROTECTOR.

3. Enforce the use of EYE PROTECTOR by operators and

others in work area.

4. Keep Nailers in safe working order.

5. Maintain Nailers properly.

6. Ensure that Nailers which require repair are not further

used before repair.

SAVE THIS MANUAL AND
KEEP IT AVAILABLE FOR OTHERS!

Summary of Contents for NR90AC

Page 1: ...rt ou des blessures graves Ce manuel renferme des instructions importantes sur la sécurité de l outil Lire et bien assimiler ce manuel avant d utiliser le cloueur Conserver ce manuel à l intention des autres utilisateurs du cloueur NAILER CLOUEUR MARTILLO NEUMÁTICO MANUAL DE INSTRUCCIONES E INSTRUCCIONES DE SEGURIDAD PELIGRO La utilización inadecuada e insegura de este martillo neumático puede res...

Page 2: ...ENT DU SENS D ÉCHAPPEMENT 28 UTILISATION DU CAPUCHON DE BEC 28 ENTRETIEN ENTRETIEN ET INSPECTION 29 ENTRETIEN ET REPARATIONS 29 Español Página INFORMACIÓN IMPORTANTE 31 DEFINICIÓN DE LAS PALABRAS CLAVE 31 SEGURIDAD INSTRUCCIONES IMPORTANTES DE SEGURIDAD PARA LA UTILIZACIÓN DEL MARTILLO NEUMÁTICO 32 RESPONSABILIDADES DEL EMPRESARIO 34 OPERACIÓN NOMENCLATURA 35 ESPECIFICACIONES 36 SELECCIÓN DE PUNTA...

Page 3: ...Manual and in the sections which contain the operation and maintenance instructions Hazards that must be avoided to prevent bodily injury or machine damage are identified by DANGERS and WARNINGS on the Nailer and in this Manual Never use this Nailer for applications other than those specified in this Manual DEFINITIONS OF SIGNAL WORDS DANGER indicates an imminently hazardous situation which if not...

Page 4: ... 120 psi Do not exceed maximum recommended air pressure 120 psi 8 3 bar 8 5 kgf cm2 Never connect the Nailer to pressure which potentially exceeds 200 psi 13 7 bar 14 kgf cm2 as the Nailer can burst 4 NEVER POINT NAILER TOWARD YOURSELF OR ANYONE ELSE Always assume the Nailer contains fasteners Never point the Nailer toward yourself or anyone else whether it contains fasteners or not If fasteners a...

Page 5: ...do not depress the trigger 2 do not depress the push lever and 3 keep the Nailer pointed downward 16 KEEP HANDS AND FEET AWAY FROM FIRING HEAD DURING USE Never place your hands or feet closer than 8 inches 200 mm from the firing head A serious injury can result if the fasteners are deflected by the workpiece or are driven away from the point of entry 17 PLACE NAILER PROPERLY ON WORKPIECE Do not dr...

Page 6: ...AILER CAREFULLY Because of high air pressure in the Nailer cracks in the surface are dangerous To avoid this do not drop the Nailer or strike the Nailer against hard surfaces and do not scratch or engrave signs on the Nailer Handle the Nailer carefully 31 MAINTAIN NAILER WITH CARE Keep the Nailer clean and lubricated for better and safer performance 32 USE ONLY PARTS ACCESSORIES OR FASTENERS SUPPL...

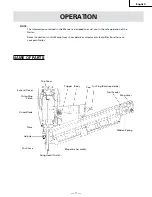
Page 7: ...Nailer Some illustrations in this Manual may show details or attachments that differ from those on your own Nailer NAME OF PARTS Top Cover Body Trigger Cap Air Plug Sold separetely Nail Feeder Stop Lever Ribbon Spring Magazine Assembly Firing Head Outlet Push Leve Adjuster Nose Piston Piston Ring Exhaust Cover Driver Blade ...

Page 8: ... 7 kgf cm2 Air inlet 3 8 NPT Thread NAIL SELECTION Only nails shown in the Table below can be driven with this Nailer Plastic collated strip nails Min Max Full head nails ACCESSORIES WARNING Accessories other than those shown below can lead to malfunction and resulting injuries STANDARD ACCESSORIES 1 Eye protector 1 2 Allen wrench for M8 screw 1 3 Allen wrench for M6 screw 1 4 Allen wrench for M5 ...

Page 9: ...dustries Moisture or oil in the air compressor may accelerate wear and corrosion in the Nailer Drain daily 2 Filter Regulator Lubricator Use a regulator with a pressure range of 0 120 psi 0 8 3 bar 0 8 5 kgf cm2 Filter regulator lubricator units supply an optimum condition for the Nailer and extend the Nailer life These units should always be used Filter The filter removes moisture and dirt mixed ...

Page 10: ...LUBRICATION It is important that the Nailer be properly lubricated Without proper lubrication the Nailer will not work properly and parts will wear prematurely Use Hitachi pneumatic tool lubricant Do not use detergent oil or additives These lubricants will harm the O rings and other rubber parts This will cause the Nailer to malfunction Filter regulator lubricator units should always be used Keep ...

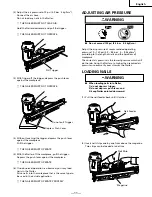
Page 11: ... workpiece that is the same type to be used in the actual application THE NAILER MUST OPERATE PROPERLY ADJUSTING AIR PRESSURE WARNING Do not exceed 120 psi 8 3 bar 8 5 kgf cm2 Adjust the air pressure at recommended operating pressure 70 120 psi 4 9 8 3 bar 5 8 5 kgf cm2 according to the length of nails and the hardness of workpiece The correct air pressure is the lowest pressure which will do the ...

Page 12: ...ng of the Nailer 1 do not push Nailer on workpiece with strong force 2 take Nailer away from workpiece using recoil 3 release trigger quickly when performing trigger fire Do not drive nails into thin boards or near corners and edges of workpiece Nails can be driven through or away from workpiece and hit someone Never drive nails from both sides of a wall at the same time Nails can be driven into a...

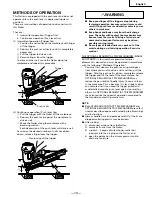
Page 13: ...bsequent fastener may be driven possibly causing injury Some types of loaded nails can spark out of the muzzle during a nail driving operation Exericise caution THE OPTIONAL SEQUENTIAL TRIP MECHANISM SINGLE SHOT PARTS is for use where precision fastener placement is desired and must be operated in accordance with the following Method of Operation You must first depress the push lever upward posi t...

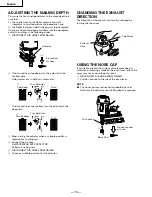
Page 14: ...eep Turn Adjuster Flush ADJUSTING THE NAILING DEPTH To assure that each nail penetrates to the same depth be sure that 1 the air pressure to the Nailer remains constant requlator is installed and working properly and 2 the Nailer is always held firmly against the workpiece If nails are driven too deep or shallow into the workpiece adjust the nailing in the following order 1 DISCONNECT AIR HOSE FRO...

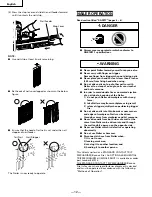
Page 15: ...le and hurt someone 2 Storing When not in use for an extended period apply a thin coat of the lubricant to the steel parts to avoid rust Do not store the Nailer in a cold weather environment Keep the Nailer in a warm area When not in use the Nailer should be stored in a warm and dry place Keep out of reach children 3 WARNING LABEL Change the WARNING LABEL if missing or damaged A new WARNING LABEL ...

Page 16: ... PROBLEM Nailer operates but no nail is driven Weak drive Slow to cycle Drives too deep Skipping nails Intermittent feed Nails jam Driven nail is bent Drives properly during normal operation but does not drive fully at faster nailing speeds CHECK METHOD CORRECTION Check for a jam Clear a jam Check function of nail feeder per Clean and lubricate page 15 Ribbon spring weakend or damaged Replace ribb...

Page 17: ...ons relatives aux instructions d utilisation et d entretien Les dangers à éviter pour empêcher tout risque de blessures ou de dommage de l outil sont identifiés par les mots DANGER et AVERTISSEMENT sur le cloueur et dans ce manuel Ne jamais utiliser ce cloueur pour des applications autres que celles qui sont spécifiées dans ce manuel DEFINITION DES MOTS DE SIGNALISATION DANGER indique une situatio...

Page 18: ...c et régulé AVERTISSEMENT 3 NE PAS DEPASSER 120 PSI Ne pas dépasser la pression d air maximale recommandée de 120 psi 8 3 bars 8 5 kgf cm2 Ne jamais raccorder le cloueur à une pression susceptible de dépasser 200 psi 13 7 bars 14 kgf cm2 car le cloueur pourrait exploser 4 NE JAMAIS CLOUER VERS SOI NI VERS QUELQU UN D AUTRE Toujours supposer que le cloueur renferme des clous Ne jamais diriger le cl...

Page 19: ...NFONCES Quand on charge des clous dans le cloueur ou qu on raccorde le tuyau d air 1 ne pas appuyer sur la gâchette 2 ne pas actionner le levier poussoir et 3 diriger le cloueur vers le bas 16 ELOIGNER LES MAINS ET LES PIEDS DE LA TETE DE CLOUAGE PENDANT L UTILISATION Ne jamais approcher les mains ni les pieds à moins de 8 pouces 200 mm de la tête de clouage Il y a risque de blessures graves si le...

Page 20: ...er tout risque ne pas faire tomber le cloueur ni le heurter contre des surfaces dures et ne pas le rayer ni graver des inscriptions dessus Manipuler le cloueur avec précaution 31 ENTRETENIR SOIGNEUSEMENT LE CLOUEUR Veiller à ce que le cloueur soit toujours propre et graissé pour obtenir un fonctionnement optimal et en toute sécurité 32 UTILISER EXCLUSIVEMENT DES PIECES ACCESSOIRES OU CLOUS FOURNIS...

Page 21: ... du manuel peuvent montrer des détails ou des accessoires qui diffèrent de ceux de votre cloueur NOM DES PIECES Couvercle supérieur Levier d arrêt Alimenteur de clous Bouchon d air vendu séparément Corps Capuchon Gâchette Ressort de rebond Ensemble de magasin Tête de clouage sortie Levier poussoir Ajusteur Bec Lame d entraînement Couvercle d échappement Piston Bague de piston ...

Page 22: ...us 2 recharges 075 ft3 cycle à 100 psi Consommation d air 2 7 l cycle à 6 9 bars 2 7 l cycle à 7 kgf cm2 Arrivée d air Filetage 3 8 NPT SELECTION DES CLOUS Seuls les clous indiqués dans le tableau ci dessous pourront être utilisés avec ce cloueur Recharge de clous à assemblage Min Max plastique Clous à tête ACCESSOIRES AVERTISSEMENT Les accessoires autres que ceux indiqués ci dessous risquent de m...

Page 23: ...nter l air comprimé au cloueur devront respecter les exigences ANSI B19 3 Normes de sécurité pour les compresseurs des industries de transformation L humidité ou l huile dans le compresseur d air peuvent accélérer l usure et la corrosion du cloueur Purger tous les jours 2 Filtre régulateur lubrificateur Utiliser un régulateur d une pression comprise entre 0 120 psi 0 8 3 bars 0 8 5 kgf cm2 Les uni...

Page 24: ...plein d huile de machine pneumatique Hitachi Si l on ne possède pas de lubrificateur mettre 2 à 3 gouttes d huile de machine pneumatique Hitachi dans le bouchon d air du cloueur deux fois par jour ENTRETIEN PAR TEMPS FROID Ne pas ranger le cloueur dans un environnement froid Le laisser dans un endroit chaud jusqu à ce que l on soit prêt à travailler Si le cloueur est déjà froid l amener dans un en...

Page 25: ...il proprement dit LE CLOUEUR DOIT FONCTIONNER CORRECTEMENT REGLAGE DE LA PRESSION D AIR AVERTISSEMENT Ne pas dépasser 120 psi 8 3 bars 8 5 kgf cm2 Régler la pression d air à la pression de travail recommandée de 70 120 psi 4 9 8 3 bars 5 8 5 kgf cm2 en fonction de la longueur des clous et de la dureté du matériau La pression d air correcte est la pression la plus basse capable d effectuer le trava...

Page 26: ... sur d autres clous ni avec le cloueur à un angle trop aigu les clous pourraient ricocher et blesser qulqu un Pour éviter tout risque de déclenchement double ou toute éjection inadvertante d un clou dus à un bondissement du cloueur 1 ne pas appuyer le cloueur trop fort contre la pièce 2 éloigner complètement le cloueur de la pièce avec le rappel 3 relâcher la gâchette rapidement lorsqu on effectue...

Page 27: ...uage car un contact accidentel du levier poussoir sur l opérateur ou sur les personnes alentour pourrait entraîner des blessures graves Ne pas approcher les mains ni le corps de la section de sortie des clous Le cloueur avec mécanisme de déclenchement par contact risque de faire un bond après avoir enfoncé un clou ce qui pourrait enfoncer un autre clou et provoquer des blessures Certains types de ...

Page 28: ...tourner l ajusteur sur le côté profond 3 Cesser de tourner l ajusteur quand on a trouvé la position qui convient lors de l essai de clouage 4 Brancher le tuyau d air TOUJOURS PORTER DES LUNETTES DE PROTEC TION Effectuer un clouage d essai 5 DEBRANCHER LE TUYAU D AIR DU CLOUEUR 6 Sélectionner la position de l ajusteur qui convient Couvercle supérieur Event d échappement 2 1 Ne pas brancher le tuyau...

Page 29: ...n certain temps enduire ses pièces en acier d une mince couche de graisse pour éviter toute corrosion Ne pas remiser le cloueur dans un environnement froid Le laisser dans un endroit chaud Lorsqu on ne se sert pas du cloueur le remiser dans un endroit chaud et sec Le ranger hors de portée des enfants 3 ETIQUETTE D AVERTISSEMENT Remplacer l ETIQUETTE D AVERTISSEMENT si elle manque ou qu elle est en...

Page 30: ...us ne s enfoncent pas Entraînement faible Cycle lent Les clous s enfoncent trop profondément Certains clous sont sautés Alimentation intermittente Des clous se coincent Les clous enfoncés sont tordus Les clous s enfoncent bien normalement mais pas complètement à des vitesses supérieures VERIFICATION CORRECTION Vérifier si un clou est coincé Dégager le clou Vérifier le fonctionnement de Nettoyer et...

Page 31: ...en la sección SEGURIDAD de este manual y en las secciones que contienen las instrucciones sobre operación y mantenimiento Los riesgos que habrá que eludir para evitar lesiones o el daño de la máquina se identifican mediante PELIGRO y ADVERTENCIA en el martillo neumático y en este manual No utilice nunca este martillo neumático para aplicaciones que no sean las especificadas en este manual DEFINICI...

Page 32: ...o seco y regulado ADVERTENCIA 3 NO SOBREPASE 120 psi No sobrepase nunca la presión de aire máxima recomendada de 120 psi 8 3 barias 8 5 kgf cm2 No conecte nunca el martillo neumático a una presión que pueda sobrepasar potencialmente 200 psi 13 7 barias 14 kgf cm2 ya que el martillo neumático podría explotar 4 NO APUNTE NUNCA CON EL MARTILLO NEUMÁTICO HACIA SÍ MISMO NI HACIA OTRAS PERSONAS Piense s...

Page 33: ... la manguera de aire 1 no apriete el gatillo 2 no presione la palanca de empuje ni 3 mantenga el martillo neumático apuntado hacia abajo 16 MANTENGA LAS MANOS Y LOS PIES ALEJADOS DE LA CABEZA DE SALIDA DE LAS PUNTAS DURANTE LA UTILIZACIÓN No coloque sus manos ni pies a menos de 8 200 mm de la cabeza de salida de las puntas Si la pieza de trabajo desvía las puntas o si éstas salen del punto de intr...

Page 34: ...eumático las rajas en su superficie pueden resultar peligrosas Para evitar esto no deje caer el martillo neumático ni lo golpee contra superficies duras y no grabe nada en el mismo Maneje cuidadosamente el martillo neumático 31 MANTENGA EL MARTILLO NEUMÁTICO CON CUIDADO Mantenga el martillo neumático limpio y lubricado para que rinda al máximo y con la mayor seguridad 32 UTILICE SOLAMENTE LAS PIEZ...

Page 35: ...ste manual pueden mostrar detalles o accesorios diferentes a los de su propio martillo neumático NOMENCLATURA Cubierta superior Gatillo Cuerpo Tapa Toma de aire Vendida aparte Alimentador de puntas Palanca de parada Resorte de cinta Conjunto del cargador Anillo del pistón Cubierta de escape Pistón Morro Ajustador Cabeza de salida de las puntas Palanca de empuje Cuchilla impulsora ...

Page 36: ...istras 095 pies 3 ciclo a 100 psi Consumo de aire 2 7 litros ciclo a 6 9 barias 2 7 litros ciclo a 7 kgf cm2 Entrada de aire Rosca 3 8 NPT SELECCIÓN DE PUNTAS Con este martillo neumático solamente podrán utilizarse las puntas indicadas en la tabla siguiente Puntas colocadas en ristra de Mín Máx plástico Puntas con cabeza completa ACCESORIOS ADVERTENCIA Los accesorios que no sean los mostrados a co...

Page 37: ...deberá poder resistir una presión mínima de 150 psi 10 4 barias 10 6 kgf cm2 o el 150 de la presión máxima producida en el sistema el valor más alto sea 4 Acoplador de manguera El martillo neumático podrá instalarse de la forma siguiente Quite el tapón guardapolvo colocado en la entrada de aire Instale una boquilla macho 3 8 NPT en la entrada de aire ACCESORIOS OPCIONALES vendido aparte Mecanismo ...

Page 38: ...on lubricante para herramientas neumáticas Hitachi Si no dispone de lubricador aplique 2 3 gotas de lubricante para herramientas neumáticas Hitachi a la entrada de aire del martillo neumático dos veces al día CUIDADOS PARA CLIMAS FRÍOS No guarde el martillo neumático en un lugares fríos Déjelo en un lugar cálido antes de comenzar a trabajar Si el martillo neumático está frío póngalo en un lugar cá...

Page 39: ...EBERÁ FUNCIONAR 6 Si no observa nada anormal cargue puntas en el martillo neumático Clave en la pieza de trabajo las mismas puntas que vaya a utilizar en la aplicación real EL MARTILLO AUTOMÁTICO DEBERÁ FUNCIONAR ADECUADAMENTE AJUSTE DE LA PRESIÓN DE AIRE ADVERTENCIA No sobrepase 120 psi 8 3 barias 8 5 kgf cm2 Ajuste la presión del aire al valor recomendado 70 120 psi 4 9 8 3 barias 5 8 5 kgf cm2 ...

Page 40: ...cificaciones ANSI Z87 1 ADVERTENCIA No apunte nunca con el martillo neumático hacia sí mismo ni hacia otras personas No transporte nunca el martillo neumático con un dedo en el gatillo No coloque sus manos ni pies a menos de 8 200 mm de la cabeza de salida de las puntas No clave una punta sobre otra ni con el martillo neumático con un ángulo demasiado agudo ya que las puntas podrían rebotar y heri...

Page 41: ...con el martillo neumático fuera de la pieza de trabajo 2 Presione la palanca de empuje contra la pieza de trabajo para clavar una punta 3 Desplace el martillo neumático por la pieza de trabajo con un movimiento de rebote Con cada presión de la palanca de empuje se clavará una punta Después de haber clavado las puntas necesarias separe el dedo del gatillo ADVERTENCIA Mantenga el dedo separado del g...

Page 42: ...lice el ajuste en el orden siguiente 1 DESCONECTE LA MANGUERA DE AIRE DEL MARTILLO NEUMÁTICO 2 Si las puntas penetran demasiado gire el ajustador hacia la parte de menor profundidad El ajuste se realiza en incrementos de media vuelta Si las puntas se insertan demasiado poco gire el regulador hacia la parte de mayor profundidad 15 Ajustador Desconecte la manguera de aire 2 Demasiada profundidad Gir...

Page 43: ...cho tiempo aplique una capa fina de lubricante a las piezas de acero para evitar que se oxiden No guarde el martillo neumático en un lugar frío Guarde el martillo neumático en un lugar cálido Cuando no vaya a utilizar el martillo neumático deberá guardarlo en un lugar cálido y fresco Mantenga el martillo neumático fuera del alcance de los niños 3 ETIQUETA DE PRECAUCIÓN Si la ETIQUETA DE PRECAUCIÓN...

Page 44: ...neumático funciona pero no clava puntas Poca fuerza Reciclado lento Las puntas penetran demasiado Salto de puntas Alimentación intermitente Puntas atascadas Las puntas se clavan dobladas El funcionamiento es normal pero no es posible clavar a gran velocidad Compruebe si está atascado Desatásquelo Compruebe el funcionamiento del Limpie y lubrique alimentador de puntas de acuerdo con la página 43 Es...

Page 45: ... 45 Español ...

Page 46: ... 46 Español ...

Page 47: ... 44 949 821 Hex Socket Hd Bolt M5 16 3 45 872 035 Dust Cap 1 46 949 864 Roll Pin D3 22 1 47 880 674 Trigger A 1 48 881 952 Trigger Pin 1 49 949 865 Roll Pin D3 28 2 50 880 361 Pushing Lever Guide 1 Item No Code No Part Name Q ty 51 877 699 Head Valve O Ring I D 16 8 1 52 878 881 Valve Bushing B 1 53 878 885 O Ring S 18 1 54 981 317 O Ring S 4 1 55 880 672 Valve Piston B 1 56 878 925 O Ring I D 8 8...

Page 48: ...912 Code No C99086862 N Printed in Japan Shinagawa Intercity Tower A 15 1 Konan 2 chome Minato ku Tokyo 108 6020 Japan ...

Reviews: