Hitachi L42VK06U Instructions For Use Manual Download Page 39

 English

- 34 -

Appendix C: Supported File Formats for USB Mode

Media

File

Extension

Format

Remarks

Video

Audio

(Maximum resolution/Bit rate etc.)

Music

.mp3

--

MPEG 1/2

Layer 1/ 2/

3 (MP3)

Sample Rate: 8K ~ 48KHz, Bit Rate: 

32K~320Kbps

Photo

.jpg

Baseline

JPEG

MAX. Width 7680 Height 4320, 16 Mega-pixel

Support format: 444/  422/ 420 

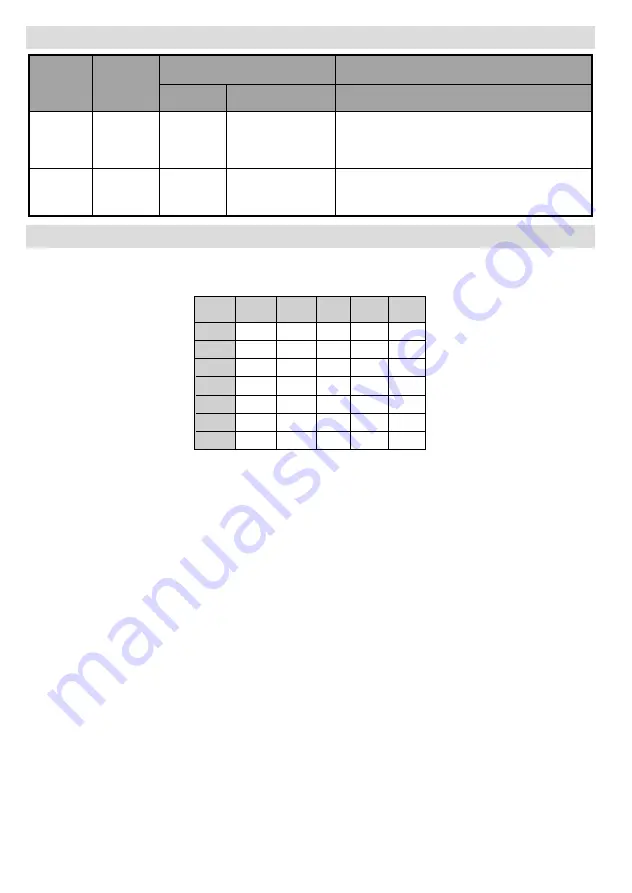
Appendix D: Supported DVI Resolutions

When connecting devices to your TV’s connectors by using DVI converter cables (not supplied), you can refer 
to the following resolution information.

24Hz

25Hz

30Hz

50Hz

60Hz

480i

;

480p

;

576i

;

576p

;

720p

;

;

1080i

;

;

1080p

;

;

;

;

;

Summary of Contents for L42VK06U

Page 1: ...GB Instructions for use L42VK06U 42 LCD Colour Television ...

Page 2: ...V or connect the aerial through a VCR Aerial RF Socket wall socket wall socket Aerial RF Lead Aerial RF Lead It is recommended that a scart lead should be fitted between your TV and VCR to enhance your picture and sound quality Scart leads are essential if you have a stereo TV and VCR and wish to obtain stereo sound from your equipment These leads can be purchased from your Hitachi dealer or any g...

Page 3: ...HDMI OUT RF connector lead Device to TV wall socket Aerial RF Lead Aerial RF Socket High Definition Your LCD Television is capable of displaying High Definition pictures from devices such as a High Definition Satellite Receiver or DVD Device These devices must be connected via the HDMI socket or Component Socket TFT LCD TV Scart Lead to AV 1 on TV Note These three methods of connection perform the...

Page 4: ...on NB When the set is first switched on the set will be in standby and the indicator on the front of the set will illuminate red Press Operate Standby or channel up down P P or numeric buttons 1 2 3 to operate insert plug European plug and switch on insert plug UK plug Programme Up Programme Down To select a programme number For navigation of the menus SIDE VIEW Operate Standby RC 3900 To enter th...

Page 5: ...s please refer to the Install Menu section of the instruction book When the TV is turned on for the first time the menu for the language selection appears on the screen The message Welcome please select your language is written in all language options sequentially in the menu on the screen By pressing or buttons highlight the language you want to set and press OK After then First time Installation...

Page 6: ...XVHKROGV URZQ FRS ULJKW DQG GDWDEDVH ULJKW OO ULJKWV UHVHUYHG 2UGQDQFH 6XUYH LFHQFH QXPEHU URZQ FRS ULJKW DQG GDWDEDVH ULJKW OO ULJKWV UHVHUYHG 2UGQDQFH 6XUYH LFHQFH QXPEHU Please note that the maps are only indicative of the areas in which Freeview HD will be available as the transmission network upgrade progresses For detailed coverage information associated with specific dates the postcode check...

Page 7: ...G RI RI 8 KRXVHKROGV QG RI 62 LQ RI 8 KRXVHKROGV URZQ FRS ULJKW DQG GDWDEDVH ULJKW OO ULJKWV UHVHUYHG 2UGQDQFH 6XUYH LFHQFH QXPEHU URZQ FRS ULJKW DQG GDWDEDVH ULJKW OO ULJKWV UHVHUYHG 2UGQDQFH 6XUYH LFHQFH QXPEHU ...

Page 8: ... 15 Programme Options 16 Analogue Teletext 16 Widescreen 16 IDTV Menu System 17 Channel List 17 Navigating the Entire Channel List 17 Moving the channels in the channel list 17 Deleting the Channels in the Channel List 17 Renaming channels 17 Adding Locks to Channels 18 Setting Favourites 18 Program Guide 18 Common Interface 18 TV Setup 18 Setup 19 Configuration 19 Language Settings 21 Installation...

Page 9: ...or future references Read the corresponding instructions of this handbook prior to the first usage of the device even when the usage of electronic devices is familiar to you Notice especially the chapter SAFETY PRECAUTIONS Carefully keep the handbook as future reference When selling the device or giving it away absolutely give these direction for use This device is intended to receive and display T...

Page 10: ...or objects filled with liquids such as vases to be placed on the equipment DON T place hot objects or naked flame sources such as lighted candles or nightlights on or close to equipment High temperatures can melt plastic and lead to fires DON T use makeshift stands and NEVER fix legs with wood screws to ensure complete safety always fit the manufacturer s approved stand or legs with the fixings provide...

Page 11: ...en flames and sources of intense heat such as an electric heater Ensure that no open flame sources such as lighted candles are placed on top of the TV Batteries should not be exposed to excessive heat such as sunshine fire or the like Lightning In case of storm and lightning or when going on holiday disconnect the power cord from the wall outlet Replacement Parts When replacement parts are required m...

Page 12: ...al aid has to be sought immediately Also keep the packaging foils away from children There is danger of suffocation Inserting Batteries in the Remote Control Remove the battery cover located on the back of the remote control by gently pulling backwards from the indicated part Insert two AAA R3 or equivalent type batteries inside Place the batteries in the right directions and replace the battery c...

Page 13: ... in Power Save Mode When the TV is not in use please switch off or disconnect the TV from the mains plug This will also reduce energy consumption Disconnect power when going away for longer time Note that annually using the TV set in Power Save Mode has more power efficiency than disconnecting the TV from the mains plug instead of keeping stand by mode Therefore disconnect the TV from the mains plu...

Page 14: ...Programme Up Page down in DTV mode 18 Sleep Timer 19 Picture Mode Selecion 20 Okay Store Select Channel list in DTV 21 mode Hold in TXT mode Cursor Down 22 Exit in DTV mode Return Index page in 23 TXT mode Cursor Right Subpage in TXT mode 24 Cursor Up 25 Previous programme 26 Yellow Feature Menu 27 Blue Install Menu 28 No function 29 Subtitle on off in DTV mode TXT subtitle 30 V V SCREEN SCREEN LA...

Page 15: ...g an external active subwoofer to the set to give a much deeper bass effect Use an appropriate RCA cable to connect the set to a subwoofer unit Audio Line Outs 2 output audio signals to an external device such as an optional sound system To connect the external speakers to your TV use AUDIO LINE OUTS of the TV with an audio cable 3 EXT 2 inputs or outputs for external devices 4 EXT 1 inputs or out...

Page 16: ...en AUDIO INPUTS on the TV and audio outputs of your device to enable component audio 7 S PDIF Coaxial Out outputs digital audio signals of the currently watched source Use an SPDIF coaxial cable to transfer audio signals to a device that has S PDIF input 8 RF Input connects to an antenna or a cable system Note that if you use a decoder or a media recorder you should connect the aerial cable throug...

Page 17: ...ls of external devices 7 Connect the audio cable between the AUDIO INPUTS on the TV and the AUDIO OUTPUT jacks on your device Note If you connect a device to the TV via the VIDEO INPUT you should also connect your device with an audio cable to the AUDIO INPUTS of the TV to enable audio S Video 8 Input is used for connecting an S VIDEO signal e g from a camcorder or VCR For using S VIDEO input conn...

Page 18: ...CAUTION Quickly plugging and unplugging USB devices is a very hazardous operation Especially do not repeatedly quickly plug and unplug the drive This may cause physical damage to the USB player and especially the USB device itself SIDE VIEW USB MEMORY USB Memory Connection Plug your USB device to the USB input of the TV If the plugged USB disk is not recognised please reinsert the disk It is recom...

Page 19: ...t levels of quality It is not necessary to connect by all three methods HDMI inputs Scart sockets Component video inputs Component audio inputs DVD Player Using Side AV Connectors You can connect a range of optional equipment to your LCD TV Possible connections are shown below Note that cables shown in the illustration are not supplied For connecting a camcorder connect to the S VIDEO or VIDEO IN ...

Page 20: ...esigned to control all the functions of the model you selected The functions will be described in accordance with the menu system of your TV Functions of the menu system are described in the following sections Volume Setting Press V button to increase the volume Press V button to decrease the volume Avolume level scale slider will be displayed on the screen Programme Selection Previous or Next Pro...

Page 21: ...nd select DTV from the list The TV then switches to digital TV mode Information Screen Whenever you change the channel using the P or P button or numeric buttons the TV displays the broadcast picture along with an information banner at the bottom of the screen This will remain on the screen for approximately a few seconds The information banner can also be displayed by pressing the INFO button at ...

Page 22: ...broadcasting DVB T some programmes are broadcast with subtitles Note You can enable subtitles by pressing the SUBTITLE button Digital Teletext Press the TELETEXT button The digital teletext information appears Operate it with the coloured buttons buttons and OK button The operation method may differ depending on the contents of the digital teletext Follow the instructions displayed on digital tele...

Page 23: ...amme number of the channel that you want to move services will be replaced Do you want to continue OSD will be displayed Press OK to confirm or select No to cancel Deleting the Channels in the Channel List Press or buttons to select the channel that will be deleted Press or buttons to select the Delete item on Channel List OSD Press OK button to delete the highlighted channel in the channel list Th...

Page 24: ...ral Operations part Common Interface Press MENU button to display the main menu and use the or buttons to highlight the Common Interface line and press OK button It is required to subscribe to a pay channel company to view the pay channels of the Digital Terrestrial broadcasting Obtain the Conditional Access Module CAM and the viewing card by subscribing to a pay channel company then insert those ...

Page 25: ...onization problem in the received broadcast Press or button to change the delay or use numeric buttons to enter SPDIFAudio delay manually When finished press GREEN button to apply SPDIF Audio Use this setting to define digital audio out signal type Use or buttons to set SPDIF Audio as Compressed or PCM If your selected channel includes Compressed sound stream you should connect your TV to external e...

Page 26: ...so the user cannot add channels Changes will be updated after exiting Configuration Menu Guidance When set this option gets the maturity information from the broadcast and if this maturity level is disabled the TV will not display the related video audio Set PIN Use or buttons to go to Set PIN option Press OK to display the Set PIN window Use numeric buttons to enter new pin number you will need to...

Page 27: ...erver In most domestic networks the default gateway and DNS server will both be the IP address of the router Installation The Installation menu is mainly intended to help you for creating a Channel Table in most efficient way Select Installation from the main menu by pressing or buttons Automatic Channel Scan Automatic channel scan is started by pressing OK button while Automatic channel scan item ...

Page 28: ...essing or buttons and press OK button to start installation After search is completed for digital channels a message asking whether to search for analogue channels appears on the screen This process is same as described in Automatic Search section Analogue TV Menu System Picture Menu Mode For your viewing requirements you can set the related mode option Press or button to select Mode Press or butt...

Page 29: ... Sound Menu Volume Press or button to select Volume Press or button to change the level of the Volume Equalizer Press or button to select Equalizer Press button to view equalizer menu Press or button to change the preset In equalizer menu the preset can be changed to Flat Classic User Music Movie and Speech Select the desired frequency by pressing or button and increase or decrease the frequency g...

Page 30: ...n this case the control panel buttons except for the STANDBY button will not work Hence if one of those buttons is pressed Child Lock Is On will be displayed on the screen when the menu screen is not visible Language Press or button to select Language Use or button to select the Language Default Zoom While zoom mode is set as AUTO the TV will set the zoom mode in accordance with the signal of the ...

Page 31: ...number using the numeric buttons on the remote control There are 200 programme storage between 0 and 199 Band Band can be selected either C or S Press or button to set Band Channel Channel can be changed by or button or numeric buttons Colour System Press or button to select Colour System Use or button to change the colour system to AUTO PAL SECAM or PAL60 Sound System Press or button to select So...

Page 32: ...amme space and press the GREEN button again Delete To delete a programme press the YELLOW button Pressing the YELLOW button again erases the selected programme from the programme list and the following programmes shift one line up APS Auto Programming System When you press the BLUE button for starting automatic tuning Auto Programming System menu will appear on the screen Press or button to select...

Page 33: ... Browser menu without plugging a USB device to the TV No USB Device message will be displayed on the menu screen Note Unknown file formats will be marked with a question mark You can use the following remote control buttons to browse between files stored on your USB drive Up Down Explores the files OK Views plays a selection enter folder Menu Back Red Filters JPG files GREEN Filters MP3 files Select...

Page 34: ...ngs explained in Analog Tv menu system Displaying TV Information Programme Number Programme Name Sound Indicator and Zoom Mode information is displayed on the screen when a new programme is entered or INFO button is pressed When you are in DTV Mode and press or button the Information of the previous or next programme is displayed To switch to the displayed programme just press OK button Mute Funct...

Page 35: ...xt mode when pressed once Press again to place the teletext screen over the programme mix Pressing this button again will split the screen into two windows one displaying the teletext and the other displaying the current channel Pressing again will quit the teletext mode RETURN Index Selects the teletext index page SCREEN Expand Press once to enlarge top half of the page press again to enlarge the...

Page 36: ...dings can cause double pictures or ghost images Sometimes you can improve the picture quality by changing the direction of the aerial Is the picture or teletext unrecognisable Check if you have entered the correct frequency Please retune the channels The picture quality may degrade when two peripherals are connected to the TV at the same time In such a case disconnect one of the peripherals No Pic...

Page 37: ... 8 16 9 4 3 12 800 600 72 48 1 VESA 16 9 4 3 13 800 600 75 46 9 VESA 16 9 4 3 14 800 600 85 53 7 VESA 16 9 4 3 15 832 624 75 49 7 MAC 16 9 4 3 16 1024 768 43 35 5 VESA interlace 16 9 4 3 17 1024 768 60 48 4 VESA 16 9 4 3 18 1024 768 70 56 5 VESA 16 9 4 3 19 1024 768 72 57 7 16 9 4 3 20 1024 768 75 60 0 16 9 4 3 21 1024 768 85 68 3 16 9 4 3 22 1152 864 60 53 8 16 9 4 3 23 1152 864 70 64 2 VESA 16 9...

Page 38: ...576P 50Hz O 720P 50Hz O 720P 60Hz O 1080I 50Hz O 1080I 60Hz O HDMI1 HDMI2 HDMI3 480I 60Hz O 480P 60Hz O 576I 50Hz O 576P 50Hz O 720P 50Hz O 720P 60Hz O 1080I 50Hz O 1080I 60Hz O 1080P 50Hz O 1080P 60Hz O 1080P 24Hz O X Not Available O Available Note In some cases a signal on the LCD TV may not be displayed properly The problem may be an inconsistency with standards from the source equipment DVD Se...

Page 39: ...ample Rate 8K 48KHz Bit Rate 32K 320Kbps Photo jpg Baseline JPEG MAX Width 7680 Height 4320 16 Mega pixel Support format 444 422 420 Appendix D Supported DVI Resolutions When connecting devices to your TV s connectors by using DVI converter cables not supplied you can refer to the following resolution information 24Hz 25Hz 30Hz 50Hz 60Hz 480i 480p 576i 576p 720p 1080i 1080p ...

Page 40: ... 103 x 1014 x 657 Weight Kg 18 00 Digital Reception DVB T Transmission Standards MPEG2 MPEG4 HD DVB T i DEMODULATION Symbol rate COFDM with 2K 8K FFT mode Modulation 16 QAM 64 QAM FEC for all DVB modes automatically found ii VIDEO H 264 MPEG 4 part 10 main and high profile level 4 1 MPEG 2 MP HL video decoder HD display multi format capable 1080i CVBS analogue output iii AUDIO MPEG 1 layer I II MPE...

Page 41: ...acture we cannot guarantee compatibility with future DVB transmissions due to changes that may be implemented in broadcast signals and technologies Some digital television functions may not be available in all countries We continually strive to improve our products therefore specifications may change with out prior notice For advice on where to purchase accessories please contact the store where y...

Page 42: ... subject of unauthorised modifications or alterations or has been the subject of commercial use In the event of a problem with the product within the guarantee period please return it to your nearest Argos store If the item is shown to have had an inherent defect present at the time of sale the store will provide you with a replacement Your statutory rights remain unaffected Guarantor Home Retail ...

Page 43: ...www hitachidigitalmedia com ...

Reviews: