background image

English

   - 15 -

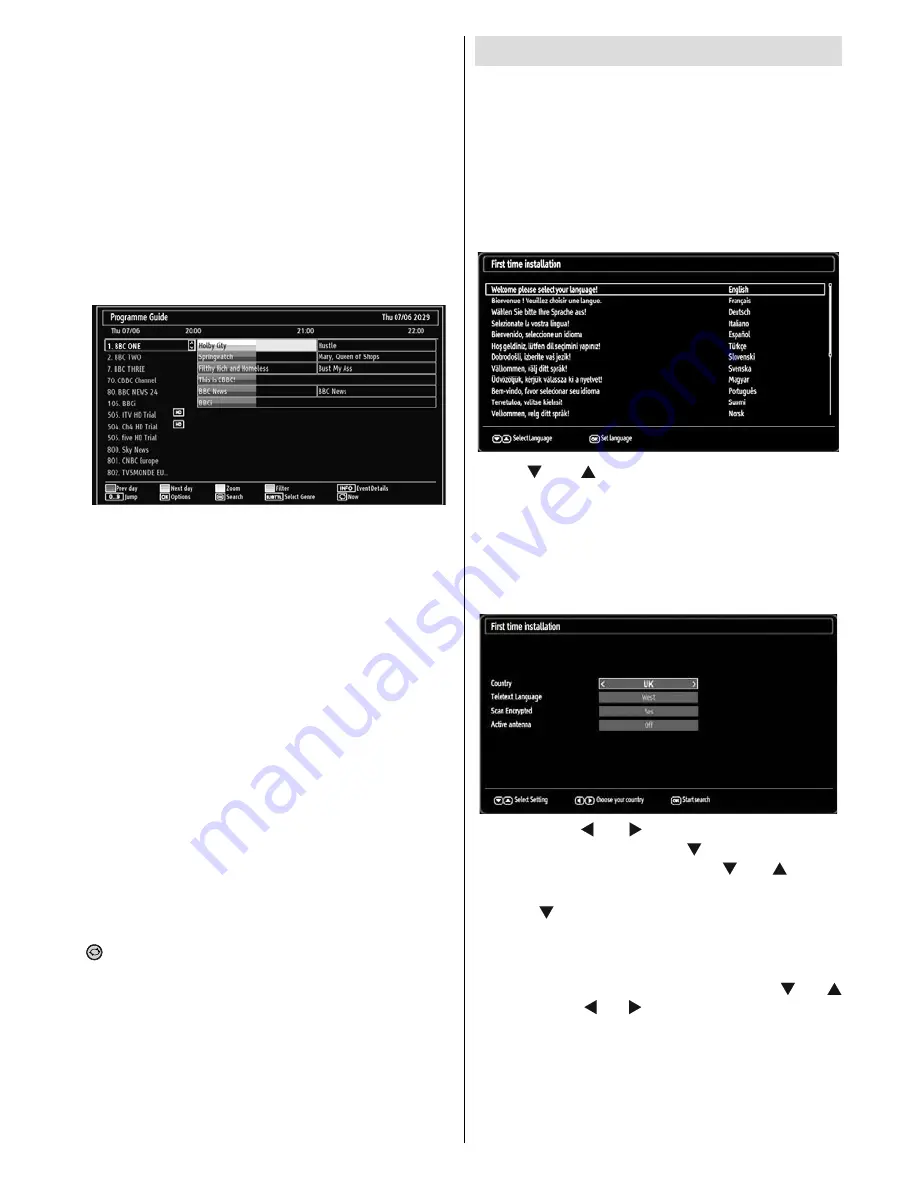
Yellow button (Prev Day):

 Displays the programmes 

of previous day.

Blue button (Next day):

 Displays the programmes 

of the next day.

Text button (Filter): 

Views fi ltering options.

Numeric buttons (Jump)

: Jumps to the preferred 

channel directly via numeric buttons.

OK (Options):

 Displays programme options including 

Select Channel

” option.

INFO (Event Details): 

Displays the programmes in 

detail.

Timeline schedule

Red button (Prev Day):

 Displays the programmes 

of previous day.

Green button (Next day):

 Displays the programmes 

of the next day.

Yellow button (Zoom)

: Expands programme 

information.

Blue button (Filter): 

Views fi ltering options.

INFO (Event Details): 

Displays the programmes in 

detail.

Numeric buttons (Jump)

: Jumps to the preferred 

channel directly via numeric buttons.

OK (Options):

 Displays programme options including 

Select Channel

” option.

Text (Search):

 Displays “

Guide Search

” menu.

SUBTTL:

Press

SUBTITLE

 button to view Select 

Genre menu. Using this feature, you can search the 
programme guide database in accordance with the 
genre. Info available in the programme guide will 
be searched and results matching your criteria will 
be listed.

 (Now)

 : Shows the current programme.

First Time Installation

IMPORTANT: Ensure that the aerial is connected 
and a Common Interface module is not inserted 
before switching on the TV for the first time 
installation.

Do not insert a common interface module during the 
search process.

When the TV is operated for the fi rst time, installation 

wizard will guide you through the process. First, 
language selection screen will be displayed:

Use “

” or “

” buttons to select your language 

and press 

OK

 button to set selected language and 

continue.

After selecting the language, “

Welcome!

” screen 

will be displayed, requiring you to set 

Country, 

Teletext Language

,

Scan Encrypted

 and 

Active

antenna

 options.

By pressing “

” or “ ” button, select the 

Country

you want to set and press “

” button to highlight 

Teletext Language

 option. Use “

” or “

” button 

to select desired 

Teletext Language

.

Press “

” button after setting Teletext Language 

option.

Scan Encrypted

 will be then highlighted. You 

can set 

Scan Encrypted 

as

Yes

 if you want to scan 

coded stations. After selecting the 

Scan Encrypted

,

select Active antenna feature by pressing “

” or “

” button. Use “ ” or “ ” button to set active antenna 
mode as on or off. If an active antenna is connected 
to your TV, you can select this option as On (5V). 
Antenna power should be Off when standard 
antenna is used instead of the active antenna.

Summary of Contents for L42VG08U

Page 1: ...uctions for use L42VG08U 42 LCD Colour Television For any TV set up or usage issues Technical Helpline No 0845 604 0105 Lines are open 9am 8pm Monday to Saturday and 11am 5pm Sunday Calls charged at local rate ...

Page 2: ...annel 18 Deleting a Channel 18 Renaming a Channel 18 Locking a Channel 18 Channel List Filter 18 Managing Stations Favourites 19 Button Functions 19 Managing Stations Sorting Channel List 19 On Screen Information 19 Media Playback Using Media Browser 19 Viewing Videos via USB 20 Viewing Photos via USB 20 Slideshow Options 20 Playing Music via USB 20 Media Browser Settings 21 Using DLNA Network Ser...

Page 3: ...pter SAFETY PRECAUTIONS Carefully keep the handbook as future reference When selling the device or giving it away absolutely give these directions for use Thank you for choosing this product This manual will guide you for the proper operation of your TV Before operating the TV please read this manual thoroughly Please do keep this manual in a safe place for future references This device is intende...

Page 4: ...N T listen to headphones at high volume as such use can permanently damage your hearing DON T leave equipment switched on when it is unattended unless it is specifically stated that it is designed for unattended operation or has a stand by mode Switch off using the switch on the equipment and make sure that your family know how to do this Special arrangements may need to be made for infirm or handic...

Page 5: ...stitutions may result in fire electrical shock or other hazards Servicing Please refer all servicing to qualified personnel Do not remove the cover yourself as this may result in an electric shock Waste Disposal Instructions for waste disposal Packaging and packaging aids are recyclable and should principally be recycled Packaging materials such as foil bag must be kept away from children Batteries ...

Page 6: ...m mains the mains plug has to be pulled from the mains socket Because of that the device should be set up in a way that an unobstructed access to mains socket is guaranteed so that in case of emergency the mains plug can be pulled immediately To exclude the danger of fire the power cord should principally be separated from the mains socket prior to a longer period of non usage i e during vacations ...

Page 7: ...If you set power save mode as Picture off a message will appear on the screen and backlight will be off within three seconds Press any button on the remote controller to activate the picture again When the TV is not in use please switch off or disconnect the TV from the mains plug This will also reduce energy consumption Disconnect power when going away for longer time It is highly recommended to ...

Page 8: ...e Guide 21 Sleep timer 22 Menu on off 23 OK Select Hold in TXT mode Channel List 24 Volume up down 25 Navigation buttons 26 AV Source 27 Previous programme 28 Blue buton 29 Yellow button Active channel list 30 Web Browser 31 Subtitle on off TXT subtitle analogue TV 32 mode Subtitle in Media Browser mode No function 33 Rapid advance in Media Browser mode 34 Stop in Media Browser mode 35 Pause in Me...

Page 9: ...s connected via the SCART socket the TV will automatically switch to AV mode Note To connect external device please use the supplied scart connection cable Component Video Inputs YPbPr 3 are used for connecting component video You can connect the component video and audio sockets with a device that has component output Connect the component video cables between the COMPONENT VIDEO INPUTS on on the...

Page 10: ...n the TV and the PC output on your PC Ethernet input For service connectivity and DLNA connection 12 Viewing the Connections Side Connectors CI Slot is used for inserting a CI card A CI card allows you to view all the channels that you subscribe 1 to For more information see Conditional Access section Side USBs 2 Side HDMI Input is for connecting a device that has an 3 HDMI socket Headphone jack i...

Page 11: ...vice to the USB inputs of the TV You can connect two USB device to your TV by using the USB inputs of the TV at the same time Note It is possible that certain types of hard disk drives are not supported With some contents desired to be played via USB media browser some functions of media browser may not function properly and this might happen due to the content being played Side HDMI Connection Yo...

Page 12: ...king any connections Note Cables shown in the illustration are not supplied If your DVD player has an HDMI socket you can connect via HDMI When you connect to DVD player as illustrated below switch to HDMI source See Input Selection section Most DVD players are connected through COMPONENT SOCKETS Use a component video cable to connect video input For enabling audio use a component audio cable as i...

Page 13: ...1 by using a proper LAN cable Use another LAN output of your modem e g LAN 2 to enable the connection to your TV You can add your TV to your LAN by connecting the LAN port at the rear of your TV to your modem s LAN connector as illustrated below PC with Nero Media Home software installed Lan Ethernet cable Broadband ISP Connection Rear of TV You might be able to connect your TV to your LAN network...

Page 14: ... cord from the mains socket Note When the TV is switched to standby mode standby LED can blink to indicate that features such as Standby Search Over Air Download or Timer is active Digital Teletext for UK only Press the button The digital teletext information appears Operate it with the coloured buttons cursor buttons and OK button The operation method may differ depending on the contents of the d...

Page 15: ... Access Press numeric buttons on the remote control to select programmes between 0 and 9 The TV will switch to the selected programme To select programmes between press the numeric buttons consecutively When the pressing time is due for the second numeric button only the first digit programme will be displayed Press directly the programme number to reselect single digit programmes Viewing Electroni...

Page 16: ...ted Now Shows the current programme First Time Installation IMPORTANT Ensure that the aerial is connected and a Common Interface module is not inserted before switching on the TV for the first time installation Do not insert a common interface module during the search process When the TV is operated for the first time installation wizard will guide you through the process First language selection s...

Page 17: ...ons Press MENU button on the remote control and select Installation by using or button Press OK button and the following menu screen will be displayed Select Automatic Channel Scan Retune by using button and press OK button Automatic Channel Scan Retune options will be displayed You can select options by using and OK buttons Auto Channel Scan Menu Operation Digital Searches and stores aerial DVB s...

Page 18: ... You can press MENU button to cancel Analog Fine Tune Select Analog Fine Tune from the Installation menu by using or and OK buttons Analog Fine Tune screen will be displayed Analog Fine Tune feature will not be available if there are no analog channels digital channels and external sources stored Press OK button to proceed Use or button to set Fine Tune When finished press OK button again First Tim...

Page 19: ...d select Edit Name option Press OK button to continue Pressing or button moves to the previous next character Pressing or button toggles the current character i e b character becomes a by and c by Pressing the numeric buttons 0 9 replaces the highlighted character with the characters printed above the button one by one as the button is pressed When finished press OK button to save Press MENU to can...

Page 20: ...l be displayed on the information banner The information banner gives information on the channel selected and the programmes on it The name of the channel is displayed along with its channel list number Hint Not all channels broadcast the programme data If the name and time of the programme are not available then information banner will be displayed with blanks If the selected channel is locked yo...

Page 21: ...n you select Photos from the main options available image files will be filtered and listed on this screen Jump Numeric buttons Jump to selected file using the numeric buttons OK Views the selected picture in full screen Slideshow button Starts the slideshow using all images RED Sorts files by date GREEN Views images in thumbnails BLUE Switch between music photo video and all YELLOW Change view style ...

Page 22: ...title position as up or down Subtitle Font Size Sets subtitle font size max 54pt Using DLNA Network Service DLNA Digital Living Network Alliance is a standard that eases viewing process of digital electronics and makes them more convenient to use on a home network For further information visit www dlna org DLNA standard allows you to view and play photos music and videos stored in the DLNA media s...

Page 23: ...m is not install to your PC Please prepare your PC with the provided Nero Media Home programme For more information about the install please refer to appendix G Changing Image Size Picture Formats Programmes can be watched in different picture formats depending on the transmission received You can change the aspect ratio image size of the TV for viewing the picture in different zoom modes Press SC...

Page 24: ...utton to view Picture Settings menu Operating Picture Settings Menu Items Press or button to highlight a menu item Use or button to set an item Press MENU button to exit Picture Settings Menu Items Mode For your viewing requirements you can set the related mode option Picture mode can be set to one of these options Cinema Dynamic and Natural Contrast Sets the lightness and darkness values of the s...

Page 25: ...be unavailable Instead VGA mode settings will be added to the Picture Settings while in PC mode PC Picture Settings For adjusting PC picture items do the following Press or button to select Picture icon Picture menu appears on the screen Contrast Brightness Colour Colour Temp and Picture Zoom and other settings in this menu are identical to settings defined in TV picture menu under Main Menu System...

Page 26: ...imers for selected programmes Date Time Sets date and time Sources Enables or disables selected source options Other Settings Displays other setting options of the TV set Using a Conditional Access Module IMPORTANT Insert or remove the CI module only when the TV is SWITCHED OFF In order to watch certain digital channels a conditional access module CAM can be necessary This module must be inserted ...

Page 27: ... Settings menu will function as described below Language Settings In the Settings menu highlight the Language Settings item by pressing or buttons Press OK and Language Settings submenu will be displayed on the screen Use or buttons to highlight the menu item that will be adjusted and then press or button to set Notes System Language determines the on screen menu language Audio Language is used fo...

Page 28: ... Press OK button to view Settings menu Use or button to highlight Timers and press OK to continue Setting Sleep Timer This setting is used for setting the TV to turn off after a certain time Highlight Sleep Timer by using or button Use or button to set The timer can be programmed between Off and 2 00 hours 120 minutes in steps of 30 minutes Setting Programme Timers You can set programme timers for...

Page 29: ...ess or buttons to select a source Use or button to enable or disable the selected source Changes are automatically stored Configuring IP Settings On IP Settings window you can set IP address of the TV set IP address can be either static or dynamic Static means that the address is given by service supervisor and that you know Also subnet mask and DNS Server s IP addresses should be set correctly If ...

Page 30: ... this feature only if the broadcaster supports that additional narration track Auto TV Off You can set the timeout value of auto off feature After the timeout value is reached and the TV is not operated for selected time the TV will go off Broadcast Type When you set the desired broadcast type by using or button the TV will display the related channel list If the related source has does not includ...

Page 31: ...se note that ghosting may occur while displaying a persistent image LCD TVs image persistence may disappear after a short time Try turning off the TV for a while To avoid this do not leave the screen in still picture for extended periods No Power If your TV system has no power please check the main power cable and connection to the mains socket outlet Poor Picture Have you selected the correct TV ...

Page 32: ... properly The problem may be an inconsistency with standards from the source equipment DVD Set top box etc If you do experience such a problem please contact your dealer and also the manufacturer of the source equipment Appendix A PC Input Typical Display Modes The display has a maximum resolution of 1360 x 768 The following table is an illustration of some of the typical video display modes Your ...

Page 33: ...20p 1080i 1080p Appendix D Supported File Formats for USB Mode Supported Players Player Stream Video Decoder MSVD Audio Decoder MSAD Audio MP3 None MP3 Audio WAV AIFF None LPCM Windows Media optional WMA ASF VC1 WMA MPEG1 Program Stream MPEG 1 MPEG1 MP3 AC 3 and PCM MPEG2 Program Stream MPEG 2 MPEG2 MP3 AC 3 and PCM MPEG4 MPEG 4 H264 in MP4 container H264 and MPEG4 AAC AVI XVID MPEG4vbn MP3 AC 3 a...

Page 34: ...d searches broadcast channels for new software upgrade If new software is found and downloaded successfully with next power up TV opens with new software version Note on reboot operation Reboot is the last step in software upgrade operation if download of new software is finished successfully During reboot TV makes final initializations In reboot sequence panel power is closed and front led indicate...

Page 35: ...on language from the language selection menu before continuing Click the Next button 3 The integrated serial is displayed Please do not change displayed serial Click the Next button 4 The License Conditions EULA screen is displayed Please read the license agreement carefully 5 and select the appropriate check box if you agree to the terms of the agreement Installation is not possible without this ...

Page 36: ...ed In order to offer a better service Nero is collecting anonymous data to determine which features are used and what problems if any occur If you would like to help by participating in the 11 anonymous collection of usage data select the check box and click the Next button The final screen of the installation wizard is displayed Click the Exit button 12 A shortcut called Nero MediaHome 4 is now 1...

Page 37: ...M5 screws size M5 X 25mm Digital Reception DVB T Transmission Standards DVB T MPEG2 DVB T MPEG4 HD i DEMODULATION Symbol rate COFDM with 2K 8K FFT mode Modulation 16 QAM 64 QAM FEC for all DVB modes automatically found MHEG 5 ENGINE compliant with ISO IEC 13522 5 UK engine Profile UK only Object carousel support compliant with ISO IEC 135818 6 and UK DTT profile UK only Frequency range 474 850 MHz f...

Page 38: ...ions due to changes that may be implemented in broadcast signals and technologies Some digital television functions may not be available in all countries We continually strive to improve our products therefore specifications may change without prior notice For advice on where to purchase accessories please contact the store where you purchased your equipment Instruction book of this product will be...

Page 39: ...ubject of unauthorised modifications or alterations or has been the subject of commercial use In the event of a problem with the product within the guarantee period please return it to your nearest Argos store If the item is shown to have had an inherent defect present at the time of sale the store will provide you with a replacement Your statutory rights remain unaffected Guarantor Home Retail Gro...

Page 40: ...s rear and top of the TV This is to allow for adequate ventilation during operation Please read the main Users Guide for more safety information before installation QUICK GUIDE L42VG08U How to attach stand to the TV x 4 Before operating the set the stand must be attached to the TV as illustrated below ...

Page 41: ... lead should be fitted between your TV and VCR to enhance your picture and sound quality Scart leads are essential if you have a stereo TV and VCR and wish to obtain stereo sound from your equipment These leads can be purchased from your Hitachi dealer or any good High Street electrical retailer ANT IN VCR AV 1 AV 2 Aerial RF Socket Optional Scart Lead TV to VCR RF connector lead VCR to TV Aerial ...

Page 42: ... Device to TV wall socket Aerial RF Lead Aerial RF Socket High Definition Your LCD Television is capable of displaying High Definition pictures from devices such as a High Definition Satellite Receiver or DVD Device These devices must be connected via the HDMI socket or Component YPbPr Socket TFT LCD TV Scart Lead to Scart 1 2 on TV Note These three methods of connection perform the same function ...

Page 43: ...uminate channel Press Standby or up down P P or numeric buttons 1 2 3 to operate insert plug European plug and switch on insert plug UK plug REPEAT ZOOM TITLE ROOT TEXT SWAP 1 2 3 4 5 6 7 8 9 0 SCREEN LANG SUBTITLE OK MENU SOURCE RETURN INFO FAV SLEEP EPG DISPLAY PRESETS SEARCH MODE P P V V RC5110 Programme Up Volume Up Volume Down Programme Down To select a programme number To enter the main menu...

Page 44: ...tion Scan Encrypted will be then highlighted You can set Scan Encrypted as Yes if you want to scan coded stations After selecting the Scan Encrypted select Active antenna feature by pressing or button Use or button to set active antenna mode as on or off If an active antenna is connected to your TV you can select this option as On 5V Antenna power should be Off when standard antenna is used instea...

Page 45: ...www hitachidigitalmedia com 50178969 ...

Reviews: