background image

English

- 16 -

each day and searches for any new information which 
may be broadcasted and will download this to your 
receiver automatically. This operation will normally 
take approximately 30 minutes.

Note

: Your TV may start in First Time Installation mode after 

OAD update.

Parental Control 

Use “

” or “

” buttons to go to Parental Lock option. 

Press OK button to enter the menu. A dialog box 
asking for the lock key will be displayed. The key is set 
to “0000” initially. Enter PIN. If it is incorrect, “Wrong 
Pin” OSD will be displayed. If it is correct, the Parental 
Control menu will be displayed: 

Maturity Lock  (*)

(*) If you set Country option as UK in the fi rst time 
installation, Maturity Lock option will not be visible. 
This setting is available only for EU countries.

When set, this option gets the maturity information 
from the broadcast and if this maturity level is disabled, 
does not show video-audio. 

Menu Lock 

In menu lock you can set locking for all menus, or the 
Installation Menu to restrict access to these menus. 
If the menu lock is disabled, there will be free access 
to the menu system. Use  “

” or “

” buttons to go to 

Menu Lock option. Use  “ ” or “ ” buttons to choose 
Menu Lock Mode. 

DISABLED

 : All menus are unlocked. 

ALL MENUS

 : All  Menus are  accessible only with 

the correct lock key. So the user cannot add, delete, 
rename, channels, cannot set timers. 

INSTALLATION MENU

: Installation menu is locked.

So the user can’t add channels. Changes will be 
updated after exiting ‘Confi guration Menu’.

Set PIN 

Use “

” or “

” buttons to go to “Set PIN” option. 

Press “

OK

” to display the “Set PIN” window. Use 

numeric buttons to enter new pin number you will need 
to input your new pin a second time for verifi cation 
purposes.The factory default pin number is 0000, if 
you change the pin number make sure you write it 
down and keep it safe. 

Time Settings

In the configuration menu, highlight the Time Settings 
item by pressing “

” or “

” buttons.

Press “

OK

” and Time Settings sub menu will be

displayed on the screen. Current Time,Time Zone 
Setting and Time Zone will be available.

Use “

” or “

” buttons to highlight the Time Zone 

Setting. Time Zone Setting is set using “ ” or “ ”
buttons. It can be set to AUTO or MANUAL.

When AUTO is selected, Current Time and Time Zone 
options will not be available to be set. If MANUAL 
option is selected as the Time Zone Setting, Time 
Zone can be altered:

• By pressing “

” or “

” buttons select Time Zone.

Use “ ” or “ ” buttons to change the Time Zone 
between GMT-12 or GMT+12. Current Time on the 
top of the menu list will then change according to the 
selected Time Zone.

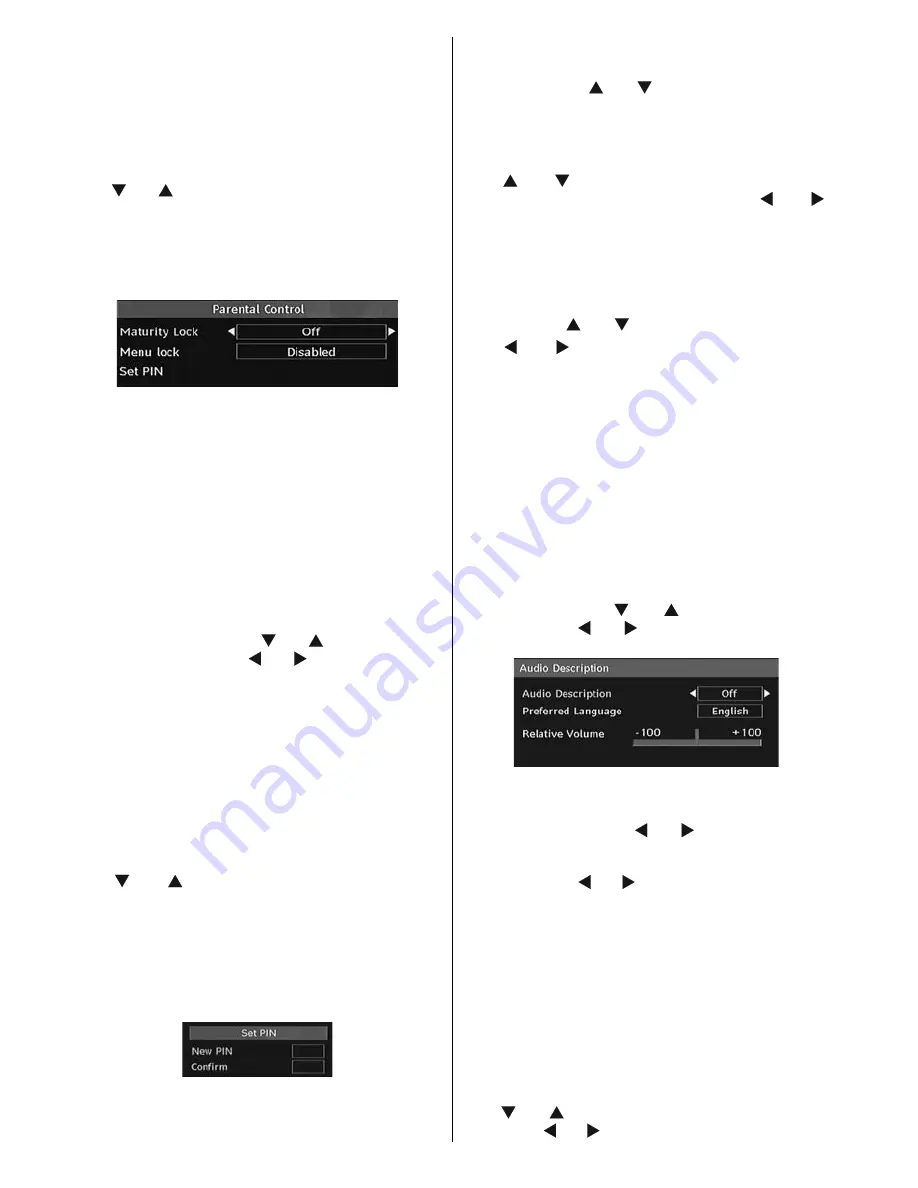
Audio Description

Audio description refers to an additional narration 
track for blind and visually impaired viewers of 
visual media, including television and movies. The 
description narrator talks through the presentation, 
describing what is happening on the screen during the 
natural pauses in the audio (and sometimes during 
dialogue, if deemed necessary). You can use this 
feature, only if the broadcaster supports that additional 
narration track. Use “

” or “

” buttons to select an 

item. Then use “ ” or “ ” buttons to set.

Audio Description

This function enables or disables the audio description 
feature by pressing the “ ” or “ ” buttons.

Preferred Language

By pressing the “ ” or “ ” buttons the preferred audio 
description language is being changed.

This setting can be used, only if it is available.

Relative Volume

Using this option, the Audio Description volume level 
can be increased or decreased relatively, according 
to the general volume.

Standby Search (*)

(*) This setting is visible only when the Country option 
is set to Denmark, Sweden, Norway or Finland.

Use “

” or “

” button to select Standby Search and 

then press “ ” or “ ” button to set this setting as On or 

Summary of Contents for L19DP04U

Page 1: ...GB Instructions for use L19DP04U 19 LCD Colour Television with integral DVD Player 2 ...

Page 2: ...ection 10 Basic Operations 10 Operation with the Buttons on the TV 10 Initial Settings 11 General Operation 11 Electronic Programme Guide EPG 12 Displaying Subtitles 12 Digital Teletext for UK only 12 Analogue Teletext 12 Widescreen 12 IDTV Menu System 13 Channel List 13 Timers 14 Conditional Access 15 TV Setup 15 Setup 15 Media Browser 18 Playing MP3 Files 19 Viewing JPG Files 19 Slideshow Option...

Page 3: ...ase do keep this manual in a safe place for future references Preparation For ventilation leave a free space of at least 10 cm all around the set To prevent any fault and unsafe situations please do not place any objects on top of the set Use this device in moderate climates 10 cm 10 cm 10 cm Safety Precautions Please read the following recommended safety precautions carefully for your safety SOME...

Page 4: ...osed to excessive heat such as sunshine fire or the like Lightning Before a storm and lightning or when going on holiday disconnect the power cord and aerial lead from the wall sockets DON T remove any fixed cover as this may expose dangerous voltages DON T obstruct the ventilation openings of the equipment with items such as newspapers tablecloths curtains etc Overheating will cause damage and shor...

Page 5: ...Waste Electrical and Electronic Equipment Directive 2002 96 EC WEEE The mark indicates the requirement NOT to dispose the equipment including any spent or discarded batteries as unsorted municipal waste but use the return and collection systems available If the batteries or accumulators included with this equipment display the chemical symbol Hg Cd or Pb then it means that the battery has a heavy ...

Page 6: ... 12 Info TXT reveal 13 Picture mode selection 14 Source selection 15 Red Sound 16 Green Picture 17 Yellow Feature Current language in DTV 18 mode Menu 19 Blue Install 20 OK Select 21 Cursor right TXT Subpage 22 Cursor down TXT Downpage 23 Volume up 24 Volume down 25 Mute 26 Teletext Mix 27 Subtitle in DTV mode TXT Subtitle 28 FAV Favourite Selection in DTV mode 29 Media Player buttons 30 Only avai...

Page 7: ...pBPr are used for connecting component video You can use PC input to enable YPbPr signal sonnection with a device that has component output Connect the YPbPr to PC cable between the PC INPUT on the TV and the component video outputs of your device YPbPr cable is not supplied HDMI 3 HDMI input HDMI Input is for connecting a device that has an HDMI socket Your LCD Television is capable of displaying...

Page 8: ...ound connection in such a case use an appropriate audio cable between the connected device s audio outputs and the TV s audio inputs Note If you connect a device to the TV via the VIDEO or PC YPbPr cable YPbPr cable is not supplied you should also connect your device with an audio cable to the AUDIO INPUTS of the TV to enable audio Headphone jack is used for connecting an external headphone to the...

Page 9: ...ation Especially do not repeatedly quickly plug and unplug the drive This may cause physical damage to the USB player and especially the USB device itself SIDE VIEW USB MEMORY USB Memory Connection Plug your USB device to the USB input of the TV Note USB hard disk drives are not supported Connecting the LCD TV to a PC For displaying your computer s screen image on your LCD TV you can connect your ...

Page 10: ...Use a SCART cable as shown below HDMI inputs Scart socket Component audio inputs DVD Player D SUB PC RCA cable is not supported optional Note These methods of connection perform the same function but in different levels of quality It is not necessary to connect by all three methods Using Side AV Connectors You can connect a range of optional equipment to your LCD TV Possible connections are shown ...

Page 11: ... Download or Timer is active Input Selection Once you have connected external systems to your TV you can switch to different input sources Press SOURCE button on your remote control for directly changing sources or Select Source option from the main menu by using or button Use then or button to highlight an input and press button to select Note You can mark desired source options by pressing the O...

Page 12: ...r buttons and press the OK button The IDTV will automatically tune to the UHF or VHF for EU countries transmission channels searching for digital terrestrial TV broadcasts and displaying the names of channels found This process will take about a few minutes After Automatic Search is completed the following message asking for analogue channel search appears on the screen To search for analogue chan...

Page 13: ... the following warning message display on the screen for UK only Digital Teletext for UK only Press the button The digital teletext information appears Operate it with the coloured buttons cursor buttons and OK button The operation method may differ depending on the contents of the digital teletext Follow the instructions displayed on digital teletext screen When Press SELECT button or similar mes...

Page 14: ...tem on Channel List menu Following OSD will be displayed next to OK item to indicate that enter a number by using the numeric buttons on the remote control and press OK to confirm Note If you enter the same programme number of the channel that you want to move channel services will be replaced Do you want to continue OSD will be displayed Press OK to confirm or select No to cancel Deleting the Chann...

Page 15: ...to add to the favourite list By pressing OK button the highlighted channel is added to the Favourite List F icon indicates that a channel is added to Favourite List Removing a Channel from Favourite List Highlight the channel that you want to remove from the favourite list and press OK button to remove You can press OK button again to re add a channel To activate Favourites go to the Configuration ...

Page 16: ...formation for all menu items in Analogue TV Menu System section Setup The adjustments in this menu are given as the following Configuration You can configure the settings of your TV Select Configuration from Setup menu and press OK to view this menu Press the EXIT button on the remote control to exit Hard of Hearing for EU countries only Use or button to select Hard of Hearing and then press or butto...

Page 17: ...change the pin number make sure you write it down and keep it safe Time Settings In the configuration menu highlight the Time Settings item by pressing or buttons Press OK and Time Settings sub menu will be displayed on the screen Current Time Time Zone Setting and Time Zone will be available Use or buttons to highlight the Time Zone Setting Time Zone Setting is set using or buttons It can be set t...

Page 18: ... will be seen in subtitles Note If the Country option is set to Denmark Sweden Norway or Finland the Language Settings menu will function as described below Language Settings In the configuration menu highlight the Language Settings item by pressing or buttons Press OK and Language Settings submenu will be displayed on the screen Use or buttons to highlight the menu item that will be adjusted and t...

Page 19: ...Clear Service List and then press OK The following OSD message will be displayed on the screen Press OK to cancel Select Yes by pressing or button and press OK to delete all of the channels First Time Installation The user can use this item to load default settings which were loaded to the receiver at the factory To install factory settings highlight First Time Installation menu item and press OK ...

Page 20: ...r next file to play Shuffle INFO button Plays the files randomly If shuffle mode is enabled previous next function will also jump to the tracks randomly Loop button Plays the selected file repeatedly Viewing JPG Files Jump 1 9 buttons jump to selected file using the numeric buttons OK OK button views the selected picture in full screen Slideshow button starts the slideshow with all pictures in the folde...

Page 21: ...ose from one of these options Cool Normal and Warm Note Setting Cool option gives white colours a slight blue stress Setting Warm option gives white colours a slight red stress For normal colours select Normal option Noise Reduction If the broadcast signal is weak and the picture is noisy use Noise Reduction setting to reduce the noise amount Press or button to select Noise Reduction Press or to c...

Page 22: ...izing left or right speaker balance Press or button to select Balance Press or button to change the level of the balance Balance level can be adjusted between 32 and 32 Headphone Press or button to select Headphone Press button to view the headphone menu Headphone sub menu options are described below Volume Press or button to select Volume Press button to increase headphone volume level Press butt...

Page 23: ...ssing or button Menu Timeout To set a specific display timeout for menu screens set a value for this option Press or button to select Menu Timeout Use or button to change menu timeout to 15 sec 30 sec or 60 sec Teletext Language Press or button to select Teletext Language Use or button to change Teletext Language to West East Turk Gre Cyrillic Arabic or Persian HDMI PC Full Mode If you want to view...

Page 24: ... select Store Program Press or OK button to store the settings Stored will be displayed on the screen Program Table Select Program Table by pressing or button Press to display Program Table By moving the cursor in four directions you can reach 20 programmes in the same page You can scroll the pages up or down by pressing the navigation buttons to see all the programmes in TV mode except for the AV...

Page 25: ...only while the TV is in PC source PC Position Menu Select the first icon by pressing or button PC Position menu appears on the screen Autoposition If you shift the picture horizontally or vertically to an unwanted position use this item to put the picture into correct place automatically This setting therefore automatically optimizes the display Select Autoposition item by using or buttons Press O...

Page 26: ...erent zoom modes Press SCREEN button to directly change the zoom mode Available zoom modes are listed below Note In YPbPr and HDMI modes while in 720p 1080i resolutions only 16 9 mode is available Zoom mode cannot be changed while in PC mode Auto When a WSS Wide Screen Signalling signal which shows the aspect ratio of the picture is included in the broadcast signal or the signal from an external d...

Page 27: ...ing may occur while displaying a persistent image LCD TVs image persistence may disappear after a short time Try turning off the TV for a while To avoid this do not leave the screen in still picture for extended periods No Power If your TV system has no power please check the main power cable and connection to the mains socket outlet Poor Picture Have you selected the correct TV system Is your TV ...

Page 28: ... 4 3 2 640 480 72 37 9 VESA 16 9 4 3 3 640 480 75 37 5 VESA 16 9 4 3 4 800 600 56 35 2 VESA 16 9 4 3 5 800 600 60 37 9 VESA 16 9 4 3 6 800 600 70 43 8 16 9 4 3 7 800 600 72 48 1 VESA 16 9 4 3 8 800 600 75 46 9 VESA 16 9 4 3 9 832 624 75 49 7 MAC 16 9 4 3 10 1024 768 60 48 4 VESA 16 9 4 3 11 1024 768 70 56 5 VESA 16 9 4 3 12 1024 768 72 57 7 16 9 4 3 13 1024 768 75 60 0 16 9 4 3 14 1152 864 70 64 2...

Page 29: ... 50Hz O 1080I 60Hz O HDMI 480I 60Hz O 480P 60Hz O 576I 50Hz O 576P 50Hz O 720P 50Hz O 720P 60Hz O 1080I 50Hz O 1080I 60Hz O 1080P 24Hz O 1080P 50HZ O 1080P 60HZ O X Not Available O Available Note In some cases a signal on the LCD TV may not be displayed properly The problem may be an inconsistency with standards from the source equipment DVD Set top box etc If you do experience such a problem plea...

Page 30: ...Format Remarks Video Audio Maximum resolution Bit rate etc Movie mpg dat vob MPEG1 MPEG Layer 1 2 3 MPEG2 MPEG2 avi XviD 3ivx PCM MP3 XviD Verson up to 1 1 2 MPEG4 PCM MP3 MS ISO MPEG4 PCM MP3 Support SP and ASP Music PCM Sample Rate 8K 48KHz mp3 MPEG 1 2 Layer 1 2 3 MP3 Sample Rate 8K 48KHz Bit Rate 64K 320Kbps Photo jpg Baseline JPEG WxH 8902x8902 up to 77Mega pixel Support format 444 440 422 42...

Page 31: ...s Transmission standard DVB T MPEG 2 Demodulation COFDM with 2K 8K FFT mode FEC all DVB modes Video MP ML PAL 4 3 16 9 Audio MPEG Layer I II 32 44 148kHz NUMBER OF PRESET CHANNELS 200 CHANNEL INDICATOR On Screen Display RF AERIAL INPUT 75 Ohm unbalanced OPERATING VOLTAGE 220 240V AC 50 Hz AUDIO German Nicam Stereo AUDIO OUTPUT POWER WRMS 10 THD 2 x 2 5 POWER CONSUMPTION W 45 W max 1 W Standby PANE...

Page 32: ...JPEG MPEG playback NTSC PAL playback according to disc content LPCM audio via coaxial and optical digital audio outputs optional Multi Audio up to 8 support According to disc content Multi Subtitle up to 32 support According to disc content Multi Angle up to 9 support According to disc content 8 level parental control Fast forward and rewind in 5 different speeds 2x 4x 8x 16x 32x Slow motion playb...

Page 33: ... Do not expose the disc to direct sunlight or heat sources such as hot air ducts or leave it in a car parked in direct sunlight as the temperature can rise quickly and damage the disc After playing store the disc in its case On cleaning Before playing clean the disc with a cleaning cloth Wipe the disc from the center out Do not use solvents such as benzine thinner commercially available cleaners o...

Page 34: ...via the remote control While playing a file you should press STOP button three times to eject Overview of the Remote Control Standby 1 Numeric buttons 2 Return back 3 Language selection Set language 4 Display time DVD menu 5 Clear 6 Stop 7 No function 8 Rapid Reverse 9 Rapid advance 10 Info 11 Zoom 12 Repeat 13 Root 14 Menu 15 Title 16 OK Select 17 Navigation Buttons 18 Subtitle 19 Angle 20 Search ...

Page 35: ...r mode selection during playback Press repeatedly to switch between modes LANG Audio language X X MENU Displays TV menu OK SELECT Enter View Play REPEAT Displays repeat options RETURN Returns back to the previous menu if available ROOT Goes back to the root folder if available SEARCH MODE Direct selection of scenes or time Selects the desired file Selects the desired file SUBTITLE Subtitle on off ...

Page 36: ...ack to the initial settings If a language is selected not supported by the 7 disc the subtitle language will automatically be set to the disc s priority language Usually a circulation will happen while switching 8 to another language that is you can cancel the subtitle by pressing this button a number of times until Subtitle Off appears on the screen When the power is turned on or the disc is 9 re...

Page 37: ...ting The picture quality is poor DVD Make sure the DVD disc surface is not damaged Scratch fingerprint etc Clean the DVD disc and try again See instructions described in Notes on Discs to clean your disc properly Ensure that the DVD disc is in the drawer with the label uppermost A damp DVD disc or condensation may effect the equipment Wait for 1 to 2 hours in Stand by to dry the equipment Disc does...

Page 38: ...city than a single 1 2 mm thick disc Since the two thin discs are adhered to each other there is the potential to achieve double sided play sometime in the future for even longer duration play Subtitles These are printed lines appearing at the bottom of the screen which translate or transcribe the dialogue They are recorded on the DVD discs Time Number This indicates the playtime which has elapsed...

Page 39: ...V D c o n ta in s ex c ellen t s o u n d a n d v id eo d u e to D o lb y D ig i tal an d M P E G 2 S y s tem Var io u s s c r een an d au d io fu n c t io n s c a n b e eas ily s el ec t ed t h r o u g h th e o n s c r een m enu A n L P is r ec o r d ed as an an alo g s ig n al w ith m o r e d is t o rtio n C D is r e c o r d e d as a D ig ita l S ig n al w ith b et ter au d i o q u ality les s d ...

Page 40: ...srt Support Text File Format but do not support Picture File Format smi sub ssa ass Note Necessary bitrates for some video types are higher than USB limits For this reason some video types cannot be played Specifications Types of Discs Supported DVD SS SL 4 7 DVD 5 SS DL 4 7 DVD 9 DS SL 4 7 DVD 10 DS DL 4 7 DVD 18 CD DA CD R CD RW MP 3 JPEG Video Type MPEG 2 Video Standard Decoding MPEG 1 supported...

Page 41: ...e subject of unauthorised modifications or alterations or has been the subject of commercial use In the event of a problem with the product within the guarantee period please return it to your nearest Argos store If the item is shown to have had an inherent defect present at the time of sale the store will provide you with a replacement Your statutory rights remain unaffected Guarantor Home Retail ...

Page 42: ...our TV or connect the aerial through a VCR Aerial RF Socket wall socket wall socket Aerial RF Lead Aerial RF Lead It is recommended that a scart lead should be fitted between your TV and VCR to enhance your picture and sound quality Scart leads are essential if you have a stereo TV and VCR and wish to obtain stereo sound from your equipment These leads can be purchased from your Hitachi dealer or ...

Page 43: ...wall socket Aerial RF Lead Aerial RF Socket High Definition Your LCD Television is capable of displaying High Definition pictures from devices such as a High Definition Satellite Receiver or DVD Device These devices must be connected via the HDMI socket or Component Socket TFT LCD TV Scart Lead to AV 1 on TV Note These three methods of connection perform the same function but in different levels o...

Page 44: ...ition NB When the set is first switched on the set will be in standby channel and the indicator on the front of the set will illuminate red Press Operate Standby or up down P P or numeric buttons 1 2 3 to operate insert plug European plug and switch on insert plug UK plug Programme Up Volume Up Volume Down Programme Down To select a programme number To enter the main menu For navigation of the men...

Page 45: ...s please refer to the Install Menu section of the instruction book When the TV is turned on for the first time the menu for the language selection appears on the screen The message Welcome please select your language is written in all language options sequentially in the menu on the screen By pressing or buttons highlight the language you want to set and press OK After then First time Installation...

Page 46: ...e operated unless user selects DVD mode on remote control how to watch a DVD Switch the TV on 1 2 Press play button if there is a disc inside of the loader 3 4 Select the preferred menu item from DVD menu when it s displayed and press SELECT 5 Press DVD button on Remote Control If there is no disc inside of the loader please insert a disc properly 50152114 ...

Page 47: ...www hitachidigitalmedia com 50151056 ...

Reviews: