background image


JPEG2000 Stand alone DVR User Guide


- 10 -   


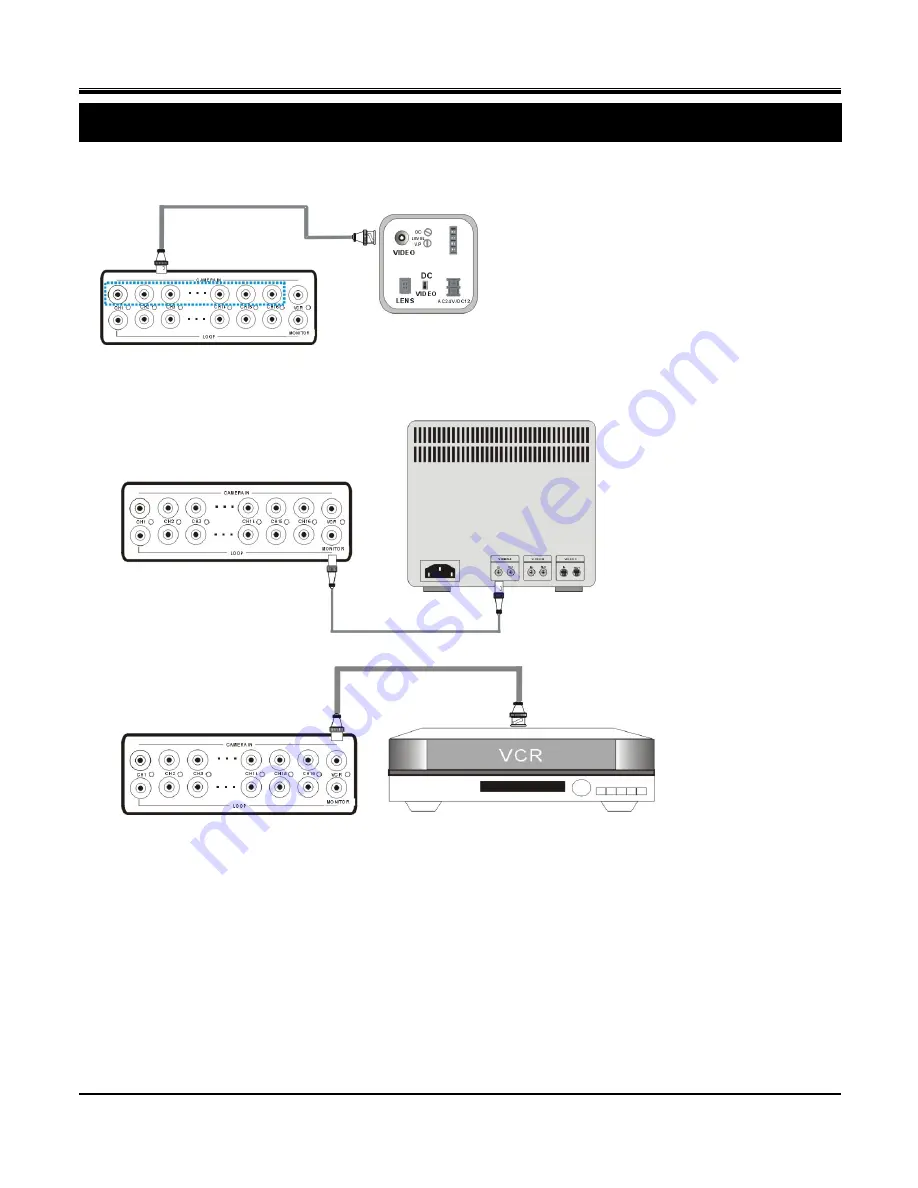
2-1 Camera and monitor installation 

2-1-1 Camera installation


Connect 

camera 

to 

DVR 

camera 

in 

CH1~CH16 


Please do not start the DVR before the camera. 

installation is done. 


2-1-2 Monitor and VCR installation


Monitor: Connect the MONTIOR port on the DVR back panel to the “video in” port on the monitor. 


VCR: Connect the VCR port on the DVR back panel to the “Video In” on the VCR. 


CHAP.2 Installation 

Summary of Contents for JPEG2000

Page 1: ...ion 11 2 3 Network and serial port installation 12 2 4 HDD installation 14 2 5 Power plugging 15 CHAP 3 Operation 3 1 Display configuration 16 3 2 Screen switch OSD position adjust 17 3 3 PIP view 17 3 4 Freeze view 17 3 5 View in sequence 18 3 6 Zoom view 19 3 7 Keylock 19 3 8 switch audio channel 19 3 9 Record 20 3 10 Playback 21 CHAP 4 Set up 4 1 Log in 24 4 2 Display setup 25 4 3 Configuration...

Page 2: ...ut notification CHAP 5 CD R bck up 5 1 Data backup 44 5 2 CD R player software installation 45 5 3 CD R player software interface 46 CHAP 6 PTZ camera control 6 1 PTZ camera installation 48 6 2 PTZ camera operation 49 CHAP 7 Network remote software 7 1 Network configuration 50 7 2 Network installation and setup 50 7 3 Router setup 53 7 4 Client software 55 7 5 DDNS setup and operation 63 Appendix ...

Page 3: ...nd humidity Keep the DVR in a temperature ranging from 5 40 Keep the DVR in a well ventilated place and away from any heat generating objects Do not block the DVR s fan and vent Do not expose this unit to the sun directly If you are not sure of the installation and setup please consult the technicians If there s any damage to this unit or the power supply don t fix it yourself Consult the technici...

Page 4: ...n QUAD NTSC 360 120 PAL 360 144 FULL 4CH NTSC 60IPS PAL 50IPS 8 16CH NTSC 120IPS PAL 100IPS DUAL 4CH NTSC 120IPS PAL 100IPS 8 16CH NTSC 240IPS PAL 200IPS Frame Rate QUAD 4CH NTSC 240IPS PAL 200IPS 8 16CH NTSC 480IPS PAL 400IPS Compression JPEG2000 LOW 4CH 8 16CH NTSC 12 KB 720 240 PAL 14 KB 720 288 NTSC 12 KB 720 240 PAL 14 KB 720 288 MID 4CH 8 16CH NTSC 18 KB 720 240 PAL 20 KB 720 288 NTSC 16 KB ...

Page 5: ...rols DVR host through RS232 Alarm Input 4CH 4 Alarm Inputs 8CH 8 Alarm Inputs 16CH 16 Alarm Inputs Alarm Output 1 Programmable alarm output duration Remote Controller Infrared Remote Controller Control Device Front Panel Remote Controller RS232 Multi language English Spanish German France Chinese Assistant Functions HDD 1 HDD 160Gb or above Temperature 41 F 104 F 5 C 40 C Humidity Under 90 Dimensi...

Page 6: ...d at the motion record mode PLAY On while playback FULL On when HDD storage is full NET On when the DVR is connected remotely 3 1 16 Channel Button Switch full screen of CH1 16 4 MODE Switch among full and split screen displays 5 K LOCK Lock the buttons on front panel 6 MENU Enter the menu and set up 7 Directions ENTER Directions Navigate the menu ENTER Confirm the selected options 8 PTZ Press PTZ...

Page 7: ... and move to the area to be enlarged 11 REC To activate Emergency Record at continuous Super fine quality and Best resolution Press STOP to exit the Emergency Record mode 12 STOP Stop the emergency record and return to the record schedule programmed in the Record Setup Stop playback and return to the LIVE mode 13 SEARCH Enter the Search dialog window to search by percentage date time or the event ...

Page 8: ...NET Connection to Ethernet device 4 RS 232C Connection to PC or other DVR control devices 5 1 16 Camera Input LOOP Output CAMERA IN channel 1 16 camera input LOOP channel 1 16 camera loop out the image of camera in and loop out of the same channel would be the same 6 Monitor VCR Output MONITOR Connection to monitor VCR Connection with VCR for analog backup 7 Power Input DC power input DC12V 8 Powe...

Page 9: ... mode 6 SEARCH NEXT SEARCH Open the search window in playback For value adjustment in set up NEXT Go to the next PTZ command in PTZ mode Go to the next channel in full screen display and the next page in split screen display 7 Rec To activate Emergency Record at continuous Super fine quality and Best resolution 8 Stop Stop the emergency recordand return to the record schedule programmed in the Rec...

Page 10: ...ra to DVR camera in CH1 CH16 Please do not start the DVR before the camera installation is done 2 1 2 Monitor and VCR installation Monitor Connect the MONTIOR port on the DVR back panel to the video in port on the monitor VCR Connect the VCR port on the DVR back panel to the Video In on the VCR CHAP 2 Installation ...

Page 11: ...ut of the corresponding channel to a DVR VCR or other record device 2 2 Sensor and alarm installation 2 2 1 Input Output 1 D1 D16 Alarm Input GND for Location 16 Sensor inputs for sensor input installation 2 Relay Output NO NC COM The application of relay output is NO COM NC COM 2 2 2 Sensor installation Alarm will be triggered once one or more than one alarm input D1 D16 causes short circuit or o...

Page 12: ...alarm triggered 2 3 Network and serial port installation 2 3 1 Network setup Connect the network cable to Ethernet on back panel Ethernet Setup between ADSL and Cable is different For details please refer to Ch 7 2 Network installation 2 3 2 Serial port setup User is able to connect the COM port of PC or other device to the DVR through RS232 RS232 settings baudrate parity length stop bit are NOT a...

Page 13: ... connection and the related setup is done users are able to control the PTZ camera through the front panel buttons Please refer to Ch1and Ch6 connector description 1 DCD 2 RxD 3 TxD 4 DTR 5 GND 6 DSR 7 RTS 8 CTS 9 NC ASCII CODE Func CODE Func CODE Func CODE Func CODE Func CODE REC R RIGHT K MODE D CH3 3 CH11 STOP S NEXT N PIP I CH4 4 CH12 PLAY P ENTER 0X0D SEQ Q CH5 5 CH13 SEARCH E J SHU L CH6 6 C...

Page 14: ...DD is set as MASTER Caution 1 Power off the DVR before HDD installation 2 Jumper setting must follow the instruction of HDD manufacturer 3 Suggested HDD spec Maxtor or Hitachi 7200 RPM or above ATA 100 Maxtor Hitachi and Seagate if firmware version is above V1 46 DVR s Firmware version can be found in SYSTEM MENU f CONFIGURATION f SYSTEM INFORMATION f S W VERSION 4 HDD storage 400GB or above is su...

Page 15: ...lugging Insert the adapter to the rear power socket of DVR Insert the power cable to the other side of adapter Plug in the power cable and power on the DVR Caution Please use a 100 240VAC 50 60HZ and 12VDC 8A or 5A power supply or it may damage the DVR ...

Page 16: ...rd resolution 4CH 50IPS 720X288 60IPS 720X240 100IPS 360X288 120IPS 360X240 200IPS 360X144 480IPS 360X120 8 16CH 50IPS 720X288 60IPS 720X240 100IPS 360X288 120IPS 360X240 200IPS 360X144 480IPS 360X120 6 Quality To show record quality Basic Super Fine 7 Network LED To show if there is a client connected Disconnected Connected 8 HDD record search bar In LIVE mode the red bar means the HDD space used...

Page 17: ...Adjust OSD position High Low Low Position Press MODE DOWN at the same time High Position Press MODE UP at the same time Note The OSD position returns to its default level after the DVR reboots 3 3 PIP view In full screen mode press PIP to enter PIP mode Press PIP again to cancel 3 4 Freeze view 3 4 1 Freeze in split mode In a split screen mode press FREEZE and press a number button to select the c...

Page 18: ...s FREEZE to freeze the channel and press FREEZE again to cancel 3 5 View in sequence Press SEQ to enter Sequential Switch and press SEQ again to cancel Sequence order A B C D A B Sequence time is adjustable in system setup Please see SYSTEM MENU f CONFIGURATION f INTERVAL SETUP for details ...

Page 19: ...Use the direction buttons to choose an area and press ENTER to zoom Press ZOOM again to cancel 3 7 Key lock After pressing K LOCK you ll see LOCK on screen and no button is fucntioning at this time To unlock press and hold K LOCK and enter Admin spassword Please note that rebooting the DVR can not deactivate K LOCK You must enter ADMIN s password to unlock the keys ...

Page 20: ...Regarding record mode setup please refer to the RECORD SETUP SEARCH BAR data recorded Entire HDD storage The red bar means the percentage of the hard drive space used for recording data Under the following circumstances the system stops recording 1 when the DVR enters the menu 2 No video inputs 3 When all cameras are set to record off 4 No motion is detected while the record mode is set to MOTION ...

Page 21: ... PLAY during playback to choose to play forward or backward Press STOP key to stop playback 3 9 2 Search mode Press SEARCH key to open the search dialog window There are 3 modes for search SEARCH BAR TIME DATE EVENT LIST 1 SEARCH BAR Search by appointing a recording percentage 2 TIME DATE Search by appointing a time and date 3 EVENT LIST Search by Event list ...

Page 22: ...ows that the end time and date of the recording data 3 INPUT DATE TIME Input the appointed time and date to start playback Select the time and date by key to adjust numbers and by ef key to adjust the cursor position Then press Enter to start playback 3 9 5 EVENT LIST CH shows the channel in which the event happened EVENT shows the type of events Motion detection MOT Image lost LOS Alarm trigger A...

Page 23: ...hile playback select the direction keys of remote control to adjust the speed X times high speed playback X times low speed playback Rewind Play in forward direction Adjust the speed by REW key High speed backward playback or FF key High speed forward Playback Press the keys repeatedly to adjust the speed rate Adjust the speed by SLOW Motion keys Slow playback in backward or in forward Press the k...

Page 24: ...IGURATION SCHEDULE SETUP and HOLIDAY 4 BACK UP Provide users to backup recorded data to CD Drive 5 EXTERNAL DEVICE Includes TCP IP SETUP RS232C SETUP PAN TILT SETUP 6 FACTORY DEFAULT Reset the DVR to factory defaults 7 LANGUAGE Change the OSD language CHAP 4 Set Up Caution 1 It is strongly suggested to change the password after the initial setup Please keep records of your passwords Rebooting the ...

Page 25: ...isplay ON or hide OFF the time and date ICON DISPLAY Display ON or hide OFF the cue icons on the screen DVR STATUS Display ON or hide OFF the recording status on the screen REC PLAY BAR Display ON or hide OFF the recording percentage of HDD CAMERA TITLE Display ON or hide OFF the camera title 2 PLAYBACK Set up the following information to be displayed or not at the Playback mode TIME DATE Display ...

Page 26: ...NT Includes HDD SETUP HDD Clear and HDD INFORMATION 2 TIME DATE SETUP Program the system date and time 3 CAMERA SETUP Includes CAMERA TITLE CAMERA COLOR SETUP CAMERA ACTIVE SETUP and MOTION SETUP 4 INTERVAL SETUP Set up the switch interval of the Full screen and the PIP screen 5 ALARM SETUP Set up the Alarm mode N C or N O and the Alarm Output Duration 6 EVENT POPUP SETUP Set up the POP UP functio...

Page 27: ... 4 3 1 HDD management 1 HDD SETUP BEGIN Indicate the start Date Time of recorded data on HDD Master Slave RECORD Indicate the end Date Time of recorded data on HDD Master Slave PLAY Indicate the previous playback Date Time on HDD Master Slave STATUS Indicate the HDD status as empty normal overwrite CLEAR HDD To clear the HDD data enter the ADMIN s password to execute this function 2 HDD INFORMATIO...

Page 28: ...UP Turn the camera ON or OFF at LIVE and Record 4 MOTION SETUP Program the motion parameters and the detection area CAMERA TITLE Input the camera Title max 8 characters Using Left or Right and buttons to change the value When the modification is finished press Enter To return to the previous menu press the MENU button 1 We strongly suggest completing the following settings at the initial setup 1 S...

Page 29: ...olor hue 32 31 CAMERA ACTIVE SETUP Use the direction buttons to select an item and press ENTER to select ON and OFF If a channel is set to OFF at LIVE and ON at RECORD the channel will be recorded displayed during Playback but will not be displayed at LIVE 1 STATUS Indicate the camera status ACTIVE means the video input status is normal and LOSS means the video is lost 2 LIVE Set up the channel to...

Page 30: ... mode The editing modes are as below 1 Cell Move to the desired location and press ENTER to activiate or deactiviate the motion detection in the marked area cell by cell 2 ALL ON Change the mode to ALL ON and press ENTER to activate the motion detection in the whole window 3 ALL OFF Change the mode to ALL OFF and press ENTER to deactivate the motion detection in the whole window 4 BLOCK ON Block a...

Page 31: ...the DVR records the starting time and information of the event in the Event Log and ignores the following events within the duration set in the Event update time The setting range of the Event Update time is from 10 seconds to 990 seconds 4 3 5 Alarm setup 1 CHANNEL Use and to select a channel 2 ALARM INPUT Set up the Alarm Input type N C when the alarm is triggered the circuit turns closed ON N O...

Page 32: ...isplay 4 3 7 Buzzer setup Set up the condition that triggers the buzzer to beep Use UP and DOWN to select an itme and press ENTER to turn ON or OFF the selection 1 ALL Turn ON or OFF of all the conditions that tigger the buzzer to beep You can also setup the buzzer by the conditions Move the cursor to the desired selection and press ENTER to turn ON or OFF the selection 2 KEY BEEP Turn on off the ...

Page 33: ... to operate the DVR Change Settings Clear HDD Change Password Playback Search Remote Access Admin Manager U U User U U U It can change Manager s and Users password 4 3 9 System information Indicate the system information and its status S W version Indicate the firmware version H W version Indicate the PCB version Product ID Indicate the product ID number MASTER Indicate the information of MASTER H...

Page 34: ...e full 2 MUTIPLEX Set up the multiplex mode Duplex allow record and remote connection simultaneously The DVR stops recording while the DVR enters playback either locally or remotely During the remote connection the DVR keeps recording if the client stays at the LIVE mode It stops recording when the client enters the playback mode Triplex record and playback simultaneously The DVR keeps recording w...

Page 35: ...hich you set in RESOLUTION 1 2 is to record at half of the recording speed 1 3 is to record at one third of the recording speed You can set up the parameter from 1 1 1 2 1 3 1 4 to 1 999 2 By lowering the recording speed the DVR records less frames but gains a longer recording duration If you set the DVR s recording speed at 1 2 the recording duration will be two times longer 1 3 will make the rec...

Page 36: ...IN MOTION C Set as continuous record The DVR records continuosly at the speed set in CONTINUOUS RECORD AM Set as Alarm Motion record The DVR records at the speed set in RECORD IN ALARM when there is an alarm triggered and at the speed set in RECORD IN MOTION where there is motion detected A C Set as Alarm Continuous record The DVR records continuosly at the speed set in CONTINUOUS RECORD and switc...

Page 37: ...e to change the value Press ENTER and then press d go to SIZE to choose a backup size 3 SIZE Insert a blank CD disk and the DVR will check the disk size and displays on the screen Press ENTER to enter the SIZE selection Use or J Shuttle to change the value Press ENTER and the DVR caculates the end date and time for backup automatically 4 BURN Move the cursor to BURN and press ENTER to start the ba...

Page 38: ...rnal device 1 TCP IP SETUP Set up the DVR s TCP IP information 2 RS232C SETUP Set up the parameters of the RS232 port 3 PANTILT SETUP Set up the parameters of the PTZ control 4 6 1 TCP IP setup IP CONFIG SETUP DDNS SETUP CONNECTION SETUP DHCP SETUP ...

Page 39: ...TER to turn ON and OFF the function 2 DNS SERVER Set up DNS Server s IP address Press ENTER to enter the selection Use to move the cursor and or J Shuttle to change the value Press ENTER to confirm the settings and exit the selection 3 INTERVAL Set up an interval for the DVR to report its IP address to the DDNS server automatically D day H hour M minute Press ENTER to enter the selection and or J ...

Page 40: ...will quit trying to reconnect to the DVR after all the attempts fail The setup range is from 0 to 20 attempts DHCP SETUP 1 DHCP MODE Press ENTER to switch DHCP to AUTOMATIC 2 DETECT IP Move the curor to DETECT IP and press ENTER to start Press MENU to cancel the detection 4 6 2 RS232C setup Through the RS232 port users can connect the DVR to a PC or other control devices to control the DVR The ASC...

Page 41: ...CHANNEL Select PTZ channel 2 MODEL Select PTZ protocol 3 PTZ ID Select PTZ ID 4 BUADRATE Select Baud Rate of PTZ control code 5 CMD DELAY Set up a delay time to run the command 6 COMMAND Pick up PTZ CMD 7 LENGTH Set up the length of PTZ control code 8 CODE The control code of PTZ CMD Please refer to CHAP 6 PTZ Camera Control for more details ...

Page 42: ...e settings back to factory default 2 SCREEN DISPLAY Set SCREEN DISPLAY back to factory default 3 CAMERA COOLR SETUP Set CAMERA COLOR SETUP back to factory default 4 MOTION SETUP Set MOTION SETUP back to factory default 5 PANTILT SETUP Set PANTILT SETUP back to factory default 6 SCHEDULE SETUP Set SCHEDULE SETUP back to factory default 7 CONFIGUATION Set CONFIGURATION back to factory default 4 8 La...

Page 43: ...ttle to change thevalue Press ENTER and the DVR caculates the end date and time for backup automatically 4 BURN Move the cursor to BURN and press ENTER to start the backup System will save the file in AJP format Users have to install the program of CD R BACKUP PLAYER to playback the backup file on a PC CHAP 5 CD R Back up 1 Use a blank CD Do not format or reuse a CD even though it is rewritable 2 ...

Page 44: ...ert software CD 2 Click Install CD R backup player to start the installation 3 Select a Destination Folder 4 Copy files to the Destination Folder System will build a new icon of CD BACKUP PLAYER on PC DESKTOP Double click the icon of CD Backup Player from Desktop to run the program ...

Page 45: ...and Fast Forward Delay Select a speed to play in slow motion 1 2X 1 4 1 8X 1 16X and press for Rewind and for Forward 5 Select a 1 4 9 16 Screen display 6 Go to the next page Go to the previous page 7 Function button 8 Channel selection To select a single channel from CH1 to CH16 9 AVI SAVE To save the backup video to AVI format 10 EDIT To open the dialog window to save a single frame as a JPEG fi...

Page 46: ...print the picture To exit the EDIT mode Save as AVI file During playback you can save the backup file to AVI format 1 Open the backup file from CD R playback to where you want to start saving the AVI file Select AVI SAVE to open the AVI SAVE dialog window 2 Select the channel frame rate and AVI image size 3 Select START to save and END to stop the process 4 Click AVI SAVE again to close the AVI SA...

Page 47: ...col 2 PTZ ID enter the PTZ s ID address 3 BAUD RATE enter the PTZ s transmission baud rate 4 CMD DELAY the delay time of the command transmission between bytes Please refer to the PTZ user manual for the manufacturer s suggestion CHAP 6 PTZ camera control Each PTZ manufacturer may have different transmission buad rate Please refer to the PTZ manuals for the detail information Enter the baud rate s...

Page 48: ...ate the channel connected with a PTZ camera Indicate PTZ command press ENTER to send control code by PTZ key You can also press the PTZ button on the front panel and use the front panel pre assigned PTZ function keys to control the PTZ camera Operate by PTZ control keys After entering PTZ control mode PAN TILT function can be controlled by direction keys and pre assigned PTZ function keys ...

Page 49: ...ervice over a coaxial cable line which can be the cable of your Cable TV The bandwidth of Cable ranges from 3 Mb to 15 Mb or more The upload bandwidth usually ranges from 384kb to 2Mb or more However the connection speed may drop when many people are using the sevice at the same time 7 2 Network installation and setup 7 2 1 Via Cable Connect the Network cable of Cable Modem output to DVR Enter SYS...

Page 50: ...L DEVICE f TP IP SETUP f IP CONFIG SETUP Enter the IP address gateway subnet mask provided by your ISP Then assign a port number to the DVR or you can use the default one as well If you find that you cannot enter or change any addresses check if DHCP is set to Automatic Press MENU to go back to the previous page TCP IP Setup and then enter DHCP SETUP Select DHCP MODE and press ENTER to switch DHCP...

Page 51: ...the Subnet Mask should match the Subnet Mask IP of your router Set up the router to forward the port to the DVR Please refer to 7 3 Router Setup for details After the setup is completed and the DVR can be accessed from Internet proceed to the DDNS setup Since you may get different IP addresses from time to time setting up the DDNS service allows you to log in from the remote by using a fixed code ...

Page 52: ...ils please read your router s manual First connect a computer to the router for configuration In this example the DVR s IP is set to 192 168 1 53 and its port number is 8000 The router model is PCI BLW 04G Enter the router s setup and select Static IP or PPPoE 1 WAN connection type Static IP setup Select the mode in WAN connection Type Enter the static IP Address Subnet Mask Gateway DNS provided b...

Page 53: ... of 211 20 82 39 2 Virtual server setup Enter Virtual Server setup Enter DVR s IP 192 168 1 53 and port number 8000 Enable the port and check both protocols of TCP and UDP Save the settings before leaving this page Once the routing table is setup when the client software connects to 211 20 82 39 with PORT 8000 the router will forward the packets to its matching destination 192 168 1 53 and thus co...

Page 54: ...puter will auto run the Install program We suggest installing the software on Windows XP or Windows 2000 1 Install Client software Click Install Client software 7 4 2 Install Client software Select a Destination Folder When finished the software will create a shortcut on the desktop Click the shortcut to run the client software ...

Page 55: ...lit To select Full 4 9 16 split screen display 5 Channel Selection To select CAM1 16 when full or split screen display 6 Connect To select a DVR IP address from IP list for connection 7 Disconnect To disconnect the DVR 8 Playback To enter playback 9 Setup To enter the setup 10 Power To close the remote program The connection to the DVR will break off after the remote software is closed 11 Transmis...

Page 56: ...select DDNS and click the tab DDNS on the top and enter DDNS setup page If you are setting up a new DVR to connect follow the steps 1 Enter the DVR s location or name 2 Enter the DVR s IP address and port number 3 Eenter the user ID as ADMIN and DVR Admin s password 4 Press SAVE and then OK Click CONNECT from Remote Viewer Interface 1 How to find out my real IP address if you have computers connec...

Page 57: ... Load Open the DDNS list Please see the following illustration DDNS LIST for details 4 IP Address Show DVR s current IP address and Port number 5 USER ID Enter ADMIN 6 PASSWORD Enter the DVR Admin s password 7 Get IP Click Get IP to get the current DVR IP address and port number from DDNS server 8 Click OK and then click CONNECT from Remote Viewer Interface DDNS LIST 1 DDNS SETUP LIST Show all sav...

Page 58: ...o Save Reorded Images Set a path to save the video clips If you do not specify a path the program will save all files to its default location C Program Files Remote_J2K 6 Run in Full Screen Mode Check the box to enlarge the Interace to the full computer screen 7 4 5 PTZ control 1 ZOOM Use to adjust PTZ Zoom IN OUT 2 FOCUS Use to adjust PTZ Fous 3 PAN TILT CONTROL Click the direction buttons to con...

Page 59: ...AY Time Date 4 Screen Split To select Full 4 9 16 split screen display 5 Search Button To operate the search function 6 Time Selection To select the time of playback 7 Channel Selection To select CAM1 16 when full screen display 8 Auxiliary Function Button SAVE To save image as JPEG file to PC when the playback is paused PRINT To print out the picture when the playback is paused EVENT To show the ...

Page 60: ...ayback Operation Drag the mouse over the time bar to select a playback time Select a Year Month Day to playack Click RW or PLAYBACK to start the playback If the DVR cannot find the selected playback date and time the playback will starts from the next video clip Playback by EVENT LIST You can search a playback video clip by EVENT LIST The events include Video Loss Motion and Alarm Press EVENT Sele...

Page 61: ...ight before where you want to save and press SAVE The picture will be saved to the assigned path which you set up in 7 4 4 Remote software setup f PTZ SAVE print the recorded data Press STOP and PRINT to print out the picture SAVE AS AVI During playback press RECORD to start saving to AVI and press RECORD again to stop A message Saving OK pops up when you successfully save the video to AVI ...

Page 62: ... advr com tw or http 59 124 143 151 by IE browser Select REGISTER to register a new account 2 Add a new account Group Add a new user name User Password Add user password Confirm Password Confirm the password E mail Add an Email address for the password reminders 3 Enter group name and password to LOGIN DDNS function ...

Page 63: ...s can be found in DVR s SYSTEM MENU f EXTERNAL DEVICE f TCP IP SETUP f IP CONFIG SETUP IP Enter the DVR s current IP address PORT Enter the DVR s port number It is required to enter DVR NAME and MAC ADDRESS DVR s IP and PORT number can be left blank Press OK to save the settings 6 Edit and delete DVR information EDIT To edit the DVR information DELETE To delete the DVR information ...

Page 64: ...s INTERVAL Set an interval for the DVR to auto update its IP address to DDNS server D day H hour M minute REGISTER Connect to DDNS server and register the DVR information to DDNS database DNS STATUS Indicate the current status of DDNS connection IP ADDRESS Indicate the current IP address in DDNS server IP PORT Indicate the current IP address in DDNS server REMAIN TIME Indicate the remaining time t...

Page 65: ...ed and saved before click LOAD to browse the list Save Load Save Save the setup into the DDNS list Load Open the DDNS list DVR INFO Get IP Click Get IP to get the current DVR IP address and port number from DDNS server IP Address Show DVR s current IP address and Port number User ID Enter ADMIN Password Enter the DVR Admin s password and click OK to complete the DDNS setup Click CONNECT to get the...

Page 66: ...DDNS connection 1 DVR connect to DDNS server automatically and update the IP address by itself 2 The client accessesto DDNS server and requests IP address from DDNS server 3 DDNS server replies the DVR s IP address and port number 4 Client PC connects to DVR ...

Page 67: ...VR PORT Indicate the PORT of DVR ID Use ADMIN PW Enter the ADMIN s password 3 CONNECT DISCONNECT CONNECT Connect to DVR and get the live picture DISCONNECT Interrupt the connection with DVR 4 Status Window Shows the current status of connection 5 Selection of multi screen Switch to the different modes of multi screen displays 6 Channel selection Select a single channel for full screen display 7 PT...

Page 68: ...ation IP Address Enter the IP address of DVR Network Port Enter the port of DVR User ID Enter Admin User Password Enter Admin s password Save File Path Set a path to save the backup file This function is active only when the connection is established Start Backup Time The start time of file backup This function is only active under the connection is established End Backup Time The end time of file...

Page 69: ... the percentage of backup image received Backup Rate Indicate the completed percentage of backup image received Receive bps Indicate the bps of backup image received Save Size Indicate the size of backup image saved Backup Procedure 1 Select Connect Test to test the status to DVR connection 2 Select Unlock to get the record start End time of DVR 3 Select Set Backup Time to setup the backup functio...

Page 70: ...e 2 Indicate the present time of monitoring 3 Indicate the start end time of backup file 4 Switch to the different modes of multi screen 5 Channel selection Ch1 Ch16 6 SPEED Adjust the speed of fast forward DELAY Adjust the speed of reward 7 Function bar on playback To the beginning Fast Rewind Rewind Pause Forward Fast Forward To the end ...

Page 71: ...tions ON To start the audio function Ch1 4 to select the channel with audio Save AVI file 1 Click to open the backup file and select single channel 2 Click to open the AVI SAVE function 3 CHANNEL Select a single channel FRAMERATE Set the frame rate SIZE Set the file size of AVI SAVE START Start AVI SAVE STOP Stop AVI SAVE The AVI file path will be saved under C WEB_BACKUP ...

Page 72: ...JPEG2000 Stand alone DVR User Guide 72 4ch DVR The numbers are for reference only The recording duration is caculated under the continuous recording mode Record speed 1 1X Appendix 1 Record time table ...

Page 73: ...JPEG2000 Stand alone DVR User Guide 73 8 16ch DVR The numbers are for reference only The recording duration is caculated under the continuous recording mode Record speed 1 1X ...

Page 74: ...JPEG2000 Stand alone DVR User Guide 74 Appendix 2 System configuration ...

Page 75: ...d Play keys on front panel and power on DVR 3 The DVR beeps for a moment 4 When the Windows system detect new device please select Install from a list or specific location 5 Select the location of USB driver 6 A warning message pop up while the driver is installing Please select Continue Anyway Appendix 3 Firmware upgrade ...

Page 76: ...JPEG2000 Stand alone DVR User Guide 76 7 Start to copy the driver to Windows system 8 After installation the USB device BulkUsb Sys Usb Bulk I O Driver can be found from Device Manager ...

Page 77: ...USB upgrade program Insert the Install CD 1 Please select Install USB upgrade program Allupdate 2 Set up Directory default Directory C Program Files J2000 Allupdate After installation there ll be a shortcut on desktop Click on it for remote viewing ...

Page 78: ...PLAY and power on the DVR 4 When the DVR is powered on you will hear very short beeps Keep holding the SEARCH and PLAY buttons When the beeps turn slow and the Send icon of the program J2000 USB Downloader becomes active release the buttons 5 Click SEND for transmission After transmission the DVR will reboot automatically When DVR shows HDD detection message power off DVR Step 1 update BOOT Step 2...

Page 79: ... on the DVR 3 When the DVR is turned on you will hear very short beeps Keep holding the SEARCH and PLAY buttons When the beeps turn slow and the Send icon of the program J2000 USB Downloader becomes active release the buttons 4 Click SEND to transmit the files The DVR automatically reboots after the file transmission is completed Congratulations you have finished the update ...

Page 80: ...en that says HDD DETECT press PLAY and System enters PLAY ONLY MODE To exit PLAY ONLY MODE reboot the DVR and DO NOT press PLAY at the initial screen Search Use Search Bar to search the data by percentage You cannot use Time Date and EVENT LIST to search the data Appendix 4 Play only mode Under PLAY ONLY MODE 1 DVR cannot record 2 DVR cannot backup video to CD R 3 You still can connect to the DVR ...

Reviews: