background image

Version 1.0

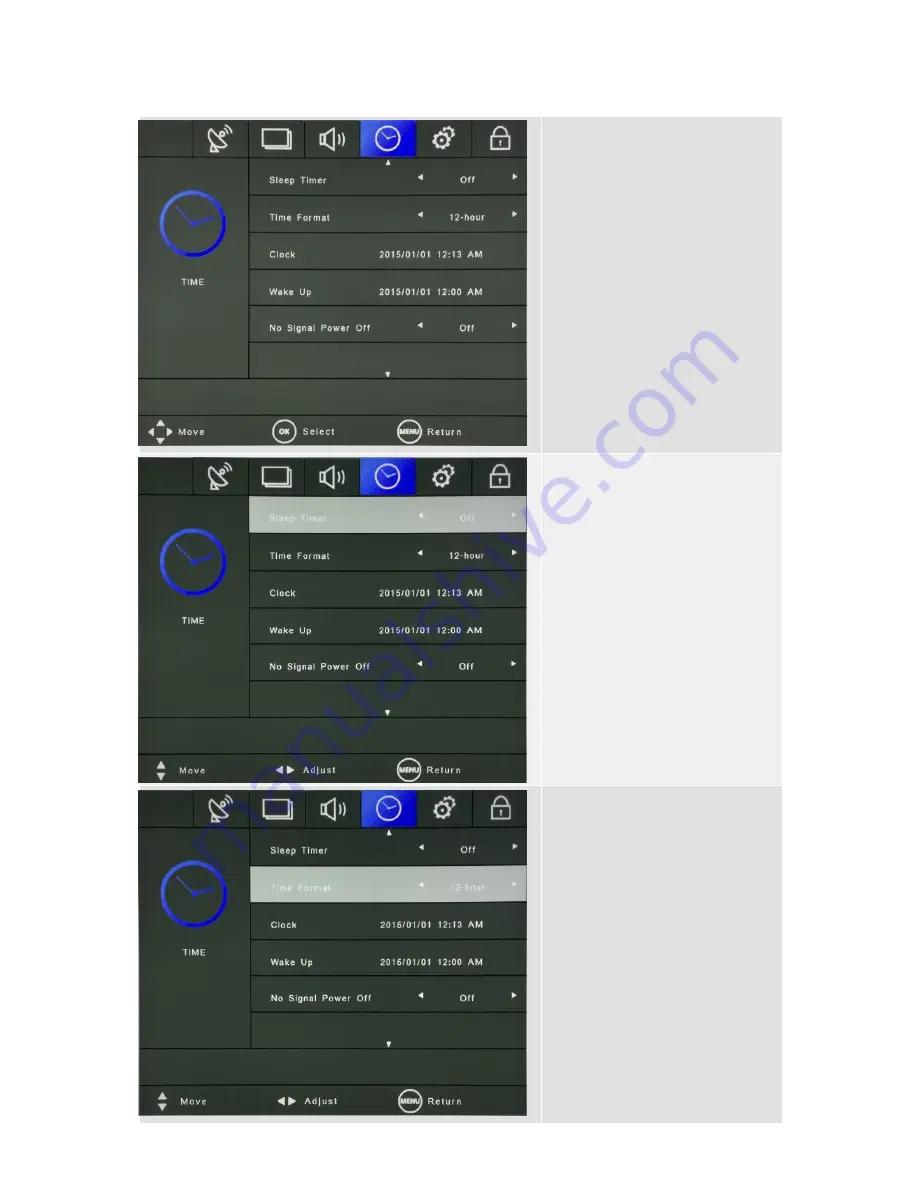
5-4 Time menu

Press the [MENU] Button. The OSD Main MENU will be shown.

<TIME MENU>
1) Go to Time Menu by pressing 
Menu button on remote controller 
or OSD key

2) Set Sleep Timer, Time Format, 
Clock, Wake Up, No Signal Power 
Off by pressing 

/

icon

<Sleep Timer>
1) Go to Sleep Timer by pressing 

/

on the remote controller or 

OSD key.

2) Set timer by 
5/10/15/30/60/90/120/180/240 
minutes to turn off automatically 
with OK or SELECT button

3) Press Sleep Timer again on the 
remote controller or OSD key to 
cancel Sleep Timer

<Time Format>

1) Adjust Time Format by 

pressing ◀/▶ icon :

12-Hour(AM,PM) or 24-Hour

Summary of Contents for HILU-86101

Page 1: ...User Manual Model HILU86101 86 Interactive LED LCD 86 85 60 ...

Page 2: ...ance 2 Introduction 9 3 Product Description 10 3 1 Front View 3 2 Rear View 3 3 Connection 4 Remote Control 15 5 OSD Menu Description 17 6 Product Specifications 28 7 Product Dimensions 30 8 Troubleshooting 31 9 1 Product Self Diagnosis 9 2 Before Requesting Service Version 1 0 ...

Page 3: ...RNING means If you ignore the warning message you may be seriously injured or there is a possibility of accident or death CAUTION means If you ignore the caution message you may be slightly injured or the product may be damaged NOTE means The note helps you understand and use the product safely Please read the note carefully before using the product When moving the product please grab the handles ...

Page 4: ...ng It may damage the product due to electric shock Only a power cord specified by product manufacturer are recommended Do not use the power cord from other devices It may cause electric shock or fire Hold the plug itself when unplugging the power plug from the wall socket If not there is risk of electric shock or fire Before moving or installing this product be sure to turn off the power and disco...

Page 5: ...ren to climb on or play on the product or the furniture and stands on which the product is placed Caution Do not allow an impact shock or any objects to fall into the product and do not drop anything onto the screen Make sure the product is turned off unplugged and all cables have been removed It may take more than 4 people to than carry Do not press or put stress on the front panel of the product...

Page 6: ...ith the product When a cart is used be careful when moving the cart product combination to avoid injury from tip over Install where it cannot be pushed pulled over or knocked down It is recommended to move the product in the box or packing material that originally came in When holding the product the screen should face away from you to avoid damage Caution If a fixed image displays on the screen f...

Page 7: ...e top and bottom of the frame firmly Handles are only for the supporting purpose When attaching the stand to the set place the screen facing down on a cushioned table or flat surface to protect the screen from scratches by more than 2 people Make sure that the screws are fastened tightly If they are not fastened securely enough it may tilt forward after being installed Version 1 0 ...

Page 8: ...ng the stand When mounting on a wall 1 2 3 Panel Avoid displaying a fixed image on the screen for a long period of time 2 or more hours for LCD to prevent image burn Recommend to power off or set the power saving mode or screen saver when not in use Due to technological constraints of the Panel manufacturer the images generated by this product may appear either brighter or darker than normal by ap...

Page 9: ...ssories contact the local dealer where you purchased your product The illustrations in this manual may differ from the actual product and item Accessory User Manual Warranty Card HDMI Cable USB Cable for TOUCH Power Cable Remote Controller Battery 1 5 V AAA Pen X 2 LCD LED Display Version 1 0 ...

Page 10: ...Laptop automatically Touch sensor s priority is as below Internal OPS External Desk top Front Notebook HDMI Input connected to HDMI 2 Important Notice The USB cable 3 m that Hitachi provides in this accessory box is for use of connection to Touch USB at the back Therefore in case of connecting USB cable to Touch USB in front separate USB cable is required and the length of cable is strongly recomm...

Page 11: ...S HDMI 2 HDMI 1 DP 4 Volume Up Right 5 Volume Down Left 6 Move Up 7 Move Down 1 POWER SWITCH ON OFF 2 AC IN 100V 240V 50 60HZ 3 HDMI OUT 4 HDMI 3 INPUT 5 DISPLAY PORT INPUT 6 HDMI 2 INPUT HDMI 1 INPUT 7 VGA INPUT 8 VGA AUDIO IN 8 AUDIO LINE OUT 10 RS232C 11 USB FOR UPDATE 12 L R SPEAKER OUT 13 USER FOR TOUCH Version 1 0 10 11 12 13 ...

Page 12: ...up again after mounting OPS PC in the slot HDMI Input When you install Remote module There is a slot on for Remote module When you need to install Remote module remove screws and existing cover first and screw up again after mounting Remote module in the slot AC cord holder To prevent take Power cable out please use cable holder if you need SCREW 4x11 ...

Page 13: ...t to the DisplayPort cable 2 VGA Connection In case of transmission digital video signal from an external device to the screen connect the external device and the product with the VGA cable and to transmit an audio signal connect an audio cable in PC AUDIO IN port separately Version 1 0 3 4 When you connect HDMI 1 or 2 with PC or DVD Bluray Player it doesn t work HDMI OUT When you connect HDMI 3 F...

Page 14: ...ed to external speakers internal speaker may not sound The connection is as below Note that when using OPS PC Connection 1 Do not connect touch sensor USB cable to the port Touch sensor cable is already connected by internal OPS docking board 2 Power on LCD LED Display OPS turns on automatically 3 Power off LCD LED Display OPS turns off automatically Version 1 0 ...

Page 15: ...menu in main OSD menu Navi gates input source Navigates down menu in main OSD menu Navi gates input source Navigates next menu in main OSD menu Navigates before menu in main OSD menu OK Select the highlighted menu option MENU Activates main OSD menu EXIT Escapes main OSD menu FREEZE Allows you to capture and freeze an image from a moving image that you are watching VOL Volume UP VOL Volume Down MU...

Page 16: ...ote Control to display the menu Press of the MENU button will take you back to monitor viewing 2 To go to advance to the next menu Press OK on the Remote Control 3 To go back to the previous menu Press MENU on the Remote Control 4 Typical Menu Operation Press MENU button The main menu will appear Use to select the desired menu option icon While the desired menu option is selected press OK to move ...

Page 17: ...2 Set Picture Mode Color Mode Screen Size Noise Reduction Dynamic Contrast and Color Range in Picture Menu by pressing icon Picture mode 1 Go to Picture Mode by pressing on the remote controller or OSD key 2 Adjust Brightness Contrast Color Tint and Sharpness with OK or SELECT button 3 User can use preprogrammed Standard Movie and Soft or can make his own favorite setting ...

Page 18: ...old by pressing icon Screen Size 1 Go to Screen Size by pressing on the remote controller or OSD key 2 Select ratio of screen by pressing icon Full 1 1 Normal Zoom and Cinema Wide Noise Reduction 1 Go to Noise Reduction by pressing on the remote controller or OSD key 2 Select Noise Reduction level by pressing icon Weak Middle Strong ...

Page 19: ...r OSD key 2 Available in Full HD resolution below 3 Select On or Off to adjust contrast by pressing icon Color Range 1 Go to Color Range by pressing on the remote controller or OSD key 2 Available in Full HD resolution below 2 Select color range by pressing icon Auto 16 235 for TV 0 255 for PC ...

Page 20: ...remote controller or OSD key 2 Set Sound Mode Surround Audio Only Equalizer in Audio Menu by pressing icon Sound Mode 1 Go to Sound Mode by pressing on the remote controller or OSD key 2 Adjust Bass Treble and Balance with OK or SELECT button 3 User can use preprogrammed Standard Music Movie and Sports or can make his own favorite setting ...

Page 21: ...ff spatial impression direction and reverberation of sound by pressing icon Equalizer Setting 1 Go to Equalizer Setting by pressing on the remote controller or OSD key 2 Adjust frequency characteristic by pressing icon 3 User can use preprogrammed Rock Pop and Jazz or can make his own favorite setting ...

Page 22: ...t Clock Wake Up No Signal Power Off by pressing icon Sleep Timer 1 Go to Sleep Timer by pressing on the remote controller or OSD key 2 Set timer by 5 10 15 30 60 90 120 180 240 minutes to turn off automatically with OK or SELECT button 3 Press Sleep Timer again on the remote controller or OSD key to cancel Sleep Timer Time Format 1 Adjust Time Format by pressing icon 12 Hour AM PM or 24 Hour ...

Page 23: ...Day Hour Minute Wake Up 1 Set Wake Up Time by pressing icon Year Month Day Hour Minute 2 It turns on automatically when it is Wake Up Time No Signal Power Off 1 It turns off automatically when there is no video input data 2 Set closing time by pressing icon 1 3 5 10 15s ...

Page 24: ... OSD key 2 Set Menu Language Menu Transparency OSD Time Out All Reset Blue Background CEC COM ID HDMI Setting by pressing icon Menu Language 1 Go to Menu Language by pressing on OSD key 2 Set Language by pressing icon English Japanese Menu Transparency 1 Go to Menu Transparency by pressing on OSD key 2 Set transparency of OSD by pressing icon 0 25 50 75 100 ...

Page 25: ...eset 1 Go to All Reset by pressing on OSD key 2 Press OK or SELECT button Then Are you sure pops up 3 Press not to do All Reset or press to default OSD settings Blue Background 1 Go to Blue Background by pressing on OSD 2 Turn on or off Blue Background by pressing 3 If there is no video data blue background displays with On while black background displays with Off ...

Page 26: ...TV source only COM ID 1 Go to COM ID by pressing on remote controller or OSD 2 Assign command ID to connect other devices with RS232 by pressing HDMI Setting 1 Go to HDMI Setting by pressing on remote controller or OSD 2 Press OK or SELECT button to set frame frequency Hz of HDMI source and EDID HDMI ports 1 2 3 4 Front and OPS source 3 EDID 1 4 frame frequency 30Hz EDID 2 0 frame frequency 60Hz ...

Page 27: ...Version 1 0 5 6 Lock menu Press the MENU Button The OSD Main MENU will be shown Keypad lock 1 Go to Lock Menu by pressing on remote controller or OSD 2 Set Keypad Lock On or Off by pressing ...

Page 28: ...d blocking Detection Method Touch tool Hand or other solid object except sharpness Accuracy 2mm Response time 12ms Available Touch Point 10 Points Windows 4 points Mac with driver software 1 point Mac without driver software Operating Systems Windows 7 8 10 MAC 10 10 10 12 PC connector USB SIGNAL CONNECTIVITY Connector HDMI x4 Rear 2 0ver x3 Inside OPS 2 0ver x1 HDMI Out 1 4ver x1 USB B for touch ...

Page 29: ...ECTRICAL Power Requirement 100 240V AC 50 60 Hz Power Consumption Max 333W Power Consumption Standby 0 5W Speaker Output 20W 20W Stereo 8 ohms ENVIRONMENTAL Operating Temperature 0 40 ºC 32 104 Storage Temperature 20 60 ºC 4 140 Operating Humidity 20 to 80 RH no condensation OSD FUNCTIONS OSD Language Function T B D English Japanese OSD Key Lock Function Support ...

Page 30: ...8 Product Dimensions Version 1 0 ...

Page 31: ... the Standard Signal Mode Table 3 Picture rolls vertically Check if the signal cable is securely connected Connect it again securely 4 Image is not clear Picture is blurred Run frequency Coarse and Fine tuning Turn on again after removing all accessories video extension cable etc Set resolution and frequency to the recommended ranges 5 The image is too light or too dark Adjust the Brightness and C...

Page 32: ...Version 1 0 date version Description 170501 1 0 release Revision ...

Reviews: