background image

39

ENGLISH

Multifunctional settings

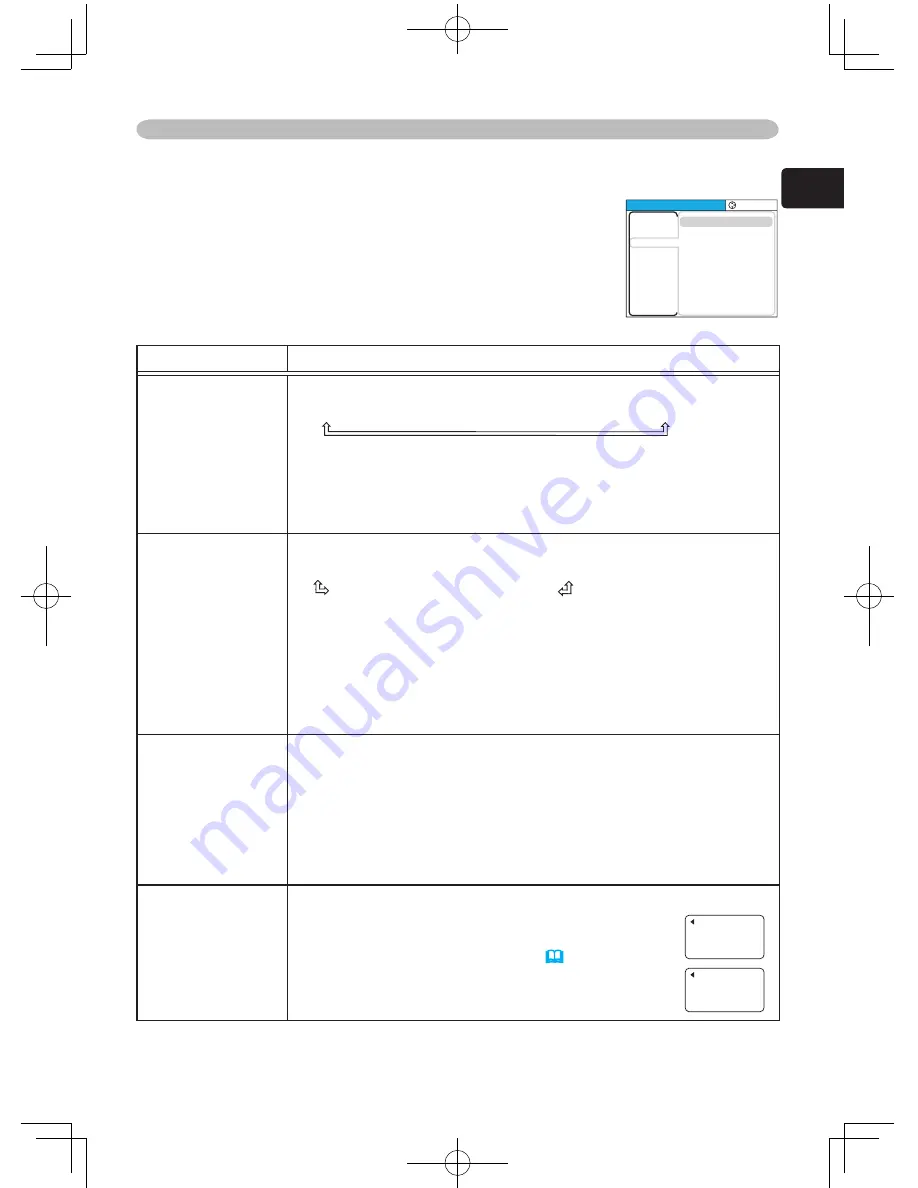
With the INPUT menu, the items shown in the table below 

can be performed.

Choose an item using the cursor buttons ▲/▼ on the 

projector or remote control, and press the cursor button ► 

on the projector or remote control, or the ENTER button 

on the remote control to execute the item. Then perform it 

referring to the following table.

INPUT menu

Item

Description

COLOR SPACE

Using the buttons ▲/▼ switches the mode for color space.

AUTO 

 RGB 

 SMPTE240 

 REC709 

 REC601

      
• This item can be chosen only for an RGB signal or a component 

video signal.

• The AUTO mode automatically selects the optimum mode.

• The AUTO operation may not work well at some signals. In such a 

case, select a suitable mode other than AUTO.

VIDEO FORMAT

Using the buttons ▲/▼ switches the mode for video format.

AUTO  

  NTSC  

  PAL  

  SECAM 

      N-PAL 

 M-PAL 

 NTSC4.43 

• This item is performed only for a video signal from the VIDEO port 

or the S-VIDEO port. For a component video signal, the signal type 

is identified automatically, independently of this function.

• The AUTO mode automatically selects the optimum mode.

• The AUTO operation may not work well for some signals. If the 

picture becomes unstable (ex. an irregular picture, a color lack), 

please select the mode depending on the input signal.

FRAME LOCK

Using the buttons ▲/▼ turns the frame lock function on/off.

TURN ON 

 TURN OFF

• This item performs only for an RGB signal with vertical frequency 

of 50 to 72 Hz.

• When the TURN ON is selected, a moving picture is displayed 

more smoothly.

• This function may cause a certain degradation of the picture. In 

such a case, please select the TURN OFF.

INFORMATION

Choosing this item displays a dialog titled “INPUT INFORMATION”.

It shows the information about the current input.
•The “FRAME LOCK” message on the dialog means  

the frame lock function is working. (

39

)

•This item cannot be chosen for no signal.

INPUT-INFORMATION

RGB

1024x768 @60.0

FRAME LOCK

INPUT-INFORMATION

S-VIDEO

SECAM

AUTO

MENU [RGB]

:SELECT

COLOR SPACE
VIDEO FORMAT
FRAME LOCK
INFORMATION

AUTO
AUTO
TURN OFF

PICTURE
IMAGE
INPUT
SETUP
SCREEN
OPTION
EASY MENU

Summary of Contents for EDPJ32

Page 1: ...icrosoft Corporation All other trademarks are the properties of their respective owners Before using this product please read the User s Manual Safety Guide and related manuals to ensure the proper use of this product After reading them store them in a safe place for future reference The information in this manual is subject to change without notice The manufacturer assumes no responsibility for a...

Page 2: ...of computer signal 15 Connecting power supply 16 Loading batteries into the remote control 17 Using the remote control 18 Power on off 19 Turning on the power 19 Turning off the power 20 Operating 21 Adjusting the volume 21 Temporarily muting the sound 21 Selecting an input signal 22 Searching an input signal 22 Selecting an aspect ratio 23 Adjusting the zoom magnifying power 24 Adjusting the focu...

Page 3: ...NPUT menu 39 Color space Video format Frame lock Information 39 SETUP menu 40 Zoom Keystone Whisper Mirror Volume 40 SCREEN menu 41 Language Menu position OSD bright Blank 41 Start up MyScreen 42 MyScreen lock Message 43 OPTION menu 44 Auto search Auto off Lamp time 44 Filter time Service 45 Maintenance 47 Lamp 47 Air filter 50 Inside of the projector 52 Caring for the lens 52 Caring for the cabine...

Page 4: ... rooms where low noise is more important than brightness Compact Body Even with its many features this projector is extremely compact and slim which gives you more flexibility and usability to use it where you want Various symbols are used in this manual The meanings of these symbols are described below About this manual To suitably use please be aware of what is written following this symbol NOTE ...

Page 5: ...to use the original packing material Use special caution for the lens part NOTE 1 Projector with Lens cover 2 Strap for Lens cover 3 Filter cover for bottom up use 4 Remote control 5 Two AA batteries for Remote control 6 Power cord 7 RGB cable 8 Component video adapter RCA D sub 9 Audio adapter RCA Stereo mini 10 User s manuals Do not place the projector on an unstable surface WARNING VIDEO RGB SE...

Page 6: ...t 16 Power switch 19 20 Elevator button 12 S VIDEO port 13 22 VIDEO port 13 22 CONTROL port 14 Lamp cover 47 48 49 Lamp unit is inside A lamp has a finite product life Preparation of a new lamp and early replacement are recommended Elevator foot 12 Bottom side Speaker Front Right side Rear Left side Control buttons 7 Ports See below About connection please see the section Connecting your devices 13...

Page 7: ...54 55 POWER indicator 19 20 54 55 INPUT button 22 Cursor buttons 28 STANDBY ON button 19 20 SEARCH button 22 RGB button 22 VIDEO button 22 ASPECT button 23 MAGNIFY ON button 26 OFF button 26 FREEZE button 26 POSITION button 25 ESC button 30 STANDBY ON button 19 20 AUTO button 24 BLANK button 27 VOLUME button 21 MUTE button 21 KEYSTONE button 25 Zoom button 24 button 24 MENU button 28 Menu cursor b...

Page 8: ... lens cover to the lens of the projector and slowly turn over the projector so that the top is facing up Do not fasten the lens cover during use or immediately after use Handling while the projector is in a high temperature could cause a burn and or malfunction to the projector Close the lens cover to prevent the lens surface being scratched when the projector is not used WARNING CAUTION Strap rin...

Page 9: ...e air filter referring the section Air filter 50 3 Slowly turn the projector so that the bottom is facing up 4 Set the filter cover for bottom up use Interlocking the tabs snap the filter cover for bottom up use into place Do not replace the filter cover and or air filter during use or immediately after use Handling while the projector is in a high temperature could cause a burn and or malfunction to th...

Page 10: ...ntion enough to ventilation The high temperature of the projector could cause a fire a burn and or malfunction to the projector Do not stop up block and cover the projector s vents Keep a space of 30 cm or more between the sides and other objects such as walls Do not place the projector on a metallic thing or anything weak in heat Do not place the projector on a carpet cushion or bedding Do not pla...

Page 11: ...e projector to keep the light from directly hitting the projector s remote sensor CAUTION a Screen size b Projection distance c Screen height 40 1 0 1 5 57 50 20 50 1 3 1 8 72 62 25 60 1 5 2 2 87 75 29 70 1 8 2 6 101 87 34 80 2 0 2 9 116 100 39 90 2 3 3 3 130 112 44 100 2 5 3 7 145 125 49 120 3 0 4 4 174 149 59 150 3 8 5 5 218 187 74 200 5 1 7 4 291 249 98 inch m m inch m inch a Screen size b Proj...

Page 12: ...tor during use or immediately after use Handling while the projector is in a high temperature could cause a burn and or malfunction to the projector Before operating make sure that the power switch is off that the power cord is not plugged in and that the projector is cool adequately If you press the elevator button without holding the projector the projector might crash down overturn smash your fi...

Page 13: ...able with 2 RCA connectors to 2 RCA connectors use the accessory audio adapter For a component video cable with 3 RCA connectors to 3 RCA connectors use the accessory component video adapter NOTE K K K S Video out Video out Audio out Audio cable Audio cable Audio out Component video cable Audio out Audio cable Video cable S Video cable Component video out ...

Page 14: ... simultaneous LCD and CRT display For details on how this is done please refer to the instruction manual of the corresponding laptop computer Be sure to check jack type signal level timing and resolution before connecting this projector to a computer Secure the screws on the connectors and tighten Some computers may have multiple display screen modes Use of some of these modes will not be possible...

Page 15: ...ESA DDC display data channel compatible Please take advantage of this function by connecting the accessory RGB cable to the RGB port DDC 2B compatible Plug and Play may not work properly if any other type of connection is attempted Please use the standard drivers in your computer as this projector is a Plug and Play monitor NOTE Resolution H x V H frequency kHz V frequency Hz Rating Signal mode 72...

Page 16: ...maged contact your dealer to newly get correct one Only plug the power cord into an outlet rated for use with the power cord s specified voltage range Never modify the power cord Never attempt to defeat the ground connection of the three pronged plug The power outlet should be close to the projector and easily accessible Do not touch the power cord with a wet hand Check that the connecting portion ...

Page 17: ...esult in battery explosion cracking or leakage which could result in fire injury and or pollution of the surrounding environment Be sure to use only the batteries specified Do not use batteries of different types at the same time Do not mix a new battery with used one Make sure the plus and minus terminals are correctly aligned when loading a battery Keep a battery away from children and pets Do not...

Page 18: ... remote control Be careful in handling the remote control Incorrect handling could cause damage or malfunction Do not drop or expose the remote control to physical impact Do not get the remote control wet or place it on wet objects Remove the batteries from the remote control and store them in a safe place if you will not be using the remote control for an extended period CAUTION Replace the batte...

Page 19: ... will begin blinking in green When the power is completely on the indicator will stop blinking and light in green To display the picture select an input signal according to the section Selecting an input signal 22 When the power is on a strong light is emitted Do not look into the lens and openings of the projector WARNING Turn the power on in right order Please power on the projector prior to the...

Page 20: ... periods of time Turn the power off in right order First power off the connected devices and then the projector Except for an emergency whenever you turn the projector off obey the procedure of the following Turning off the power and do not disconnect the power cord until the procedure is completed Neglect causes a damage of the electrode and un lighting of the lamp This projector is controlled by...

Page 21: ...will appear on the screen indicating that you have muted the sound To restore the sound press the MUTE button or VOLUME button Even if you do not do anything the dialog will automatically disappear after a few seconds VIDEO RGB SEARCH FREEZE OFF ON MAGNIFY ASPECT AUTO BLANK MUTE VOLUME KEYSTONE POSITION ESC ENTER MENU RESET ZOOM VIDEO RGB SEARCH FREEZE OFF ON MAGNIFY ASPECT AUTO BLANK MUTE VOLUME ...

Page 22: ...eck its input ports in order to find any input signals Then when an input is found the projector will stop searching and display the image If no signal is found the projector will return to the state selected before the operation RGB S VIDEO VIDEO STANDBY ON INPUT MENU LAMP TEMP POWER VIDEO RGB SEARCH FREEZE OFF ON MAGNIFY ASPECT AUTO BLANK MUTE VOLUME KEYSTONE POSITION ESC ENTER MENU RESET ZOOM VI...

Page 23: ...ent initializes the aspect ratio setting While setting the WIDE mode the correction of keystone distortion is not effective 25 40 Setting the WIDE mode may limit the magnify range 26 For an RGB signal NORMAL 4 3 16 9 For a video signal s video signal or component video signal 4 3 16 9 WIDE MOVIE1 MOVIE2 For no signal 4 3 16 9 VIDEO RGB SEARCH FREEZE OFF ON MAGNIFY ASPECT AUTO BLANK MUTE VOLUME KEY...

Page 24: ...t suited for the respective input signal will be automatically selected This function is available only when the AUTO mode is selected to the VIDEO FORMAT item in the INPUT menu 39 And the aspect ratio will be selected automatically For a video signal s video signal or component video signal The vertical position and horizontal position will be automatically adjusted For a component video signal T...

Page 25: ...eystone distortions 2 Use the cursor buttons to correct the distortion To close the dialog and complete this operation press the KEYSTONE button again Even if you don t do anything the dialog will automatically disappear after a few seconds The adjustable range for correction will vary among inputs For some signals this function may not work well While setting the WIDE mode for aspect ratio the co...

Page 26: ...nify range 23 36 1 Press the FREEZE button on the remote control The FREEZE indication will appear on the screen and the projector will enter the FREEZE mode To exit the FREEZE mode and restore the screen to normal press the FREEZE button again Freezing the screen The projector automatically exits the FREEZE mode when the input signal is changed or when one of the projector s buttons or the remote...

Page 27: ...s the BLANK button again Temporarily blanking the screen The projector automatically returns to the input signal screen when the input signal is changed or when one of the projector s buttons or the remote control buttons are pressed VIDEO RGB SEARCH FREEZE OFF ON MAGNIFY ASPECT AUTO BLANK MUTE VOLUME KEYSTONE POSITION ESC ENTER MENU RESET ZOOM VIDEO RGB SEARCH FREEZE OFF ON MAGNIFY ASPECT AUTO BL...

Page 28: ...of description of this manual these functions may not work correctly with some input NOTE ENTER Advanced MENU EASY MENU is pointed at EASY MENU ASPECT is pointed at EASY MENU ASPECT ZOOM KEYSTONE MODE BRIGHT CONTRAST COLOR TINT SHARPNESS WHISPER MIRROR RESET FILTER TIME LANGUAGE 4 3 0 0 NORMAL 0 0 0 0 3 NORMAL NORMAL EXECUTE 0h ENGLISH Go To Advance Menu EASY MENU Go to Advanced Menu is pointed at...

Page 29: ... TEMP COLOR TINT SHARPNESS PROGRESSIVE MY MEMORY 0 0 DEFAULT 1 HIGH 0 0 0 TURN OFF SAVE 1 ENTER MENU RGB SELECT PICTURE IMAGE INPUT SETUP SCREEN OPTION EASY MENU Go To Easy Menu Advanced MENU EASY MENU is pointed at EASY MENU EASY MENU ASPECT is chosen EASY MENU ASPECT ZOOM KEYSTONE MODE BRIGHT CONTRAST COLOR TINT SHARPNESS WHISPER MIRROR RESET FILTER TIME LANGUAGE 4 3 0 0 NORMAL 0 0 0 0 3 NORMAL ...

Page 30: ...he menu name The dialog for reset will appear Point at RESET on the dialog using the cursor button 7 To close the menu Press the MENU button again Even if you do not do anything the operation will complete and the menu will disappear automatically after about 10 seconds Note that items whose functions are performed simultaneously with operation LANGUAGE H PHASE VOLUME etc cannot reset MENU RGB SEL...

Page 31: ...cted source NORMAL CINEMA DYNAMIC NORMAL COLOR TEMP MIDDLE GAMMA 1 DEFAULT CINEMA COLOR TEMP LOW GAMMA 2 DEFAULT DYNAMIC COLOR TEMP HIGH GAMMA 3 DEFAULT When the combination of GAMMA and COLOR TEMP differs from pre assigned modes above the display on the menu for the MODE is CUSTOM BRIGHT Using the buttons adjusts the brightness See the BRIGHT item in the PICTURE menu 33 CONTRAST Using the buttons...

Page 32: ...the items of EASY MENU except FILTER TIME and LANGUAGE Pressing the button displays a dialog for confirmation To perform reset point at RESET using the button 30 FILTER TIME Performing this item resets the filter timer which counts usage time of the air filter See the FILTER TIME item in the OPTION menu 45 LANGUAGE Using the buttons switches the language of menu See the LANGUAGE item in the SCREEN me...

Page 33: ...s of particular tones Choose an item using the buttons and adjust the level using the buttons You can display a test pattern for checking the effect of your adjustment by pressing the ENTER button Each time you press the ENTER button the pattern changes as below No pattern Gray scale of 9 steps Ramp Gray scale of 15 steps The eight equalizing bars correspond to eight tone levels of test pattern ex...

Page 34: ...and adjust the level using the buttons You can display a test pattern for checking the effect of your adjustment by pressing the ENTER button Each time you press the ENTER button the pattern changes as below No pattern Gray scale of 9 steps Ramp Gray scale of 15 steps COLOR Using the buttons adjusts the strength of whole color Strong Weak This item can be chosen only for a video signal TINT Using ...

Page 35: ...please select the TURN OFF even though the screen image may lose the sharp MY MEMORY Choosing a mode of MY MEMORY using the buttons and then pressing the button or the ENTER button performs each function LOAD1 LOAD2 LOAD3 LOAD4 SAVE4 SAVE3 SAVE2 SAVE1 This projector has 4 numbered memories for adjustment data Performing the LOAD1 LOAD2 LOAD3 or LOAD4 loads the data on the memory whose number corre...

Page 36: ...ignal or component video signal 4 3 16 9 WIDE MOVIE1 MOVIE2 For no signal 4 3 16 9 The NORMAL mode keeps the original aspect ratio of the signal For an HDTV component video signal of 1125i 1080i or 750p 720p this item cannot be chosen Performing the automatic adjustment initializes the aspect ratio setting While setting the WIDE mode the correction of keystone distortion is not effective 25 40 Set...

Page 37: ...d might not be exact display ratio V POSITION Using the buttons adjusts the vertical position Up Down H POSITION Using the buttons adjusts the horizontal position Left Right H PHASE Using the buttons adjusts the horizontal phase to eliminate flicker Right Left This item can be chosen only for an RGB signal or a component video signal except 525i 480i and 625i 576i H SIZE Using the buttons adjusts t...

Page 38: ...ure when adjusting For a video signal or s video signal The video format best suited for the respective input signal will be automatically selected This function is available only when the AUTO mode is selected to the VIDEO FORMAT item in the INPUT menu 39 And the aspect ratio will be selected automatically For a video signal s video signal or component video signal The vertical position and horiz...

Page 39: ...nent video signal the signal type is identified automatically independently of this function The AUTO mode automatically selects the optimum mode The AUTO operation may not work well for some signals If the picture becomes unstable ex an irregular picture a color lack please select the mode depending on the input signal FRAME LOCK Using the buttons turns the frame lock function on off TURN ON TURN...

Page 40: ...ISPER Using the buttons turns off on the whisper mode NORMAL WHISPER When the WHISPER is selected acoustic noise and screen brightness are reduced MIRROR Using the buttons switches the mode for mirror status NORMAL H INVERT V INVERT H V INVERT VOLUME Using the buttons adjusts the volume High Low Multifunctional settings With the SETUP menu the items shown in the table below can be performed Choose...

Page 41: ...or 10 seconds OSD BRIGHT Using the buttons switches the brightness level of the OSD On Screen Display BRIGHT DARK BLANK Using the buttons switches the mode for the blank screen The blank screen is a screen for the temporarily blanking feature 27 It is displayed by pressing the BLANK button MyScreen ORIGINAL BLUE WHITE BLACK MyScreen is a screen you can register as a desired screen The ORIGINAL scr...

Page 42: ...sing this item displays a dialog titled MyScreen It will ask you if you start capturing the picture from the current screen Please wait for the target picture to be displayed 2 Press the ENTER button when the picture is display The picture will freeze and the frame for capturing appears To restore the screen and return to the previous dialog press the RESET or ESC button 3 Using the buttons adjust...

Page 43: ...ng the current MyScreen MESSAGE Using the buttons turns on off the message function TURN ON TURN OFF When the TURN ON is selected the following message function works AUTO IN PROGRESS while automatically adjusting NO INPUT IS DETECTED SYNC IS OUT OF RANGE Searching while searching for an input signal Detecting when an input signal is detected The input signal display displayed when it is changed T...

Page 44: ...BLE When the time is set to 0 the projector is not turned off automatically When the time is set to 1 to 99 and when the passed time with a no signal or an unsuitable signal reaches at the set time the projector lamp will go off and the power indicator begins blinking Please refer to the section Turning off the power 20 LAMP TIME The lamp time is the time counted after the last resetting It is sho...

Page 45: ...TER button to execute the item FAN SPEED AUTO ADJUST GHOST FACTORY RESET FILTER MESSAGE FAN SPEED Using the buttons switches the rotation speed of the cooling fans HIGH NORMAL The HIGH is the mode for use at highlands etc Note that the projector is noisier when the HIGH is selected Except for use at highlands please use setting the NORMAL mode The HIGH mode may shorten the lifetimes of the lamp AU...

Page 46: ...t by the menu 53 When the TURN OFF is chosen the air filter cleaning message will not appear Please check and clean the air filter periodically even if there is no message If the air filter becomes blocked by dust or others the internal temperature will rise which could cause malfunction or reduce the lifetime of the projector It is recommended to choose 100h in general Please be careful with the ope...

Page 47: ...ll make a loud bang when it does ventilate the room well and make sure not to breathe the gas that comes out of the projector vents or get it in your eyes or mouth Before replacing the lamp turn the projector off and unplug the power cord then wait at least 45 minutes for the lamp to cool sufficiently Handling the lamp while hot can cause burns as well as damaging the lamp Never unscrew except the...

Page 48: ...ol for at least 45 minutes 2 Prepare a new lamp If the projector is mounted on the ceiling or if the lamp has broken also ask the dealer to replace the lamp 3 After making sure that the projector has cooled adequately slowly turn over the projector so that the bottom is facing up 4 Please loosen the screw marked by arrow Then unhook the claws of the lamp cover and remove the lamp cover 5 Loosen th...

Page 49: ...n the OPTION menu 44 Please reset the lamp time only when you have replaced the lamp for a suitable indication about the lamp NOTE 1 Press the MENU button to display a menu Only when the EASY MENU has appeared please perform the next step 2 2 Point at the Go To Advance Menu in the menu using button then press the button 3 Point at the OPTION in the left column of the menu using button then press t...

Page 50: ...ntly 3 Disconnect all the connectors and adapters that were connected to the projector s ports Then slowly turn the projector so that the lens side is facing up While the projector is placed lens side up hold the projector 4 Remove the filter cover and the air filter Then slowly turn the projector so that the bottom is facing up 5 Apply a vacuum cleaner to the vent of the projector for the air filter...

Page 51: ...of the projector could cause an electric shock a burn and or malfunction to the projector Use only the air filter of the specified type Do not use the projector with the air filter and the filter cover removed Do not remove the filter cover and the air filter in a smoky or dusty place It could result in a fire and or malfunction to the projector The air filter should be cleaned periodically If the air filt...

Page 52: ...h If soiling is severe dip soft cloth in water or a neutral cleaner dilute in water and wipe lightly after wringing well Then wipe lightly with a soft dry cloth Do not take care of the projector during use or immediately after use Handling while the projector is in a high temperature could cause a burn and or malfunction to the projector Before operating make sure that the power switch is off that...

Page 53: ...cs for your projector or the signal source specs CHECK THE AIR FLOW The internal portion temperature is rising Please turn the power OFF and allow the unit to cool down at least 20 minutes After having confirmed the following items please turn the power ON again Is there blockage of the air passage aperture Is the air filter dirty Does the peripheral temperature exceed 35 C If the same indication is...

Page 54: ...l the POWER indicator finishes blinking and then perform the proper measure referring to the item descriptions below Blinking In Red or Lighting In Red Lighting In Red Turned off The lamp does not light and there is a possibility that interior portion has become heated Please turn the power off and allow the projector to cool down at least 20 minutes After the projector has sufficiently cooled down ...

Page 55: ...ce company Blinking In Red or Lighting In Red Turned off Lighting In Red There is a possibility that the interior portion has become heated Please turn the power off and allow the projector to cool down at least 20 minutes After the projector has sufficiently cooled down please make confirmation of the following items and then turn the power on again Is there blockage of the air passage aperture Is ...

Page 56: ... the SERVICE item in the OPTION menu 46 to reset all settings to factory default Phenomenon Cases not involving a machine defect Reference page The electrical power cord is not plugged in Correctly connect the power cord 16 The power switch is not set to the on position Set the power switch to On 19 The main power source has been interrupted during operation such as by a power outage blackout etc ...

Page 57: ...rectly connect the connection cables 13 14 The brightness is adjusted to an extremely low level Adjust the BRIGHT to a higher level using the menu function or the remote control 31 33 The computer cannot detect the projector as a plug and play monitor Make sure that the computer can detect a plug and play monitor using another plug and play monitor 15 Color settings are not correctly adjusted Perf...

Page 58: ...stal projector Liquid Crystal panel Panel size 1 4 cm 0 55 type Drive system TFT active matrix Pixels 415 272 pixels 858 horizontal x 484 vertical Lens F 1 65 f 20 4 mm Lamp 165W UHB Power Supply AC100 120V 2 7A AC220 240V 1 5A Power Consumption 240W Temperature range 5 35 C Operating Size 285 W x 73 H x 202 D mm Not including protruding parts Please refer to the following figure Weight mass 2 2 kg...

Page 59: ...59 ENGLISH Specifications Dimension diagram unit mm 202 285 69 33 5 73 83 ...

Page 60: ......

Reviews: