DISASSEMBLY INSTRUCTIONS
B1-1
Fig. 1-3
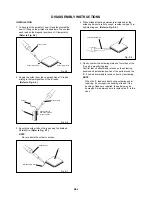
1-4: SYSCON PCB (Refer to Fig. 1-4)
1.
2.
3.
Remove the 4 screws
1
.
Disconnect the following connectors: (CP8501 and
CP8502).
Remove the Syscon PCB in the direction of arrow.
Syscon PCB
1
1
1
1
Fig. 1-4
1-5: AV PCB (Refer to Fig. 1-5)
1.
2.
3.
Remove the 4 screws
1
.
Remove the screw
2
.
Remove the AV PCB in the direction of arrow.
1
1
1
1
2
AV PCB
Fig. 1-5
DeckChassis
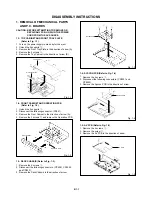
1. REMOVAL OF MECHANICAL PARTS
AND P.C. BOARDS
CAUTION: BEFORE ATTEMPTING TO REMOVE OR
REPAIR ANY PCB, UNPLUG THE POWER
CORD FROM THE AC SOURCE.
1-1: TOP CABINET AND FRONT TRAY PLATE
(Refer to Fig. 1-1)
1.
2.
3.
4.
5.
Turn on the power supply to stand by for the eject.
Unlock the 2 supports
1
.
Remove the Front Tray Plate in the direction of arrow (A).
Remove the 5 screws
2
.
Remove the Top Cabinet in the direction of arrow (B).
2
2
2
2
2
Top Cabinet
(B)
1
1
(A)
Fig. 1-1
Front Tray Plate
1-2: FRONT CABINET AND OPERATION PCB
(Refer to Fig. 1-2)
1.
2.
3.
4.
Unlock the 3 supports
1
.
Disconnect the following connector: (CP651).
Remove the Front Cabinet in the direction of arrow (A).
Remove the 3 screws
2
and remove the Operation PCB.
Front Cabinet
Operation PCB
Fig. 1-2
(B)
(A)
1-3: DECK CHASSIS (Refer to Fig. 1-3)
1.
2.
3.
Remove the 4 screws
1
.
Disconnect the following connectors: (CP4001, CP4002
and CD503).
Remove the Deck Chassis in the direction of arrow.
1
1
1
1
2
2
2
1
1
1
Summary of Contents for DV-C4
Page 9: ...SPEC NO M2A1 11A O R NO W162001 ...
Page 25: ...A B C D A B C D 1 2 1 2 CUT ...

