English
10
䡬
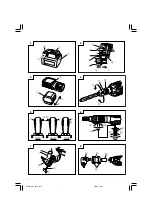
If the sleeve becomes loose during operation, tighten
it further. The tightening force becomes stronger
when the sleeve is tightened moreover.
(2) Dismounting the bit
Firmly grasp the ring and loosen the sleeve by
turning it toward the left (in the counterclockwise
direction as viewed from the front). (See
Fig. 4
)
2. Selecting the appropriate drill bit
䡬
When boring concrete or brick
Use the drill bits specified in the Optional
Accessories.
䡬
When boring metal or plastic
Use an ordinary metalworking drill bit.
䡬
When boring wood
Use an ordinary woodworking drill bit.
However, when drilling 6.5 mm or smaller holes,
use a metalworking drill bit.
3. Confirm that the battery is mounted correctly.
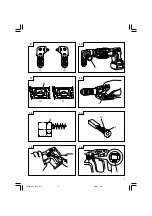
4. Confirm the direction of bit rotation (Fig. 5)
The bit rotates clockwise (viewed from the rear
side) by pushing the R-side of the push button. (
Fig.
5-a
)
The L-side of the push button is pushed to turn the
bit counterclockwise. (
Fig. 5-b
)
The motor does not rotate if the push button is set
to the center position. (
Fig. 5-c
)
5. Installing the side handle and handle joint (Fig. 6)
A Side handle and handle joint can be installed on
either side of the tool for right or left handed use.
To install the side handle and handle joint, thread
it into the socket on the desired side of the tool
and tighten it securely.
6. Attaching the angle unit. (Optional accessory)
(1) Removing keyless chuck from impact drill (
Fig. 7
)
䡬
To remove the keyless chuck from the impact drill,
open the keyless chuck jaws as far as possible and
turn out the locking screw (left hand thread). This
screw locks the keyless chuck to the spindle. Install
the hex. bar wrench into the keyless chuck. Place
the accessory wrench in the hexagonal opening of
the angle unit spindle. Tightly restrain the impact
drill on a firm base. Turn the keyless chuck until
the wrench is at about a 30° angle to the bench
top and strike the wrench sharply with a hammer
so the keyless chuck turns in the counterclockwise
direction (viewed from the front side). This should
loosen the keyless chuck from the spindle which
has a right hand thread and you will be able to
remove the keyless chuck by hand.
CAUTION:
If the keyless chuck cannot be removed by striking
the wrench, don’t strike the wrench forcibly and
send the impact drill to a HITACHI AUTHORIZED
SERVICE CENTER.
(2) Attaching the angle unit.
䡬
After removing the keyless chuck, engage the
coupling to the impact drill spindle. Fit the joint
sleeve to the gear cover, attach the angle unit to
the other end of the joint sleeve, and turn the angle
unit slightly in either direction so the hex. hole in
the coupling engages the hex. portion of the angle
unit spindle. Adjust the direction of the angle unit
and tighten the joint sleeve by clamping bolts.
Tighten two clamping bolts equally and gradually
in turn with a torque of 686-784N·cm (70-80kgf·cm)
(extent of force which can be subjected by only a
wrist with the open end wrench provided to tight
clamping bolts.). (
Fig. 8
)
䡬
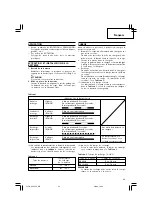
To operate the angle unit at low speed, attach the
keyless chuck to the angle unit spindle at the side
marked “LOW” and secure the locking screw. At
this setting, the drilling speed is decreased to about
70% and the drilling torque is increased to about
150%. (
Fig. 9
)
䡬
To operate the angle unit at high speed, attach the
keyless chuck to the angle unit spindle at the side
marked “HIGH” and secure the locking screw. At
this setting, the drilling speed is increased to about
150% and the drilling torque is decreased to about
70%. (
Fig. 9
)
(3) Installing the side handle and handle joint (
Fig. 10
)
The side handle and handle joint can be installed
on either side of the angle unit for right or left
handed use. To install the side handle and handle
joint, thread it into the socket on the desired side
of the angle unit and tighten it securely.
(4) Removing keyless chuck from angle unit
䡬
The keyless chuck can be removed from angle unit
in the same manner it was removed from the impact
drill; however, ALWAYS REMOVE ANGLE UNIT
FROM THE IMPACT DRILL BEFORE ATTEMPTING
TO LOOSEN KEYLESS CHUCK. This will prevent
damage of impact drills gear. Use open end wrench
provided to hold angle unit spindle before attempting
to loosen keyless chuck.
CAUTION:
If the keyless chuck cannot be removed by striking
the wrench, don’t strike the wrench forcibly and
send the impact drill to a HITACHI AUTHORIZED
SERVICE CENTER.
7. IMPACT to ROTATION changeover (Fig. 11)
The Impact Drill can be switched from IMPACT
(impact plus rotation) to ROTATION (rotation only)
by turning the change lever. When boring concrete,
stone, tile or similar hard materials, turning the
change lever to IMPACT side. The drill head impacts
against the material while continuing to rotate.
When boring metal, wood or plastic, turning the
change lever to ROTATION side. The impact drill
can be used as an ordinary electric drill.
CAUTION
䡬
Do not use the IMPACT function for the material
such as woods or metals. Such usage will not only
reduce drill efficiency, but may also damage the
drill tip.
䡬
The change lever may not turn smoothly when
changing from impact drill mode to drill mode. (
Fig.
11
)
In this case, operate the machine for few seconds.
The spindle shaft will then be pushed forward, and
the change lever can be moved smoothly.
8. High-speed/Low-speed changeover (Fig. 12)
Prior to changing speed, ensure that the impact drill
has come to a complete stop. To change speed,
depress the shift lock and slide in to the appropriate
direction, as indicated by the arrow in
Fig. 12
. The
numeral "1" engraved in the impact drill body denotes
low speed, the numeral "2" denotes high speed.
01Eng_DV24DV_WE
5/8/09, 16:05
10


