background image

iv

Remote Control (Cont.)

Using the remote control

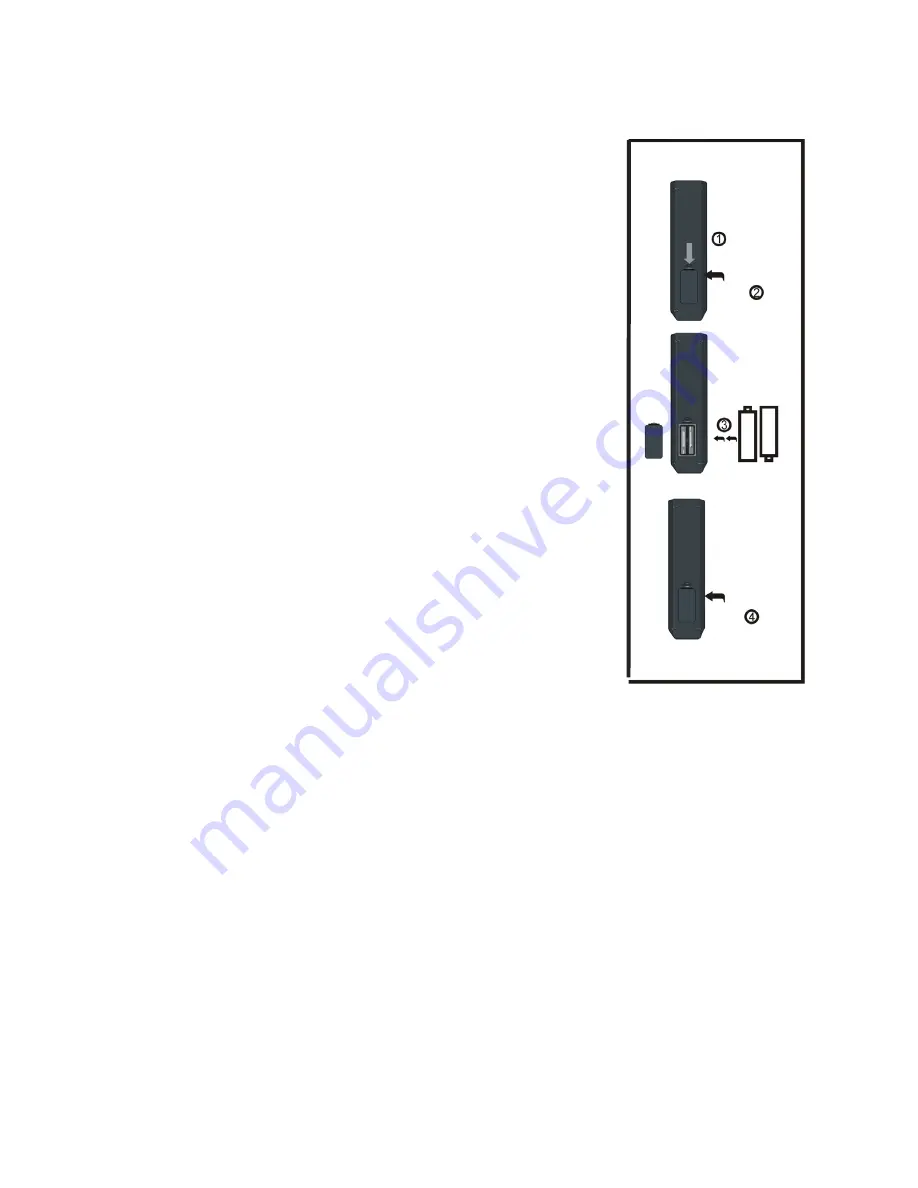
Inserting batteries

Install the batteries as illustrated in Fig. 1, right. 

s

Open the cover at the back of the remote control unit 
completely.

s

Insert two AAA size batteries according to the polarity 
markings (+ / -) inside the compartment. Make sure  
the batteries are correctly aligned and properly 
pushed into place so they can power the remote 
control unit. 

s

Slide the cover back into position.

NOTE:  

When testing the remote control unit after 
replacing the batteries, make sure the TV is 
properly connected to the mains power supply.

Battery service life

s

The service life of batteries depends on usage and 
environmental conditions. They should normally last 
for about one year. 

s

If the remote control fails to work even when it is 
operated near the player, replace the batteries.

Fig. 1

Push

Open

Press

Precautions when using batteries

s

Do not use old and new batteries together.

s

Do not use different types of battery (for example, Manganese and Alkaline 
batteries) together.

s

Note that there are chargeable and non-chargeable batteries. Do not 
attempt to charge non-chargeable batteries.

s

Remove the batteries from the remote control unit if you do not intend to 
use the unit for a long time.

s

When discarding used batteries, follow any guidelines for recycling and 
disposal of batteries that apply in your local area.

s

Keep batteries away from children and pets. 

s

Never throw batteries into a fire or expose them to fire or other sources of 
extreme heat.

Summary of Contents for DF2200

Page 1: ... Models DF2200 DF2200DV DF2300DV DF2400 DF2400DV DF3200DV DH3200 DF4000DV LED LCD HDTV OWNER S GUIDE For Models DF2200 DF2200DV DF2300DV DF2400 DF2400DV DF3200DV DH3200 DF4000DV LED LCD HDTV OWNER S GUIDE ...

Page 2: ...0 CH Play the next previous channel 11 DISPLAY Display information of the current program 12 Up navigation button 13 Left navigation button 14 OK Confirm selection 15 Right navigation button 16 Down navigation button 17 MENU Display the main menu press it again to return to the previous menu page 18 EXIT Exit the menu page TV TITLE Display the title of a disc DVD 19 SOURCE Switch the input source ...

Page 3: ...ile INDEX Display the record list in DTV mode 38 Play the previous file 39 RED button TV GOTO Start playing from a certain point DVD 40 GREEN button TV ANGLE Change the playing angle if available 41 BLUE button TV A B Repeat playing between A and B DVD 42 YELLOW button TV REPEAT Change repeat mode DVD NOTE Teletext or Austext is no longer available nor is there any plan for a replacement teletext ...

Page 4: ...d environmental conditions They should normally last for about one year s If the remote control fails to work even when it is operated near the player replace the batteries Fig 1 Push Open Press Precautions when using batteries s Do not use old and new batteries together s Do not use different types of battery for example Manganese and Alkaline batteries together s Note that there are chargeable a...

Page 5: ...right The remote control will not operate if its path is blocked NOTES s Do not drop step on or otherwise impact the remote control This may damage the parts or lead to malfunction s The operating distance may vary according to the brightness of the room s Do not point bright light at the remote control sensor s Do not place objects between the remote control and the remote control sensor s Do not...

Page 6: ...uctions 1 Installation 5 Controls and Connections 7 Getting Started 14 Basic Operations 15 Electronic Program Guide EPG 17 Recording 18 USB Mode 24 Menus 23 DVD Mode 36 Frequently Asked Questions 48 Specifications 51 Repair and Refurbished Goods or Parts Notice 52 Contents ...

Page 7: ...he presence of important operating and maintenance servicing instructions in the literature accompanying the appliance IMPORTANT WARNINGS AND CAUTIONS s Only connect this TV to a mains socket with a protective earthing connection s To prevent damage which may result in fire or an electric shock hazard do not expose this appliance to rain or moisture s Do not change or modify the appliance in any w...

Page 8: ...ly If the antenna touches a power line contact with the antenna could result in fire electric shock or serious injury s Install the unit at an adequate distance from the wall to ensure sufficient ventilation If the temperature inside the unit rises it may result in fire General Safety Instructions Cont Installation s Only install this TV set in accordance with the instructions in this manual If a ...

Page 9: ...tric shock s Always grasp the plug when disconnecting the power cord Pulling the cord can damage the internal wire and may cause a fire s Unplug this TV during lightning storms or when unused for long periods of time Not doing so may result in fire or electric shock Usage conditions and restrictions s Follow the instructions in this manual when installing and adjusting the TV set Only adjust those...

Page 10: ...not play with the TV Cleaning and maintenance s To reduce the risk of fire and electric shock unplug the TV before cleaning s Wipe off any moisture dirt or dust on the power plug pins with a clean dry cloth Failure to do so may result in fire or electric shock s Only use a soft dry cloth for cleaning the TV do not use a damp cloth Never clean with industrial strength polish wax benzene paint thinn...

Page 11: ... 3 Tighten the screws supplied with a screwdriver to affix the stand to the panel Fig 3 Fig 4 IMPORTANT s Make sure the TV set is unplugged from the power supply before installing or removing the stand s The TV panel may be awkward to install on your own We recommend you ask someone to help with installation and or removal of the stand Your TV is packaged with the stand and the cabinet separated B...

Page 12: ...e screws supplied with a screwdriver to affix the stand to the panel Fig 3 Fig 4 IMPORTANT s Make sure the TV set is unplugged from the power supply before installing or removing the stand s The TV panel may be awkward to install on your own We recommend you ask someone to help with installation and or removal of the stand Your TV is packaged with the stand and the cabinet separated Before using t...

Page 13: ...crews supplied with a screwdriver to affix the stand to the panel Fig 3 Fig 4 IMPORTANT s Make sure the TV set is unplugged from the power supply before installing or removing the stand s The TV panel may be awkward to install on your own We recommend you ask someone to help with installation and or removal of the stand Your TV is packaged with the stand and the cabinet separated Before using the ...

Page 14: ... own s Use four standard M4 10mm screws or longer depending on the mounting bracket to mount this TV IMPORTANT s Make sure the TV set is unplugged from the power supply before wall mounting it and removing the stand s The TV panel may be awkward to install on your own We recommend you ask someone to help with installation and or removal of the stand Back of the TV NOTE The screws in the package ar...

Page 15: ...L button increase decrease the volume level or move left right 6 CH button select the next previous channel or move up down 7 MENU button enter the menu setting page 8 SOURCE button select the input source 9 POWER button switch the TV on or to standby 10 Disc slot insert a disc following the guide on the side of this slot 11 USB2 port for multimedia file playback in DVD mode 12 SD MMC MS Card slot...

Page 16: ...inal 4 VGA input terminal 5 YPbPr video input mini terminal 6 CVBS AV video input terminal 7 AUDIO R L input terminals for use with YPbPr CVBS 8 USB1 input terminal for multimedia file playback USB mode 9 HDMI input terminal 10 RF input terminal for connection of the external antenna 11 COAXIAL S PDIF output terminal 2 3 4 5 6 7 8 9 10 11 1 1 ...

Page 17: ...nnected from the main unit before connecting the TV to an AC power source s Read through the instructions before connecting the TV to other equipment Main unit To power outlet Connecting an external antenna Antenna Outdoor antenna amplifier 75 antenna plug Antenna amplifier power plug Indoor antenna amplifier ...

Page 18: ... unit with other devices to receive high definition multimedia signal HDMI cable not included Composite video CVBS connection For basic connection use the composite Audio L R white red and CVBS yellow cable to connect the unit with other devices AV cable not included Back of DVD VCR ...

Page 19: ...d use this product as a monitor VGA cable not included Audio cable not included Back of PC Coaxial connection Use a coaxial S PDIF cable to connect the unit with an amplifier or other audio decoding device for coaxial S PDIF audio signal output cable not included Earphone connection Earphone cable not included ...

Page 20: ...14 USB 1 connection for USB mode Insert a USB memory device into the USB 1 port for playback of video music photo multimedia files USB device optional not included Controls and Connections Cont ...

Page 21: ...ode the indicator will glow red First use When you switch on the TV for the first time the First Time Installation menu will be displayed on the screen as illustrated below s OSD language Use the buttons to select your OSD language and then use the button to go to the next item s Country Use the buttons to select the country you are living in and then use the button to go to the next item s Auto s...

Page 22: ...again to restore sound Picture and sound mode s Press the P MODE button on the remote control repeatedly to select the picture mode directly available options Standard Mild Personal Dynamic s Press the S MODE button on remote control repeatedly to select the sound mode directly available options Standard Music Personal Movie Sleep time setting s Press the SLEEP button on the remote control repeate...

Page 23: ...watch it Teletext s Press the TEXT button on the remote control to view the available teletext information Press OK to hide the information NOTE See the note on page iii for important information about teletext services in Australia TV Radio for DTV mode only s Press the TV RADIO button on the remote control to switch the unit between TV and radio mode Subtitle s Press the SUBTITLE button on the r...

Page 24: ...can view any EPG information you have to activate every channel for which you want to view program information To do this use the buttons to select a channel in the left column then press OK to confirm s Press the buttons to switch between columns s Press the buttons to select a different channel program in the list s Press the RED button to display the TV guide of the previous day s Press the GRE...

Page 25: ... sPress the INDEX button on the remote control to display the PVR Settings page Alternatively go to the Setup Menu and select PVR Settings sHighlight File Manager and press OK to enter it see page 33 sUse the buttons to select a recorded file and press OK to start playback in full screen mode Scheduled Recording in DTV mode only See instructions under EPG on the previous page or press the INDEX bu...

Page 26: ...the tool bar pictured below will appear on the screen sUse the buttons to select Play then and press OK to play the program in time shift mode s Use the keys then press OK to select a function such as Fast Forward from the on screen toolbar s To stop time shift press the STOP button on the remote control to display a dialogue box then select Yes to exit time shift mode and return to live TV signal...

Page 27: ...erience some difficulty with a scheduled recording at different times without removing the USB recording device You will need to remove the USB device as it is required to reset after each recording to protect the device from damage If you see the message DISK NOT READY displayed remove the device reconnect and proceed with your recording s Some USB storage devices may not be compatible for smooth...

Page 28: ...egory sUse the buttons to select the desired folder or file then press OK to open the folder or start playing the file When playing photo files sPress the DISPLAY button on the remote control to hide display the on screen tool bar sPress OK repeatedly to switch between Slide Show and Single View sPress the buttons to play the previous next file sPress the buttons to rotate a photo clockwise counte...

Page 29: ...the desired folder or file then press OK to open the folder or start playing the file When playing music files sPress the CH button on the remote control to switch between Player and File List sPress the BLUE button on the remote control to display the Quick Menu press it again to dismiss the menu Repeat Select the desired repeat mode Background Music Turn on off background music ...

Page 30: ...ons to display the previous next page sInput your desired page using the number buttons then press OK to go to the desired page sPress the BLUE button on the remote to display the Quick Menu press it again to dismiss the menu Repeat Select the repeat mode Background Music Turn on off background music Encode Type Select the encode type Remote operations when playing multimedia files sPress the butt...

Page 31: ...e sPress the buttons to select the preferred option sPress the buttons to adjust the value sPress the MENU button to return to the previous menu page sPress the EXIT button to exit the menu page There are menus for television operation in DTV and ATV mode pages 25 34 for PC mode page 35 and for DVD mode pages 46 47 s Press the SOURCE button on the bottom of the front panel or on the remote control...

Page 32: ...Temp Use this item to adjust the optimum colour temperature for suitable viewing Available options Normal Cool Warm Aspect Ratio Use this item to adjust the video size Available options 4 3 Full Zoom1 Zoom2 Just Scan NOTE If there is no signal pressing the ASPECT button on the remote control will not work The available video size may be different in different input sources Advanced Settings NR Noi...

Page 33: ...ound Sound simulation EQ Setting Use this item to set the equalizer Available EQ Modes Off Rock Pop Jazz User AVL Auto Volume Level Use this item to turn on off the AVL function SPDIF Use this item to select the desired SPDIF audio output type Available options Off PCM Auto Audio Description Press the OK button or the button to enter this item Then you can set the AD switch to ON or OFF NOTE Audio...

Page 34: ... not user adjustable Strength This displays the signal strength of the current channel It is not user adjustable Analog Manual Scan sPress OK or to enter Analog Scan Press to fine tune Channel to Save Select the channel number to be saved Colour System Select the colour system PAL in Australia Sound System Select the sound system AFC Turn on off automatic fine tuning Start Start scanning NOTE Colo...

Page 35: ...Press the GREEN button on the remote control to skip the highlighted channel sPress the BLUE button on the remote control to enter Move mode Use the buttons to select the preferred position then press the BLUE button again to move the channel Signal Information This item is used to display signal details such as Channel Number Frequency Quality and Strength Menus Cont ...

Page 36: ...711 Enable sUse this item to enable disable the lock system Channel Locks sPress OK or to enter sPress the button to select the channel you want to lock sPress OK repeatedly to lock unlock the highlighted channel Parental Rating sUse this item to select the desired program rating Available options No Block Block G Block PG Block M Block MA Block AV Block R Block All Lock Keyboard sUse this item to...

Page 37: ...vailable sources Default source Set the default source Default DTV program Set the default digital program Default ATV program Set the default analog program Backup to USB Backup the data to USB1 memory device Restore from USB Restore data from USB1 memory device and then your TV will switch to STANDBY mode Recall Recall the default settings of Hotel Mode New Password sInput your new password usin...

Page 38: ...aired function when this mode is on only adjustable if there is a signal Teletext sPress OK or to enter Then you can select the desired digital Teletext language and decoding page language See the note on page iii for more information about Teletext in Australia Time Settings sPress OK or to enter sPress the button to select the desired item sPress the button to adjust the value OSD Time This item...

Page 39: ...o Sync is off you can adjust the Date and Time Power On Timer Turn the auto power on timer on or off You can adjust the Time Power On Source Power On Channel when this timer is on Power Off Timer Turn the auto power off timer on or off You can adjust the Time when this timer is on To adjust the date and or time sHighlight the date and or time and press OK to enter the adjusting page sPress the but...

Page 40: ...beginning sPress the GREEN button to delete the highlighted file sPress the YELLOW button to delete all recorded files sPress the BLUE button to zoom in out Device List sIn this item you can check the available space and file system of your memory device connected to USB1 port sPress the RED button on the remote control to format your USB1 memory device ...

Page 41: ...el Press the buttons to select the desired channel Start Time Press the buttons to select the desired start date and time of the recording End Time Press the buttons to select desired end date and time of your scheduled recording NOTE After successful completion select Save to save the settings First Time Setup This item is used to recall the First Time Setup page see page 14 for details Reset Thi...

Page 42: ...erred item sPress OK or to enter the submenu press the buttons to adjust the value Auto Adjust Use this item to adjust the PC screen automatically H Position Use this item to adjust the horizontal position value from 30 to 30 V Position Use this item to adjust the vertical position value from 30 to 30 Phase Use this item to adjust the phase value from 0 to 31 Clock Use this item to adjust the sign...

Page 43: ... immediately 3 When a menu screen appears on the unit press the buttons or the number buttons to select the chapter track number then press OK to confirm 4 To stop playing and return to the menu screen press the TITLE or D MENU button on the remote control Stopping play Press the STOP button to stop playback NOTE When the player is stopped the player records the point on the DVD where STOP was pre...

Page 44: ...o to Press the GOTO button repeatedly to select the item you want to set and enter a time number chapter number track number etc then press OK Accordingly the disc will be played from the selected point Display Press the DISPLAY button to display the playing status of your disc Change subtitle language Some DVDs have multiple subtitle languages recorded To change the subtitle language to a differe...

Page 45: ... again to return to normal play Zoom play This function allows you to zoom into the picture to enlarge it or zoom out sPress the ZOOM button when playing the screen shows sUse the navigation buttons to scroll across the enlarged picture Changing the audio soundtrack language on DVD VCD discs It is possible to change the audio soundtrack language to a different language from the one selected at the...

Page 46: ...om the files displayed in this folder then press the or OK button to start playback 4 On the file selection page press the or buttons to turn to the previous or next page 5 Press the REPEAT button on the remote control to change the play mode SINGLE play one file only REPEAT ONE repeat one file REPEAT FOLDER all the files in the folder will be played repeatedly FOLDER all the files in the folder w...

Page 47: ... displayed in this folder then press the or OK button to start playback 4 During normal playback press the or button to play the previous or next file 5 Press the REPEAT button on the remote control to change the play mode SINGLE play one file only REPEAT ONE repeat one file REPEAT FOLDER all the files in the folder will be played repeatedly FOLDER all the files in the folder will be played NOTE T...

Page 48: ...the remote control to change the play mode SINGLE play one file only REPEAT ONE repeat one file REPEAT FOLDER all the files in the folder will be played repeatedly FOLDER all the files in the folder will be played NOTE The available repeat modes may vary for different discs Skip to the next previous picture Press button to skip to the next picture or button to skip to the previous picture If no ke...

Page 49: ...press 1 and 5 several seconds later it will automatically switch to track 15 sPress the or button to play the previous or next track USB 2 Memory Card playback While in DVD mode you can use the USB2 port and memory card slot next to the DVD compartment at the side of the TV set to play back content from these storage media To switch to USB Card playback in DVD mode use one of the two methods descr...

Page 50: ...y the DVD menu setup page sUse the buttons to select General Setup sUse the buttons to select SOURCE press OK twice to enter the source list sUse the buttons to select CARD or USB then press OK to enter playback mode Playback controls and functions are explained on the following page ...

Page 51: ... selection page press the or button to turn to the previous or next page 5 Press the REPEAT button on the remote control to change the play mode SINGLE play one file only REPEAT ONE repeat one file REPEAT FOLDER all the files in the folder will be played repeatedly FOLDER all the files in the folder will be played NOTE The available repeat modes may vary for different devices Important notes sTo p...

Page 52: ... sure to store the disc in its exclusive case when not in use sDO NOT store discs in humid or dusty areas or where they are exposed to direct sunlight or sources of heat such as a heating appliance Cleaning dirty discs sIf a disc is dirty wipe the surface gently with a soft cloth dampened with a little water no other liquids sWhen wiping discs always move the cloth from the centre hole towards the...

Page 53: ...e setup menu sUse the buttons to switch to another main setup item Then press the or OK button to enter the submenu page sPress the button to return to the previous menu page General setup page TV Display This setting is for selecting the TV output mode Available options Normal PS Pan scan mode Normal LB Letter box mode Wide 16 9 wide screen mode OSD Language This is for choosing your desired OSD ...

Page 54: ...guage of your disc menu if your disc menu contains multiple menu languages Program Control Use this item to select the desired program rating Password Use this item to change the password Input the password using the number buttons on the remote control The default password is 0000 NOTE If you forget the password please use the master password 4711 Default Use this item to reset to factory setting...

Page 55: ...hem with new ones sMake sure to point the remote control at the remote control sensor and try it again sMake sure to use the remote control at a distance of no more than 6m from the remote control sensor sRemove any obstacles between the remote control and remote control sensor No key operation by the main unit and or the remote control is effective Disconnect the power cord and then reconnect it ...

Page 56: ...tting is right Audio soundtrack and or subtitle language is not the initial settings If the audio soundtrack and or subtitle language does not exist on the disc the language selected at the initial settings will not be seen heard No subtitles sSubtitles appear only with discs that contain them sMake sure to select Subtitles ON in the settings otherwise they will not be displayed Alternative audio ...

Page 57: ...icular external self powered hard disks Problems relating to the card reader Problem Solution My player does not recognise my memory card when connected to the DVD player Check firstly that your memory card is compatible with the unit Supported memory card formats are SD MS and MMC We have tested this unit with most available memory cards however because of the multiple technology standards in use...

Page 58: ...wer Source AC 100 240V 50 60Hz Power Consumption d48W Operation Temperature 5ºC to 45ºC Measurement 565 W 165 D 390 H mm with stand 565 W 52 D 345 H mm without stand Weight Approx 4 0kg with stand Approx 3 8kg without stand Region code setting All DVD discs are coded by the sales territory Please note the player is set to Region 4 coding by the factory which cannot be changed This is in compliance...

Page 59: ...ht With Stand 3 8kg 3 5kg Without Stand 3 0kg 2 1kg Terminals Input Signals Tuner Analogue PAL BG DK I SECAM DK 48 25MHz 863 25MHz Digital DVB T VHF 174MHz 230MHz UHF 474MHz 862MHz AV IN 1 COMPOSITE IN 1 COMPONENT IN 1 HDMI IN 1 COAXIAL 1 RGB IN 1 USB IN 1 AUDIO IN Diameter 3 5mm Mini Jack Terminals Output Signals AUDIO OUT Analogue or Digital TV only S PDIF Digital Audio Output Coaxial Headphones...

Page 60: ...inals Input Signals Tuner Analogue PAL BG DK I SECAM DK 48 25MHz 863 25MHz Digital DVB T VHF 174MHz 230MHz UHF 474MHz 862MHz AV IN 1 COMPOSITE IN 1 COMPONENT IN 1 HDMI IN 1 COAXIAL 1 RGB IN 1 USB IN 1 AUDIO IN Diameter 3 5mm Mini Jack Terminals Output Signals AUDIO OUT Analogue or Digital TV only S PDIF Digital Audio Output Coaxial Headphones Diameter 3 5mm Mini Jack Supplied Accessories User Manu...

Page 61: ...ght With Stand 4 3kg 3 9kg Without Stand 3 5kg 3 1kg Terminals Input Signals Tuner Analogue PAL BG DK I SECAM DK 48 25MHz 863 25MHz Digital DVB T VHF 174MHz 230MHz UHF 474MHz 862MHz AV IN 1 COMPOSITE IN 1 COMPONENT IN 1 HDMI IN 1 COAXIAL 1 RGB IN 1 USB IN 1 AUDIO IN Diameter 3 5mm Mini Jack Terminals Output Signals AUDIO OUT Analogue or Digital TV only S PDIF Digital Audio Output Coaxial Headphone...

Page 62: ...nals Input Signals Tuner Analogue PAL BG DK I SECAM DK 48 25MHz 863 25MHz Digital DVB T VHF 174MHz 230MHz UHF 474MHz 862MHz AV IN 1 COMPOSITE IN 1 COMPONENT IN 1 HDMI IN 3 COAXIAL 1 RGB IN 1 USB IN 1 AUDIO IN Diameter 3 5mm Mini Jack Terminals Output Signals AUDIO OUT Analogue or Digital TV only S PDIF Digital Audio Output Coaxial Headphones Diameter 3 5mm Mini Jack Environment Working Temperature...

Page 63: ... DVB T 177 5MHz 816 5MHz AV IN CVBS PAL SECAM NTSC COMPONENT IN YPBPR 480i p 576i p 720p 50 60 1080i 50 60 1080p 50 60 HDMI1 IN HDMI2 IN HDMI3 IN 480i p 576i p 720p 50 60 1080i 50 60 1080p 24 50 60 RGB IN Analogue 640x480 60 800x600 60 1024x768 60 1280x1024 60 MEDIA IN USB Port AUDIO IN Diameter 3 5mm Mini Jack Terminals Output Signals AUDIO OUT Analogue or Digital TV only S PDIF Digital Audio Out...

Page 64: ...58 ...

Reviews: