background image

14

Your guarantee

of Excellence

Thank you for purchasing this monitor

In the unlikely event that this product should develop a fault, we
undertake to replace or repair any part of the product which fails

due to a manufacturing defect within 3 years of the date of

purchase provided that:

i)

The product has been installed and used only in accordance

with the instructions supplied with the product.

ii)

The product has not been repaired, maintained, or modified

by any person other than an HITACHI authorised engineer.

iii)

The product serial number has not been removed or altered.

This guarantee does not apply to product acquired secondhand or

cover the adjustment of user controls.

Any parts replaced under this guarantee shall become the property

of HITACHI.

Please note that  evidence of the date of purchase will be required

before any service under this guarantee is carried out.

This guarantee does not affect your statutory

rights.

In all cases of difficulty please consult your

HITACHI dealer.

GUARANTEE

Summary of Contents for CPX14QE

Page 1: ...OPERATING GUIDE FOR COLOUR MONITOR CPX14QE UK ...

Page 2: ...lp Volume Picture 6 View Modes 7 8 Dwell Time Screen Output 1 Output 2 Output 3 Alarms 9 Alarms History Main Menu More 10 12 Install Language Date Time Memory Reset OSD Label Entry Date Time PIP Labels PIP Mode Sleep Mode 12 Specifications 13 Specifications External Connectors Guarantee 14 2 OPERATING GUIDE 3 UK ENGLISH OPERATING GUIDE ...

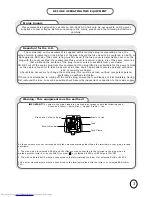
Page 3: ...re is no alternative to cutting off the mains plug ensure that you dispose of it immediately having first removed the fuse to avoid a possible shock hazard by inadvertent connection to the mains supply IMPORTANT The wires in the mains lead are coloured in accordance with the following code Green and Yellow Earth Blue Neutral Brown Live As these colours may not correspond with the coloured markings...

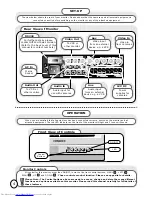
Page 4: ... and all attached equipment The red LED indicator on the front of the monitor will light and 2 tones will sound OPERATION Control Buttons ON OFF LED The view below shows the rear of your monitor Please ensure that the cameras and all external equipment is connected correctly before switching on the monitor or any of the attached equipment SET UP Monitor Controls All control for this monitor other ...

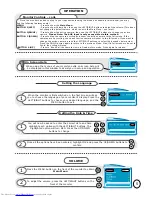
Page 5: ...n again to return to the previous Mode Also if in full screen mode set to Cycle the cycling will stop BUTTON 4 UP Press to freeze all the camera views in Quad picture mode Press again to release Press the MENU button on the front of the monitor to obtain Main Menu 1 To adjust the volume press the LEFT RIGHT buttons on the front of the monitor 2 VOLUME 5 When the monitor is first switched on the fi...

Page 6: ...ange compared to the full screen adjustment They cannot reduce to the minimum levels possible as in full screen mode i e dark Press the MENU button on the front of the monitor to obtain Main Menu 1 Press the UP DOWN buttons on the front of the monitor to select picture option Press the LEFT RIGHT buttons to confirm 3 For picture values moving the slider left will decrease values whilst moving the ...

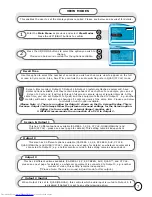
Page 7: ...t 2 to Quad and the equipment attached to Output 2 e g another monitor will have a split screen showing all 4 camera views at the same time Please see below for details on each option available Please Note 1 There is no option for Output 1 shown on the On Screen Display This is because Output 1 will always follow the picture and sound settings for the Screen option Option 1 is for use with an exte...

Page 8: ...als CYCLE Shows on a full screen the input from the 4 cameras one at a time at regular intervals set by Dwell Time with sound AUX Shows on screen the input from an attached external device e g a VCR Once altered press the MENU button to return to Main Menu or repeatedly to exit 3 8 QUAD Output 3 only Shows on screen the input from all 4 cameras at the same time with no sound SCREEN Available on Ou...

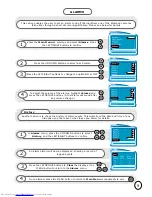
Page 9: ...light Volume and press the LEFT RIGHT buttons A test alarm will sound after any volume change 4 ALARMS An alarm history will now be displayed showing a record of logged events 2 In Alarms menu press the UP DOWN buttons to select History and the LEFT RIGHT buttons to confirm 1 History Another option is to check the History of alarm events This will tell you the date and time of any disruption and t...

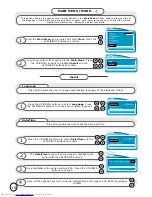
Page 10: ... MORE You will now enter further options in the Main Menu Press the UP DOWN buttons to highlight Install and the LEFT RIGHT buttons to confirm 2 Language This option allows the user to choose their desired language of the displayed OSD s Once all the options have been entered highlight OK and press the UP DOWN buttons to confirm 4 Once highlighted the option will turn RED Press the UP DOWN buttons...

Page 11: ...of 5 characters Press the MENU button to confirm 3 Press the UP DOWN buttons to select the next camera and repeat Step 3 Once all the cameras have been named press the MENU button to return to the Main Menu 4 Label Entry This option enables the user to name each camera input e g Input 1 camera 1 MON1 Please see below for details Press the UP DOWN buttons to select Date Time 1 Date Time This option...

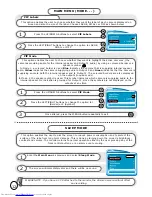
Page 12: ...L or OFF 2 Press the UP DOWN buttons to select PIP Labels 1 PIP Mode This option enables the user to choose whether they want to highlight the active cameras the cameras providing audio for the internal speaker and Output 2 audio by using a coloured border or a speaker symbol In Mode 1 a coloured border is used Blue indicates the camera that is supplying internal speaker audio Yellow indicates the...

Page 13: ...V2 minimum 2V0 maximum at an impedance of less than 1K Audio Input 0V5 nominal level 2V0 maximum at an impedance of 10K or more Video Input 1V0 peak peak at 75 impedance Video Output 1V0 peak peak at 75 impedance 12V DC Supply Connections Supply for each camera 12V nominal 250mA maximum RS232 Connections 13 1 2 3 4 5 6 7 8 9 Carrier Detect CD Receive Data Rx Transmit Data Tx Data Terminal Ready DT...

Page 14: ...The product has not been repaired maintained or modified by any person other than an HITACHI authorised engineer iii The product serial number has not been removed or altered This guarantee does not apply to product acquired secondhand or cover the adjustment of user controls Any parts replaced under this guarantee shall become the property of HITACHI Please note that evidence of the date of purch...

Page 15: ......

Page 16: ... ITALY Tel 39 02 487861 Tel 39 02 38073415 Servizio Clienti Fax 39 02 48786381 2 Email customerservice italy hitachi eu com HITACHI Europe AB Box 77 S 164 94 Kista SWEDEN Tel 46 0 8 562 711 00 Fax 46 0 8 562 711 13 Email csgswe hitachi eu com HITACHI EUROPE S A S Lyon Office B P 45 69671 BRON CEDEX FRANCE Tel 04 72 14 29 70 Fax 04 72 14 29 99 Email france consommateur hitachi eu com HITACHI EUROPE...

Reviews: