


-22-
•
Crank case
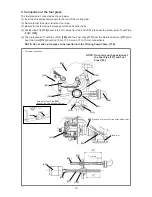
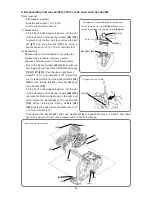
14. Disassembly and reassembly of the crank case
[Tool required]
• Hex. bar wrench (4 mm)
(1) Disassembly
• Remove the four Bolts M5
[13]
by using a hex. bar wrench (4 mm). You can now remove Crank Case
(A)
[6]
, Crank Case (B)
[44]
, and the Crank Shaft
[1]
.
• To disassemble Ball Bearing 6202C3
[4]
and the Oil Seal
[5]
, push both from the Oil Seal
[5]
side.
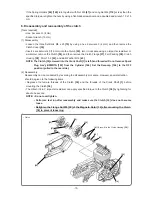
(2) Reassembly
Reassembly can be conducted by reversing the disassembly procedure. However, special attention
should be given to the following items.
• Do not reuse the Oil Seal
[5]
and Ball Bearing 6202C3
[4]
when disassembled from Crank Case (A)
[6]
and Crank Case (B)
[44]
.
• Do not reuse the Crank Case Packing
[3]
.
• Do not reuse the four Bolts M5
[13]
.
• Apply 50 to 100 mg of Piloknock Universal No. 0 (JX Nippon Oil & Energy) between the lips of the Oil
Seal
[5]
.
• Carefully clean the Crank Shaft
[1]
by using gasoline before mounting.
• Before mounting Crank Case (A)
[6]
and Crank Case (B)
[44]
, fully degrease their threaded holes.
Mount them without pinching Fuel Pipe (FKM)
[150]
.
• Assemble the Crank Case Packing
[3]
by correctly aligning its hole position without any deviation.
After matching Crank Case (A)
[6]
and Crank Case (B)
[44]
, check their outer peripheries and make
sure the Crank Case Packing
[3]
is along the Crank Case mating face.
• Cut off the protrusion of the Crank Case Packing
[3]
at the mating face of the Cylinder
[146]
after
mounting.
NOTE: Do not break the Crank Case Packing [3] when cutting it.
[1]
[3]
[4]
[5]
[6]
[44]
[5]
[4]
[13]
[46]
[45]