background image

GB   

- 20 -

Tips

Care of the Screen

Clean the screen with a slightly damp, soft cloth. Do

not use abrasive solvents as they may damage the TV

screen coating layer.

Poor Picture

Have you selected the correct TV system? Is your TV

set or house aerial located too close to the loudspeak-

ers, non-earthed audio equipment or neon lights, etc.?
Mountains or high buildings can cause double pictures

or ghost images. Sometimes you can improve the pic-

ture quality by changing the direction of the aerial.
Is the picture or Teletext unrecognizable? Check if you

have entered the correct frequency.
The picture quality may degrade when two peripherals

are connected to the TV at the same time. In such a

case, disconnect one of the peripherals.

No Picture

Is the aerial connected properly? Are the plugs con-

nected tightly to the aerial socket? Is the aerial cable

damaged? Are suitable plugs used to connect the aerial?

If you are in doubt, consult your dealer.

No Picture 

means that your TV is not receiving any

transmission. Have you pressed the correct buttons on

the remote control? Try once more.

Sound

You can not hear any sound. Did you perhaps interrupt
the sound, pressing “ ” button? Are external speakers

connected to the TV?
Sound is coming from only one of the speakers. Is the

balance set to one direction extreme? See 

SOUND

menu.

Remote Control

Your TV no longer responds to the remote control. Press

the “

TV

” button on the remote control once more. Per-

haps the batteries are exhausted. If so you can still use

the local buttons at the front of your TV.
Have you selected the wrong menu? Press “

TV

” button

to return to TV mode or press “

MENU

” button to return

to the previous menu.

No solution

Switch your TV set off and on. If this does not work, call

the service personnel; never attempt to repair it your-

self.

Specifications

TV BROADCASTING

PAL SECAM B/G  D/K  L/L’

RECEIVING CHANNELS

VHF (BANDI/III)
UHF (BAND U)
HYPERBAND
CABLE-TV (S1-S20 / S21-41)

NUMBER OF PRESET CHANNELS

100

CHANNEL INDICATOR

OSD (ON SCREEN DISPLAY)

RF AERIAL INPUT

75 Ohm Unbalanced

OPERATING VOLTAGE

220-240V AC, 50 Hz.

POWER CONSUMPTION (W) (max)

120 Watt

AUDIO OUTPUT

 Nicam Stereo

AUDIO OUTPUT POWER (W

RMS.

) (%10 THD)

2 x 10

PICTURE TUBE

28“ 16:9 (66 cm.)

DIMENSIONS (DxLxH) (mm)

'

/

+

: HLJKWNJ

01-2853WMAV-1244UK-ENG-ST7P-AK45-MULTI-PLL-FS-CLED-50052079.p65

13.07.2004, 11:04

20

Summary of Contents for CL28W460N

Page 1: ...USERS GUIDE CL28W460N CL28W460N ...

Page 2: ... Control 2 Control Panel Buttons and Rear Panel 3 Aerial Connections 4 Connect Peripheral Equipment 5 Via the Euroconnector 5 ViaAerial Input 5 Decoder 5 TV and Video Recorder 5 Playback NTSC 5 Copy Facility 5 Search for and store the test signal of the video recorder 5 Camera and Camcorder 5 Connect the decoder to the video recorder 5 Connecting Headphones 5 Preparation 6 Features 6 Safety Precau...

Page 3: ... Up Cursor Up Cursor Right Volume MENU Menu TEXT Teletext Info Program Menu Index Page Reveal Hold 16 9 Picture Mode Change Blue Install Menu F Yellow Features Menu Green Picture Menu Red Sound Menu Programme Down Cursor Down Cursor Left Volume Mute TV TV Quit Menu Time 16 9 Picture Mode Change AUTO 4 3 16 9 CINEMA SUBTITLE ZOOM 0 18 9 79 7 7 ...

Page 4: ...wer On Off Volume P CH Program MENU Menu AUDIO L Audio left AUDIO R Audio right VIDEO VCR H PHONE Headphone 3 6 mm Ø SVHS Aerial Input 75 W EXT 1 Scart Socket 1 with RGB EXT 2 Scart Socket 2 with RGB Power Cable REAR PANEL 32 5 32 5 3 3 0 18 0 18 URQW 9 FRONT PANEL ...

Page 5: ...GB 4 Aerial Connections 9 8 5RXQG RKP FRD LDO FDEOH 5HDU RI 79 2XWGRRU HULDO RQQHFWLRQV Connect Peripheral Equipment DECODER FOR SATELLITE RECEIVER VIDEO HEADPHONE AUDIO CAMERA ...

Page 6: ...AL sockets Playback NTSC Connect NTSC VCR player to Euroconnector at the back of the TV Connect NTSC VCR player to RCA Jack at the front of the TV Then press AV button to select EXT 1 RGB EXT 2 F AV or SVHS Copy Facility Source selection for VCR recording Select Features Menu in the MENU Select EXT 2 OUTPUT source pressing or button Search for and store the test signal of the video recorder Unplug...

Page 7: ...nt DO be careful with glass panels or doors on equipment This TV is supplied with a fitted mains plug This plug must not be cut off as it may contain a special radio interference filter the removal of which could lead to impaired performance If you wish to extend the lead obtain an appropriate safety approved extension lead or consult your dealer Observe the manufacturers instructions when connect...

Page 8: ...be dangerous and do not place objects filled with liquids on top Avoid from drip ping or splashing 4 Cleaning Before cleaning unplug the receiver from the main sup ply outlet Do not use liquid or aerosol cleaners Use soft and dry cloth 5 Ventilation The slots and openings on the receiver are intended for ventilation and to ensure reliable operation To prevent overheating these openings must not be...

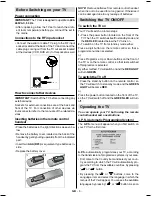
Page 9: ... on Your TV will switch on in two steps 1 Press the power button located on the front of the TV Then the TV switches itself to standby mode and the RED LED located below the TV turns on 2 To switch on the TV from stand by mode either Press a digit button on the remote control so that a programme number is selected or Press Programme Up or Down buttons on the front of the TV or on the remote contro...

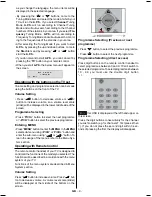
Page 10: ... Press P CH button to select the next programme or P CH button to select the previous programme Entering MENU Press MENU button to enter the MENU In the MENU select sub menu using P CH or P CH button and enter the sub menu using or button To learn the usage of the menus refer to the Menu Sys tem section Operating with Remote Control The remote control handset of your TV is designed to control all ...

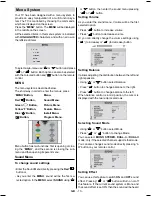
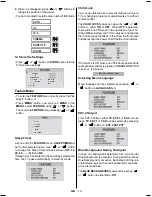
Page 11: ...directly pressing the Red button or As you enter the MENU sound will be the first se lected option In the MENU select SOUND using or button then enter the sound menu pressing or button Setting Volume As you enter the sound menu Volume will be the first selected option Press button to increase volume Press button to decrease volume Or you can directly change the volume settings using to increase or...

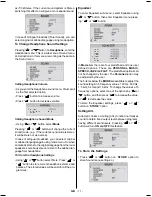
Page 12: ... to the dubbed lan guage from headphone To Store the Headphone Settings Using or button select Store Press or button to store current headphone volume and balance The stored values will be valid for all the pro grammes Equalizer To enter Equalizer sub menu select Equalizer using or button then enter Equalizer menu press ing or button 02 6725 3 5621 In Mode item there are four predefined and one us...

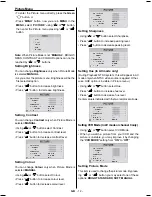
Page 13: ...ANUAL Using or button select Colour Press button to increase colour level Press button to decrease colour level 5 71 66 2175 67 2 2 85 6 531 66 3 785 02 2 2 85 7 03 220 0 18 1250 872 Setting Sharpness Using or button select Sharpness Press button to increase peaking level Press button to decrease peaking level 5 71 66 2175 67 2 2 85 6 531 66 3 785 02 2 2 85 7 03 220 0 18 1250 872 Setting Hue In AV...

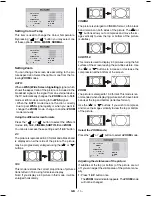
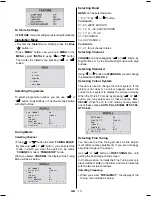
Page 14: ...picture may be progressively enlarged using the or buttons 16 9 This mode restores the correct proportions of pictures transmitted in 16 9 using full screen display Note If you display a 4 3 picture in thid mode it will be enlarged horizontally CINEMA The picture is enlarged to CINEMA format a thin black band remains on both sides of the picture The or buttons allow you to compress and move the im...

Page 15: ...ning on TV or changing programs or adjustments etc without remote control The CHILD LOCK feature can be set by or button to either ON or OFF When OFF is selected there will be no difference in the operation of your TV When ON is selected the TV can only be controlled by the remote control handset In this case the front panel buttons except the Power On Off button will not work If Child Lock is ON ...

Page 16: ...E 04 09 FRANCE 2 For band S 01 41 for all channel tables Selecting Channel CHANNEL can be changed by or button by Digit Buttons or by the Double Digit button with digit buttons Selecting Standard Using or button on STANDARD you can change the standard to BG DK L Selecting Colour System This item is used to change the colour system If the picture is not clear or no colour appears select the correct...

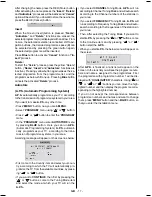
Page 17: ...C01 or S01 band and channel number as default At the bottom of the menu there is a programme sort functions section Each function is activated by color button NAME allows changing the programme name By DELETE you can delete programmes that you de cided INSERT section is for inserting programmes into another programme spaces By selecting AUTOSTORE section Autostore menu will be available To change ...

Page 18: ...r TV according to the trans mission of programme systems in your area A warning message will appear on the screen as below 35 6725 352 5 00 6 5 6 28175 781 1 02 217 18 8 11 1 First come to the Country item and select your coun try according to which the TV will automatically pro gramme the TV from the available countries by press ing or button If you want to CONTINUE then first by pressing the or ...

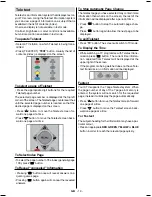
Page 19: ...cted by Remote Control Picture Mode The picture mode OSD is displayed below the sound indicator by TV Status OSD s According to the WSS data inside of the OSD box 4 3 16 9 CINEMA SUBTITLE ZOOM or AUTO is written By pressing 16 9 TXT_UPDATE button if Teletext is not active the picture mode can be switched into 4 3 16 9 CINEMA SUBTITLE ZOOM or AUTO Mode Mute Indicator It is placed in the upper middl...

Page 20: ...ressing button once will reveal answers on a quiz or games page Pressing button again will conceal the revealed answers To Stop Automatic Page Change The teletext page you have selected may contain more information than what is on the screen the rest of the information will be displayed after a period of time Press button to stop the automatic page chan ge Press button again to allow the next page...

Page 21: ...you pressed the correct buttons on the remote control Try once more Sound You can not hear any sound Did you perhaps interrupt the sound pressing button Are external speakers connected to the TV Sound is coming from only one of the speakers Is the balance set to one direction extreme See SOUND menu Remote Control Your TV no longer responds to the remote control Press the TV button on the remote co...

Page 22: ...2 487861 Tel 39 02 38073415 Servizio Clienti Fax 39 02 48786381 2 Email customerservice italy hitachi eu com HITACHI Europe AB Box 77 S 164 94 Kista SWEDEN Tel 46 0 8 562 711 00 Fax 46 0 8 562 711 13 Email csgswe hitachi eu com HITACHI EUROPE S A S Lyon Office B P 45 69671 BRON CEDEX FRANCE Tel 04 72 14 29 70 Fax 04 72 14 29 99 Email france consommateur hitachi eu com HITACHI EUROPE LTD Norway AB ...

Reviews: