


GB
- 16 -
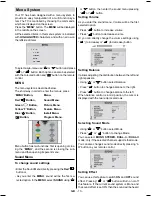
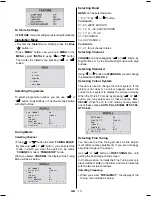
352*5$00(
781,1*02'(
67$1'$5'
&2/2856<67(0
)5(48(1&<
6($5&+
6725(
3
)5(48(1&<
%*
$872
The frequency value is,
040 - 900 MHz for band VHF1 - VHF3 - UHF.
FREQUENCY
can be changed by
or
button,
by the
Digit buttons
or by the
Double Digit button
with digit buttons.
The decimal value in frequency can not be changed by
the digit buttons, it can be changed only by the
or
button. The value can be 00, 25, 50 and 75.
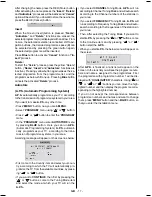
Selecting Search
To start the search process, press
button for for-
ward search or
button for backward search.
SEARCH
item bar blinks during search process, up to
the process is stopped or signal is found. To stop the
search process
or
button must be pressed
again.
To Store Settings
Press
or
button on
STORE
option to store
Install menu settings.
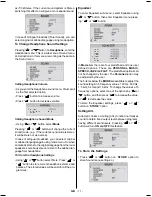
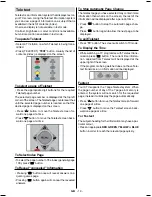
Program Menu
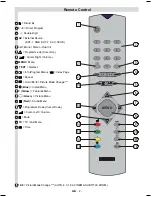
To enter Program menu directly, press the
i
button,
or
Press
MENU
button, now you are in
MENU
. In the
MENU
, select
PROGRAM
using or button.
Then enter the Program menu pressing
or
button.
6281'
3,&785(
)($785(
,167$//
352*5$0
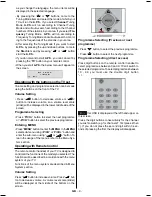
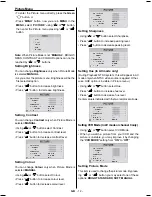
Moving cursor to four direction you can reach 30
programmes in the same page. By scrolling the pages
up or down by pressing the navigation buttons you can
select all the programmes in TV mode (except the AV
mode).
In menus, or buttons are working like "Direc-
tion Up" and "Direction Down".
By cursor action, programme selection is done auto-
matically. Selected programme is displayed with
HIGH-
LIGHTED
characters.
Programme Number is between 00 and 99. Programme
Name has a name string with 4 characters. After
autostore process the Programme Names are set to:
Frequency search "
PR01
" (programme number),
Channel search "
C01
" or "
S01
" (band and channel
number), as default.
At the bottom of the menu there is a programme sort
functions section. Each function is activated by color
button.
NAME
allows changing the programme name.
By
DELETE
you can delete programmes that you de-
cided.
INSERT
section is for inserting programmes into
another programme spaces. By selecting
AUTOSTORE
section, Autostore menu will be available.
To change the name of a decided programme, that
programme is selected and pressed to the
RED
button
(
NAME
). First letter of the selected
NAME
is displayed
with
HIGHLIGHTED
character. To change that letter
or button can be used, and to select the other
letters,
or
button can be used. If the cursor
is at the last letter of the Programme Name, pressing
button moves the cursor at the beginning. On the
contrary, if the cursor is at the beginning of the
Programme Name, pressing
button moves the cur-
sor at the end.
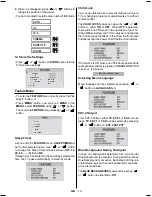
&
&
&
&
&
&
$8726725(
,16(57
'(/(7(
1$0(
At the bottom of the menu there is a programme sort
functions section. Each function is activated by coloured
button (seen above).
Name
allows changing the pro-
gramme name. By
Delete
you can delete programmes
that you do not require.
Insert
section is for inserting
programmes into another programme spaces. By se-
lecting
Autostore
section, Autostore menu will be avail-
able.
Name:
To change the name of a programme, select the
programme and then press the RED (Name) button. The
first letter begins to blink on the selected name. To
change that letter or button can be used, and
to select the other letters,
or
button can be
used. If the cursor is at the last letter of the Programme
Name, pressing
button moves the cursor at the
beginning. On the contrary, if the cursor is at the begin-
ning of the Programme Name, pressing
button
moves the cursor at the end.
01-2853WMAV-1244UK-ENG-ST7P-AK45-MULTI-PLL-FS-CLED-50052079.p65
13.07.2004, 11:04
16


