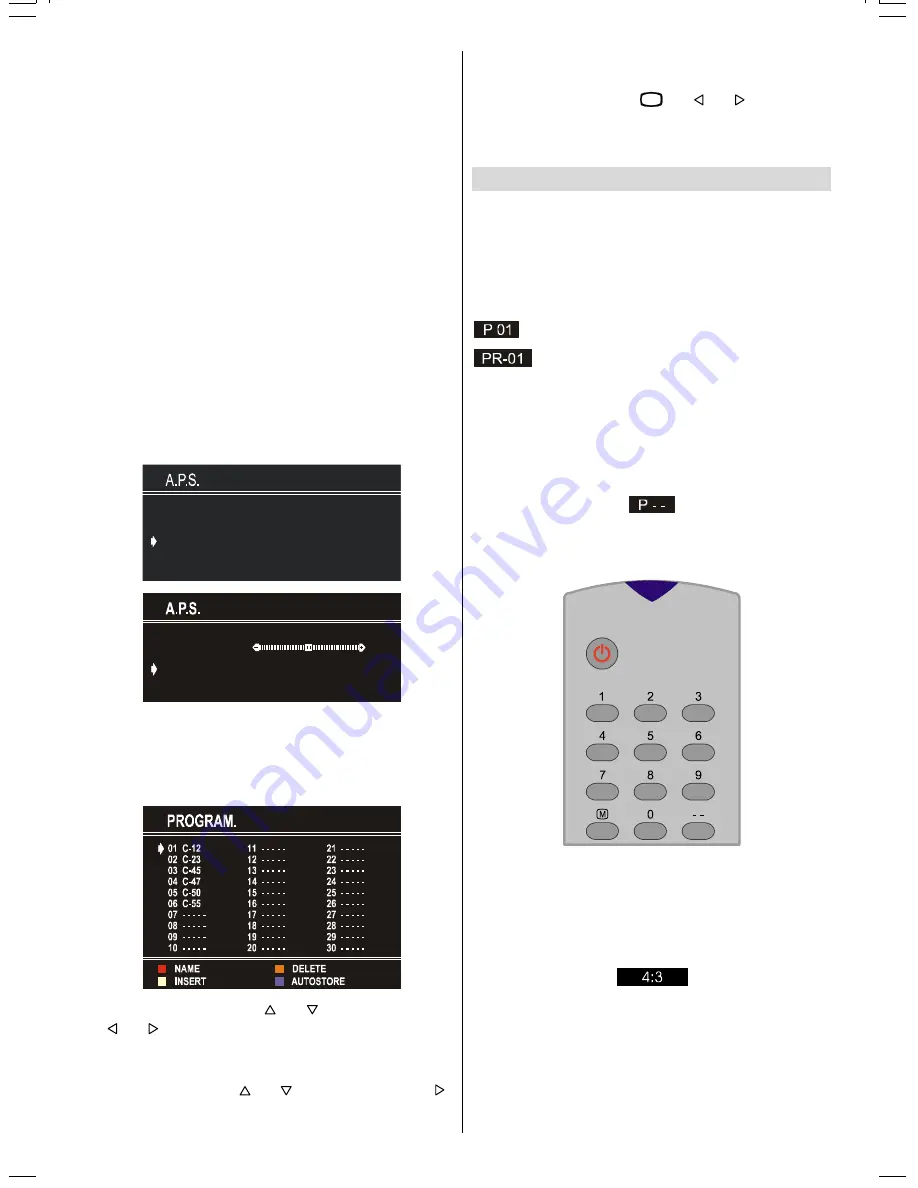
background image

GB   

- 12 -

When the 

GREEN

 button is pressed, “

NAME

”, “

AUTOSTORE

”

and “

DELETE

” functions are erased, the selected programme

(A) is displayed with green characters. From now on, the au-

tomatic selection is canceled. Cursors moves are indicated

with “

CYAN

” characters. With navigation buttons, the decided

program space (B) can be selected and by pressing the green

button again the programme will be inserted into that space.
All programmes below the inserted  programme will move

down by one number.
“

CANCEL

” function cancels the activated “

INSERT

” process.

For “

DELETE

” process press the yellow button, (“

NAME

”, “

IN-

SERT

” and “

AUTOSTORE

” functions are inactive). Pressing

yellow button again erases the selected programme from the

programme list, and the programmes below shift one up.

Pressing blue button cancels the activated “

DELETE

” process.

To enter Autostore menu, press to the blue button. To learn the

features of this function see “

A.P.S.

” below.

Autostore

(A.P.S. : Automatic Programming System)
A.P.S.

, searches and stores all channels automatically on your

TV, according to the transmission of programme systems in

your area.

3/($6(&+(&.$17(11$&$%/(

$872352*5$00,1*6<67(0

&28175<

67$1'$5'

67$57

8.

,

$36 ,6 5811,1*

3  &

&$1&(/

If you enter the 

A.P.S.

 menu, you can automatically programme

the received channels in your TV's programmes with 

A.P.S.

(Automatic programme system).
After displaying the 

PROGRAM

 menu, press 

BLUE

 button to

enter the 

A.P.S.

 menu.

• Select 

COUNTRY

 with the “ ” or “ ” button,then press the

“ ” or “ ” button to select the country you are now located.

• The “

STANDARD

” setting is fixed to “

I

”. You cannot change this

item's setting.

• Select 

START

 with the “ ” or “ ” button,then press the  “ ”

button to start 

A.P.S.

During 

A.P.S.

, “

A . P . S. IS RUNNING

” will be displayed. After

A.P.S.

 is finalized, the “

PROGRAM

” menu appears.

To cancel 

A.P.S.

, press the “

79

” or “ ” or “ ” button.

After Autostore is finalized, a programme list will apper on the

screen. In the programme list you will see the programme

numbers and names assigned to the programmes.

Other Features

TV Status

Programme Number

Programme Name (

or

 AV)

, (they are

displayed on the upper left of the screen) and 

Sleep Timer

(shows the time left on the upper right screen if enabled). In

stereo options the sound indicator is displayed with them too.

They are displayed after programme change for 3 seconds.

 Programme Number

 Programme Name (5 characters)

These OSD’s are displayed when a new programme is en-

tered by digit button, by pressing “

P+

“ or “

P-

” button, or by “

TV

”

button.

Double-digit (- -)

This OSD is displayed when the “Double-Digit” button pressed

in place of the programme number indicator.

After that, in order to enter a programme press two digits con-

secutively. Both digits must be entered within 3 seconds or the

function will disappear.

Picture Mode

If your TV has the WSS feature, the picture mode OSD is dis-

played below the sound indicator, by TV Status OSD’s. Accord-

ing to the WSS data, inside of the OSD box “4:3” or “16:9” or

“Auto” is written.

Sleep Timer Last Minute Indicator

It is displayed on the upper right of the screen. If sleep timer is

activated it is displayed with the TV status and erased with it

after 3 seconds.
If there is only one minute of the countdown left of the timer, it

is displayed automatically on the upper left of the screen, and

IB-ENG-(C2126S)-5586-AV-3040-AK30-MN1P-VST-BSI-5003XXXX.p65

26.08.2003, 14:38

12

Summary of Contents for C2126S

Page 1: ...GB Instructions for use C2126S ...

Page 2: ...nserting batteries in the remote control handset 7 Switching the TV ON OFF 7 To switch the TV on 7 To switch the TV off 7 Operating the TV 7 A P S Automatic Programming System 7 Operating with the buttons on the TV set 8 Operating with Remote Control 8 Menu System 8 Sound Menu 9 Picture Menu 9 Feature Menu 10 Install Menu 11 Programme Menu 11 Other Features 12 TV Status 12 Double digit 12 Picture ...

Page 3: ...igit V Volume P Programme Cursor Up Cursor Right Cursor Left OK OK No Function Cursor Down MUTE Mute AV External Source AV 1 F AV RGB TV TV Quit Menu TXT Teletext Red SOUND Sound Menu Green PICTURE Picture Menu Yellow FEATURE Feature Menu Blue INSTALL Installation Menu ...

Page 4: ...tion diagrams show the back of the TV where the different equipment should be connected 6 57 REARPANEL 17 11 WHUQDO DECODER FORSATELLITERECEIVER VIDEO HEADPHONE AUDIO CAMERA Power On Off VOLUME Volume VOLUME Volume PROG Program PROG Program H PHONE Headphone 3 6 mm Ø Front AV input AUDIO L Audio left white AUDIO R Audio right red VIDEO VCR yellow ...

Page 5: ...AV button TV and Video Recorder If your video recorder has a SCART socket please connect it to the TV using a SCART lead Your TV should also be con nected to your video recorder using the aerial RF output socket Please note using a SCART lead will produce better qualitiy pictures Playback of NTSC recordings This TV can display video recordings played back in the NTSC 4 43 mode Connect a VCR which ...

Page 6: ...ff as it may contain a special radio interference fil ter the removal of which could lead to impaired performance If you wish to extend the lead obtain an appropriate safety ap proved extension lead or consult your dealer Observe the manufacturers instructions when connecting ex tension leads to the TV Check the fuse rating on the new plug this should be fitted with a 5 Amp fuse which conforms to ...

Page 7: ...fied by the manufacturer or have the same specifications as the origi nal one Unauthorized substitutions may result in fire electri cal shock or other hazards 7 Servicing Please refer all servicing to qualified personnel Do not remove the back cover as this may result in an electric shock 8 X rays This television has sheilding for protection against the emis sion of X rays 9 Flame sources Do not p...

Page 8: ...witches itself to standby mode and the RED LED located below the TV turns on 2 To switch on the TV from stand by mode either Press a digit button on the remote control so that a programme number is selected or Press Programme Up or Down buttons on the front of the TV or on the remote control so that last switched off programme is selected In either case the TV will switch on and the RED LED will t...

Page 9: ...t programmes between 0 and 9 TV will switch to the selected programme To select programmes between 10 99 you must use the double digit button this OSD is displayed at the left hand upper on the screen After then press the digit buttons consecutively which programme you want to select eg for programme 27 first press 2 and then 7 When it is late to press any digit button this function will be ignore...

Page 10: ...nu To enter the Picture menu directly press the GREEN button or Press button now you are in Main menu In the Main menu select PICTURE using or button then en ter the Picture menu pressing or button Setting Brightness As you enter the picture menu Brightness will be the first selected option Press button to increase brightness Press button to decrease brightness 5 71 66 2175 67 2 285 6 531 66 02 67...

Page 11: ... all the programmes Feature Menu To enter the Feature menu directly press the YELLOW button or Press button now you are in Main menu In the Main menu select FEATURE using or button Then enter the Feature menu pressing or button Sleep Timer As you enter the Feature menu SLEEP TIMER will be the first selected option Use or button to change the Sleep Timer values between OFF 0 15 00 0 30 00 0 45 00 1...

Page 12: ...y Selected programme is displayed with CYAN characters In order to select programme is also possible by using digit or double digit button In this way programme selection is auto matic and after selection the selected programme is displayed with cyan characters The TV Status is changed by the pro gramme selection too When using double digit button in or der to select a programme the Programme Numb...

Page 13: ...etting is fixed to I You cannot change this item s setting Select START with the or button then press the button to start A P S During A P S A P S IS RUNNING will be displayed After A P S is finalized the PROGRAM menu appears To cancel A P S press the 79 or or button After Autostore is finalized a programme list will apper on the screen In the programme list you will see the programme numbers and ...

Page 14: ...r middle of the screen When a vol ume command is received pressing V or V by Remote Control or Front panel and no menu is active it stays on the screen for 3 seconds after the last volume command or until another command is received in between AV Modes By pressing the 9 button you can switch your TV to AV modes except being in Teletext Pressing this button con secutively will switch the TV in one ...

Page 15: ...are in doubt consult your dealer No Picture means that your TV is not receiving any transmis sion Have you pressed the correct keys on the remote control Try once more Sound You can not hear any sound Did you perhaps interrupt the sound pressing MUTE key Remote Control Your TV no longer responds to the remote control Press the TV button on the remote control once more Perhaps the bat teries are ex...

Page 16: ...intained or modified by any person other than an Hitachi authorised engineer iii The product serial number has not been removed or altered This guarantee does not apply to product acquired second hand or for commercial or communal use This guarantee does not cover the replacement of exhausted batteries the adjustment of user controls or aerial alignment Any parts replaced under this guarantee shal...

Page 17: ...47 Milano Italia ITALY Tel 39 02 487861 Tel 39 02 38073415 Servizio Clienti Fax 39 02 48786381 2 Email customerservice italy hitachi eu com HITACHI Europe AB Box 77 S 164 94 Kista SWEDEN Tel 46 0 8 562 711 00 Fax 46 0 8 562 711 13 Email csgswe hitachi eu com HITACHI EUROPE S A S Lyon Office B P 45 69671 BRON CEDEX FRANCE Tel 04 72 14 29 70 Fax 04 72 14 29 99 Email france consommateur hitachi eu co...

Reviews: