


--- 15 ---
[26]
[25]
[48]
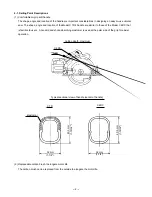
Put the internal wires into
the groove.
Put the internal wires into the groove.
[29]
Put the internal wires into the groove.
[39]
Put the internal wires into the groove.
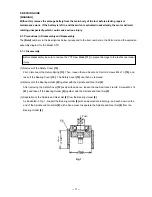
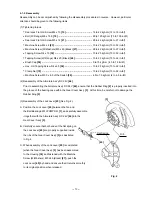
(8) Internal wire arrangement (See Figs. 6 and 7.)
Connect internal wires as illustrated in Figs. 6 and 7. At this time, ensure that none of the wires are pinched
between components during reassembly. Mount the Knob (off-lock lever) [37], Terminal (A) [36] and Spring
(F) [35] without fail.
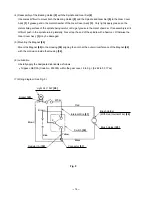
Fig. 7
[48]
[33]
[31]
[35]
[37]
[25]
[31]
[32]
[29]
[55]
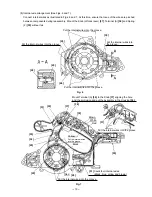
Caulk four internal wires.
(Black, blue, yellow and brown)
Put the internal wires into the groove.
Red
Black
Yellow
Fig. 6
[30]
Put the internal wires into the groove.
Mount Terminal (A) [36] to the Knob [37] aligning the hole
and the protrusion and put the assembly in the Housing [34].
Brown
[36]
White
Red
[51]
Put the internal wires
into the groove.
Summary of Contents for C 7D
Page 25: ......


