background image

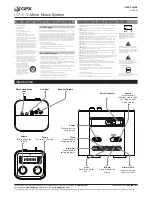
TV and Optional Component Set up

Required cords

Video connection wire for connecting a TV set(supplied)

Audio connection wire(Not included)
When connecting a wire,be sure to match the colour-coded
pins to the appropriate jacks on the components.

Note:

When using the S-VIDEO OUT jack instead of the VIDEO OUT jack for better picture clarity.

Your TV monitor must also be connected via a S-VIDEO INPUT jack.

When using the SCART OUT connector instead of the VIDEO OUT jack.

Your TV monitor must also be connected via a Scart socket.The Scart terminal contains separate
video signals and stereo audio signals.

You can connect the OPTICAL output to another amplifier with Dolby Digital decoder.

Do not connect the AC power socket
to the wall outlet before the system
connection is completed.

Connecting


the


AC


Power


Cord

Power Requirements: 

AC 230V,50Hz.

Note

Power that differs from above value will damage the system or cause the system to work abnormally.

Before connecting the AC power cord(main lead) of this system to a wall outlet,connect the speakers to the system.

Connect the AC power cords(main leads) of your TV,optional components to a wall outlet.

Yellow

Yellow

Red

White

Red

White

16

Summary of Contents for AXM628E

Page 1: ...nuel Deze intructies aandachtig doorlezen alvorens het toestel te gebuiken Leggere attentamente le istruzioni prima di usare l apparecchio Lesen Sie bitte vor Inbetriebsnahme diese Gebrauchsanweisung aufmerksam durch Pred pouzi tím si dokladone precitajte tieto pokyny Pred pouzi tím si prosim pec live prostudujte tyto pokyny DVD CD MICRO SYSTEM MICRO CHAINE CD DVD CD DVD MICRO SYSTEEM SISTEMA HI F...

Page 2: ......

Page 3: ......

Page 4: ......

Page 5: ......

Page 6: ...opening ...

Page 7: ...Do not cover any vents and make sure that there is a space of several centimetres around the unit for ventilation Index to Parts and Controls Features and scart output ...

Page 8: ......

Page 9: ......

Page 10: ......

Page 11: ......

Page 12: ......

Page 13: ......

Page 14: ......

Page 15: ......

Page 16: ...al R and connect the black wire to terminal R Avoid short circuiting your amplifier Please ensure that the bare and wires don t touch each other when connected to the speaker terminals as your system may be damaged Note Be sure to match the speaker cord to the appropriate terminal on the components to and to If the cords are reversed the sound will be distorted and will lack of bass If you use spe...

Page 17: ...lso be connected via a Scart socket The Scart terminal contains separate video signals and stereo audio signals You can connect the OPTICAL output to another amplifier with Dolby Digital decoder Do not connect the AC power socket to the wall outlet before the system connection is completed Connecting the AC Power Cord Power Requirements AC 230V 50Hz Note Power that differs from above value will da...

Page 18: ......

Page 19: ......

Page 20: ......

Page 21: ......

Page 22: ......

Page 23: ......

Page 24: ......

Page 25: ......

Page 26: ...ws the current track number and its elapsed playing time When all the tracks have been played the MP3 WMA CD CD stops and returns to the initial display 2 To stop play press STOP 3 To interrupt play press PLAY PAUSE 4 To resume play press PLAY PAUSE again PROGRAMMING TRACKS IN MP3 WMA CD CD MODE MP3 WMA CD CD Add To Program then select Program View select the programmed tracks which are to be dele...

Page 27: ...e remote control during normal slow or still pause playback 2 If you further press the ZOOM button repeatedly the magnification level increases The magnification levels are supported On each press of ZOOM the following message will appear on the TV screen 1 2 3 Note Some discs may not respond to the zoom feature Zooming does not work on subtitles or menu screens included on DVDs The magnification ...

Page 28: ...ve been shot simultaneously from a number of different angles For these discs the same scenes can viewed from each of the different angles The recorded angles differ from disc to disc 1 While playing a title shot from different angles the angle mark appears on the TV screen 2 Press the ANGLE button to change the scenes from one angle to other angle s Note The maximum number stipulated by the manuf...

Page 29: ...ecorded in multiple languages While playing a DVD disc press the SUBTITLE button repeatedly to select a desire language for subtitle The subtitle is displayed in a new language immediately Note The maximum number of subtitle languages stipulated by the manufacturers is 32 32 OSD selection OSD OSD 28 ...

Page 30: ......

Page 31: ......

Page 32: ...SCART out 3 31 Additional Information Troubleshooting Specifications ...

Page 33: ...Additional Information 32 In the unlikely event of a problem developing please contact the store where you purchased your set ...

Reviews: