background image

NL-3

Uit veiligheidsoverwegingen, haal geen deksels af en probeer niet om het product te openen. 
Raadpleeg hiervoor een bevoegde technicus.

Probeer niet om de schroeven los te maken of de behuizing van het apparaat te openen. Dit 
product bevat geen onderdelen die door de gebruiker kunnen worden gerepareerd, raadpleeg 

altijd een gekwalificeerde technicus.

OPGELET:

  OM HET RISICO OP ELEKTRISCHE SCHOKKEN TE BEPERKEN, OPEN 


HET DEKSEL (OF ACHTERZIJDE) NIET, BEVAT GEEN ONDERDELEN DIE 


DOOR DE GEBRUIKER GEREPAREERD KUNNEN WORDEN, LAAT 


ONDERHOUD DOOR GEKWALIFICEERDE TECHNICUS UITVOEREN

WAARSCHUWING:

  OM BRAND OF RISICO OP SCHOKKEN TE VERMIJDEN; STEL DIT 


APPARAAT NIET BLOOT AAN DRUPPELS OF SPATTEN.

Opmerking:

-  Dit apparaat wordt warm wanneer het gedurende een lange periode wordt gebruikt. Dit is 
  normaal en geeft geen storing van het apparaat aan.
-  Als het display of de bediening niet naar behoren werkt, schakel het apparaat uit en 
  vervolgens opnieuw in.
-  Het typeplaatje bevindt zich onderaan dit apparaat.
-  De labelinformatie bevindt zich onderaan het apparaat.

Laserproduct

Dit product is uitgerust met een laser van laag vermogen. Voor uw eigen veiligheid, verwijder 
geen  enkel  deksel  of  haal  het  product  niet  uit  elkaar.  Reparaties  mogen  alleen  door 

gekwalificeerd personeel worden uitgevoerd

GEVAARLIJKE SPANNING

Er  is  gevaarlijke  spanning  binnenin  dit  product  aanwezig,  deze  kan  voldoende  hoog 

zijn om een risico op elektrische schokken bij personen te veroorzaken.

OPGELET

De  gebruiksaanwijzing  bevat  belangrijke  gebruiks-  en  onderhoudsinstructies  voor  uw 

veiligheid. Het is nodig om deze gebruiksaanwijzing te raadplegen.

OPGELET

RISICO OP ELEKTRISCHE SCHOKKEN

NIET OPENEN

Waarschuwing:

Dit  product  is  uitgerust  met  een  inge-

bouwde laser van laag vermogen. Voor 

uw  veiligheid,  open  de  beveiligingen 

tegen laserstraling niet. Kijk niet in de 

laser wanneer het apparaat in werking 

is.

KLASSE 1

LASERPRODUCT

Downloaded from www.vandenborre.be

Summary of Contents for AXM549BT

Page 1: ...operating please read these instructions thoroughly Lisez attentivement cette notice d utilisation en totalité avant d utiliser le produit Voor gebruik lees deze gebruiksaanwijzing grondig door Prima di utilizzare il prodotto leggere attentamente le istruzioni Lea detenidamente estas instrucciones antes de utilizar el aparato Nežli začnete přístroj používat přečtěte si prosím pozorně tento návod P...

Page 2: ...D o w n l o a d e d f r o m w w w v a n d e n b o r r e b e ...

Page 3: ... to be placed on the equipment DON T place hot object or naked flame sources such as lighted candles or nightlights on or close to equipment High temperatures can melt plastic and lead to fires DON T use makeshift stands and NEVER fix legs with wood screws to ensure complete safety always fit the manufacturer s approved stand or legs with the fixings provided according to the instructions DON T us...

Page 4: ...l remain readily operable The product shall not be exposed to dirpping or splashing and that no objects filled with liquids such as vases shall be placed on the product To completely disconnect the power input the mains plug of apparatus shall be disconnected from the main Unplug the unit from the wall outlet before storms to prevent damage due to lightning and any power fluctuation When the stand...

Page 5: ...the unit again The rating label is located on the base of the unit The marking information is located at the bottom of apparatus Laser Product This product is equipped with low power laser equipment For your own safety do not remove any covers or take the product apart Repair work must be carried out by qualified personnel DANGEROUS VOLTAGE There is high voltage that may be of sufficient magnitude...

Page 6: ...you believe a cell has been swallowed Batteries battery pack or batteries installed shall not be exposed to excessive heat such as sunshine fire or the like CAUTION Danger of explosion if battery is incorrectly replaced Replace only with the same or equivalent type At full power prolonged listening to the player can damage the ear of the use WARNING To protect your hearing It is important that any...

Page 7: ...ven an explosion ALWAYS Removedead batteriesfromequipment and all batteries from equipment you know you are not going to use for a long time Otherwise the batteriesmay leak and cause damage NEVER Never dispose of batteries in fire as this can cause them to explode Please recycle dead batteries do not put with the normal household waste NEVER Never attempt to recharge ordinary batteries either in a...

Page 8: ...itching ON OFF 15 Switching the system to ECO Power Standby mode 15 Setting the Clock 15 Setting the Clock Manually 15 Setting the Clock Automatically 16 Display the Clock 16 Sound Quality 16 Adjusting the Volume 16 Adjusting the Super Bass 16 Controlling the Loudness 16 Presetting Equalizer 16 Changing the Front Panel Darkness 16 Listening to Radio Broadcasts 17 Tuning in to a Station 17 Program ...

Page 9: ...h or Search and Play 20 To Select Album 20 Playing Repeatedly MP3 disc 20 Use the USB 21 Play from Bluetooth device 22 Setting the Sleep Timer 22 Setting the Daily on Timer 23 Specifications 23 Disc Handling 24 Handling Precautions 24 If the surface is soiled B 24 Improper disc storage 24 Troubleshooting 25 D o w n l o a d e d f r o m w w w v a n d e n b o r r e b e ...

Page 10: ...ke sure all of the following contents are included Speakers x 2 Remote Control battery included The Unit AC Adaptor Instruction Manual Speaker leads x2 FM Antenna D o w n l o a d e d f r o m w w w v a n d e n b o r r e b e ...
Page 11: ...utton L 7 Loudness Button LOUDNESS 8 USB Jack 9 Remote Sensor 10 LCD Display Lens 11 Volume Control Knob 12 Next Button G Preset Up Button G 13 Previous Button H Preset Down Button H 14 Mode Button MODE 15 Speaker Output Terminals L R 16 DC Jack 17 AUX Input Terminals L R AUX IN 18 FM Antenna Socket 19 Bluetooth Antenna D o w n l o a d e d f r o m w w w v a n d e n b o r r e b e ...
Page 12: ...lbum Up Button ALB 14 Album Down Button ALB 15 Mute Button MUTE 16 Number Button 0 9 10 17 Open Close Button K 18 USB Function Button 19 Bluetooth Function Button AUX Function Button AUX 20 Repeat A B Button A B 21 Dimmer Button DIM 22 Super Bass Button S BASS 23 Sleep Button SLEEP 24 Timer Button TIMER 25 CD Display Button DISPLAY RDS Display Button DISPLAY 26 Search Forward Button C Tuning Forwa...

Page 13: ...be used for an extended period of time To avoid possible failure read the following instructions and handle the remote control properly Do not drop or cause impact to the remote control Do not spill water or any liquid on the remote control Do not place the remote control on a wet object Do not place the remote control under the direct sunlight or near sources of excessive heat Do not use caustic ...

Page 14: ...e brightness of the room Note Make sure that there is no obstacle between the infrared remote sensor of the unit and remote control If you install the unit on rack etc the remote controllable range may decrease depending on the thickness or colour of glass door of rack Do not expose the infrared remote sensor to direct sunlight or other strong light such as inverter fluorescent light D o w n l o a...

Page 15: ...s 1 The speaker wires between CD player and speaker are to be connected first 2 After the above cables are correctly connected the AC power cord can then be connected to power outlet Caution i Reversing the steps by connecting the AC power cord first will cause malfunction of the unit ii During operation if the control cable requires to be reconnected the AC power supply must be disconnected first...

Page 16: ...cting Auxiliary Equipment Connect the AUX Input terminals on the rear of the unit to the line output terminals on the auxil iary equipment with an audio cable not supplied illustrated below 2 If reception is poor connect the outside antenna Note Before attaching a 75 ohm coaxial lead the kind with a round wire going to an outside antenna disconnect the supplied FM wire antenna 1 Connect the suppli...

Page 17: ...andby ECO Power standby mode The clock will not be displayed Press the CLOCK button to display the clock on the LCD Normal standby mode The clock display on the LCD Setting the Clock Setting the Clock Manually Caution You can set the clock in standby mode only 1 In standby mode press and hold the clock button CLOCK the VFD will display CLOCK SET and CLOCK 24 begins to blink 2 Set the 12 24 hour fo...

Page 18: ...s button S BASS again to cancel the effect Controlling the Loudness This unit has a loudness function which can automatically increase the bass sound effect at low volume It can also increase the bass sound effect at high volume but it will be relatively less when it is at high volume Press the loudness button LOUDNESS to obtain the loudness function the will display on the front panel press again...

Page 19: ...desired preset number Its band and frequency are displayed on the front panel Program radio stations You can program a maximum of 20 preset radio stations FM Automatically Press and hold the programme button PROG on the remote control for two second or more to activate automatic program mode AUTO is displayed All available stations are programmed The first programmed radio station is broadcast aut...

Page 20: ... current station e g 95 30MHz CD Operation CD Playing 1 Repeatedly press the function select button FUNCTION on the unit or directly press the CD function button on the remote control to select the disc source The word DISC will be displayed on the front panel 2 Press the open close button K to open the disc door and place the disc on the disc tray with the printed side up 3 Press the open close b...

Page 21: ...the BF button to start programme play 7 Press the L button once to stop the programme play Press the L button twice to clear programme Playing the Beginning Intro of each Track Press the intro button INTRO on the remote control to play the beginning of each track consecutively The playing time of each track is 10 seconds When you hear the desired track press the BF button twice Playing Repeatedly ...

Page 22: ... control ID3 information song title and artist will be displayed or NO ID3 if there is no ID3 information Press this button again album track and playing time will be displayed To Skip Search or Search and Play Press the H G button to select the previous next track Press and hold the D C button on the remote control to search for the position that you intend to start playing To Select Album Press ...

Page 23: ...button FUNCTION on the unit or directly press the USB function button on the remote control to select the USB source The word USB will be displayed on the front panel 3 The device s stored music will be played automatically 4 When you store more than one folder in the USB flash use the ALB button on the remote control to select the next previous folder Then choose the track with the H G button to ...

Page 24: ...sable the function from your Bluetooth device Note If the signal strength is weak your Bluetooth receiver may disconnect but it will re enter pairing mode automatically This unit supports A2DP Advanced Audio Distribution Profile Setting the Sleep Timer Use the sleep timer to turn the unit off after a certain number of minutes when in play mode By setting the sleep timer you can fall asleep to musi...

Page 25: ...th the VOL button 7 Press the TIMER button the volume indicator will blink 8 Adjust volume with the VOL button 9 Press the TIMER button the timer is set and activated and is displayed To deactivate or re activate an alarm timer In standby mode press the TIMER button to activate or deactivate timer If timer is activated is displayed If timer is deactivated is disappeared Caution If disc USB source ...

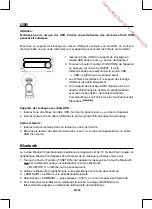
Page 26: ...ure to store the disc in its exclusive case when not in use If the surface is soiled B Wipe gently with a soft damp water only cloth When wiping discs always move the cloth from the center hole toward the outer edge If you wipe the discs using a circular motion circular scratches are likely to occur which will cause noise If the disc is brought from a cold to a warm environment moisture may form o...

Page 27: ...il the moisture condensation at the lens has cleared Replace or clean the disc Use a finalized CD or correct format disc Cannot display some files in USB device The number of folders or files in the USB device has exceeded a certain limit This phenomenon is not a malfunction The formats of these filesare not supported USB device not supported The USB device is incompatible with the unit Try anothe...

Page 28: ...for battery disposal Your unit contains batteries covered by the European Directive 2006 66 EC which cannot be disposed of with normal household waste Please inform yourself about the local rules on separate collection of batteries The correct disposal of batteries helps prevent potentially negative consequences on the environment and human health In the unlikely event of a problem developing plea...

Page 29: ... peut provoquer la surchauffe de l appareil et réduire sa durée de vie N EXPOSEZ PAS les appareils électriques à des gouttes ou des éclaboussures NE PLACEZ AUCUN récipient contenant un liquide par exemple un vase sur l appareil NE PLACEZ PAS d objet chaud ni de source de flamme vive par exemple une bougie allumée ou une veilleuse sur ou près de l appareil Les températures élevées peuvent faire fon...

Page 30: ...teur électrique Sur un autre appareil stéréo dégageant beaucoup de chaleur Dans un endroit poussiéreux ou insuffisamment aéré Dans un endroit constamment soumis à des vibrations Dans un endroit mouillé ou humide N obstruez jamais les orifices de ventilation de l appareil Vérifiez que le cordon d alimentation est correctement installé avant d allumer l appareil pour la première fois La fiche du cor...

Page 31: ...TRIQUE N ESSAYEZ PAS DE DÉMONTER LE BOÎTIER OU LE CAPOT ARRIÈRE DE L APPAREIL L APPAREIL NE CONTIENT AUCUNE PIÈCE RÉPARABLE PAR L UTILISATEUR TOUTES LES RÉPARATIONS DOIVENT ÊTRE CONFIÉES À UN RÉPARATEUR QUALIFIÉ AVERTISSEMENT POUR VOUS PRÉMUNIR CONTRE LES RISQUES D INCENDIE OU DE CHOC ÉLECTRIQUE VEILLEZ À CE QUE CET APPAREIL NE SOIT JAMAIS EXPOSÉ À DES ÉCLABOUSSURES OU À DES GOUTTES Remarque Cet a...

Page 32: ...la télécommande Demandez conseil à un médecin si vous pensez qu une pile a été avalée Les piles ou blocs piles ne doivent pas être exposées à une chaleur excessive lumière du soleil feu etc ATTENTION Danger d explosion si les piles sont incorrectement remplacées Ne remplacer que par le même type ou un type équivalent Attention Cet appareil est équipé d un laser à basse puissance Pour votre sécurit...

Page 33: ...on Retirez toujours les piles usagées de l appareil et retirez toutes les piles de l appareil avant toute période d inutilisation prolongée Sinon elles peuvent fuir et provoquer des dégâts matériels Ne jetez jamais les piles dans un feu car elles risquent d exploser Recyclez les piles usagées Ne les jetez pas avec les ordures ménagères classiques N essayez jamais de recharger des piles ordinaires ...

Page 34: ...nomie d énergie 15 Allumer éteindre l appareil 15 Mettre l appareil en veille mode économie d énergie 15 Régler l horloge 15 Réglage manuel de l horloge 15 Réglage automatique de l horloge 16 Afficher l heure 16 Régler le son 16 Régler le volume 16 Régler le renforcement des basses 16 Compensation sonore 16 Égaliseur 16 Modifier la luminosité de l affichage du panneau avant 17 Écouter la radio 17 ...

Page 35: ...age 21 Sélectionner un album 21 Répéter la lecture Disque MP3 21 USB 22 Bluetooth 22 Régler le délai d extinction automatique 23 Régler le délai d allumage automatique 23 Spécifications 24 Manipulation des disques 25 Précautions d utilisation 25 Si la surface d un disque est sale B 25 Rangement incorrect des disques 25 Dépannage 26 D o w n l o a d e d f r o m w w w v a n d e n b o r r e b e ...

Page 36: ...e l emballage contient toutes les pièces suivantes Enceintes x 2 Télécommande pile fournie Unité principale Adaptateur secteur Notice d utilisation Câbles d enceintes x 2 Antenne FM D o w n l o a d e d f r o m w w w v a n d e n b o r r e b e ...
Page 37: ...7 Compensation sonore LOUDNESS 8 Port USB 9 Capteur infrarouge 10 Écran LCD 11 Bouton de réglage du volume 12 Suivant G Station préréglée suivante G 13 Précédent H Station préréglée précédente H 14 Mode MODE 15 Sorties audio pour enceintes G et D 16 Prise d alimentation DC 17 Entrées AUX G et D AUX IN 18 Prise d antenne FM 19 Antenne Bluetooth D o w n l o a d e d f r o m w w w v a n d e n b o r r ...

Page 38: ...re Pause BF 13 Album Suivant ALB 14 Album Précédent ALB 15 Sourdine MUTE 16 Touches numériques 0 9 10 17 Bouton Ouvrir Fermer K 18 USB 19 Bluetooth AUX AUX 20 Répétition A B A B 21 Luminosité DIM 22 Super basses S BASS 23 Dormir SLEEP 24 Minuterie TIMER 25 Affichage CD DISPLAY Affichage RDS DISPLAY 26 Avance rapide C Monter la fréquence radio C 27 Touche Stop L Couplage PAIRING 28 Monter le volume...

Page 39: ...es et utilisez la télécommande correctement Veillez à ce que la télécommande ne tombe pas et ne subisse pas de choc Veillez à ne jamais renverser d eau ni aucun autre liquide sur la télécommande Ne posez pas la télécommande sur un objet mouillé N exposez pas la télécommande à la lumière directe du soleil et ne la placez pas à proximité d une source de chaleur excessive N utilisez pas de produit ca...

Page 40: ...ez qu il n y a aucun d obstacle entre le capteur infrarouge de l appareil et la télécommande Si l appareil est installé dans un meuble la portée de la télécommande peut être réduite en fonction de l épaisseur ou de la couleur de la porte en verre du meuble N exposez pas le capteur infrarouge à la lumière directe du soleil ni à une source lumineuse puissante par exemple un tube fluorescent Capteur ...

Page 41: ...es câbles correctement branchés vous pouvez brancher le cordon d alimentation dans une prise secteur Attention i N inversez pas les étapes en branchant d abord le cordon d alimentation dans une prise secteur car cela peut provoquer le dysfonctionnement de l appareil ii S il est nécessaire de rebrancher le câble de commande quand l appareil est en fonctionnement débranchez d abord son cordon d alim...

Page 42: ...t du cordon d alimentation Brancher une source audio auxiliaire Avec un câble audio non fourni branchez les entrées AUX au dos de l appareil aux sorties audio d une source audio auxiliaire comme montré ci dessous 2 Si la réception est mauvaise branchez une antenne d extérieur Remarque Avant de brancher un câble coaxial de 75 ohms pourvu d un fil rond de données relié à une antenne externe débranch...

Page 43: ...s pour basculer dans le mode veille économie d énergie ou veille normale Mode veille économie d énergie L heure n est pas affichée Appuyez sur la touche Horloge CLOCK pour afficher l heure à l écran Mode veille normale L heure est affichée Régler l horloge Réglage manuel de l horloge Attention L horloge ne peut être réglée que dans le mode veille 1 Dans le mode veille maintenez la touche Horloge C...

Page 44: ... pouvez renforcer les basses pour qu elles soient pleines et riches même à volume réduit Appuyez sur la touche Super Basses S BASS de la télécommande pour activer cette fonction s affiche sur le panneau avant Appuyez à nouveau sur la touche Super Basses S BASS pour désactiver cette fonction Compensation sonore Cet appareil intègre une fonction permettant d augmenter automatiquement les graves lors...

Page 45: ... ou de la télécommande D C la fréquence baisse ou monte automatique ment jusqu à ce qu une station soit trouvée Syntonisation Manuelle Appuyez plusieurs fois sur la touche Baisser Monter la Fréquence L BF de l appareil ou de la télécommande D C pour modifier la fréquence jusqu à trouver la station de radio désirée Stations préréglées disponible uniquement si au moins une station de radio a été pré...

Page 46: ...ODE de la télécommande pour sélectionner le mode Stéréo ou Mono afin d optimiser la réception de la FM RDS Radio Data System De nombreuses stations de radio FM diffusent des données compatibles avec le système RDS Radio Data System Votre appareil vous permet d utiliser ces données Appuyez plusieurs fois sur la touche Affichage DISPLAY de la télécommande pour afficher les informations suivantes Nom...

Page 47: ...er un passage Pour rechercher un passage précis dans une piste maintenez la touche Retour rapide D ou Avance rapide C de la télécommande appuyée Afficher les informations de lecture Appuyez plusieurs fois sur la touche Affichage DISPLAY de la télécommande pour afficher le numéro et la durée de lecture restante de la piste en cours de lecture le numéro et la durée de lecture écoulée de la piste en ...

Page 48: ... Troisième pression Désactiver la répétition A B n est plus affiché Remarque La fonction de répétition A B ne permet de répéter la lecture que d un passage interne à un fichier Disques MP3 WMA Remarque La lecture de fichiers MP3 WMA enregistrés sur un disque peut être affectée par le type et le format du disque ou la qualité d enregistrement Si vous n arrivez pas à lire correctement un disque nous...

Page 49: ...isque MP3 Appuyez plusieurs fois sur la touche MODE pour sélectionner l un des modes de répétition UN ou TOUT Première pression Répéter la lecture d un fichier TRK et REP clignotent Deuxième pression Répéter la lecture des fichiers dans un ordre aléatoire TRK est affiché en continu et REP ALB clignote Troisième pression Répéter la lecture de tous les fichiers du disque TRK est af fiché en continu ...

Page 50: ...s fiches du câble USB non fourni dans le port au dos de l appareil 2 Insérez l autre fiche du câble USB dans le port de sortie USB du support de stockage Cartes mémoire 1 Insérez la carte mémoire dans un lecteur de carte non fourni 2 Branchez le lecteur de carte mémoire dans le port au dos de l appareil avec un câble USB non fourni Bluetooth La portée Bluetooth opérationnelle maximale de l apparei...

Page 51: ...che Quand cette fonction est désactivée n est pas affichée Régler le délai d allumage automatique Vous pouvez paramétrer l appareil pour qu il s allume automatiquement tous les jours à la même heure s il est en veille Quand l allumage automatique est activé l icône est affichée Cette fonction ne peut fonctionner correctement que si l horloge a été correctement réglée 1 Dans le mode veille appuyez ...

Page 52: ...eut être lu la radio est activée automatiquement Spécifications Adaptateur secteur entrée CA 100 240 V 50 60 Hz 1 2 A Adaptateur secteur sortie CC 15 V 3 A Plage de réception FM 87 5 108 MHz Puissance absorbée 35 W Puissance de sortie 25 W x 2 Taux de distorsion harmonique 1 Impédance des enceintes 4 Ω Puissance d entrée des enceintes 25 W Dimensions Unité principale 222 L x 90 H x 255 P mm Encein...

Page 53: ...ns leur boîtier individuel après usage Si la surface d un disque est sale B Essuyez la délicatement avec un chiffon doux et légèrement humidifié avec de l eau uniquement Lors du nettoyage des disques essuyez les toujours depuis leur trou central vers leur bord extérieur Si vous les essuyez avec des mouvements circulaires vous risquez de provoquer des rayures circulaires qui généreront des distorsi...

Page 54: ...indications de polarité Changez les piles Dirigez la télécommande vers le capteur infrarouge frontal de l unité principale Aucun disque n est détecté Insérez un disque Vérifiez que la face imprimée du disque est positionnée vers le haut Attendez que la condensation présente sur la lentille du lecteur s évapore Nettoyez ou changez le disque Utilisez un disque finalisé ou dont le format est compatib...

Page 55: ...irective européenne 2006 66 CE prescrit que les piles contenues dans votre appareil ne doivent pas être jetées avec les ordures ménagères classiques Prenez connaissance des réglementations locales relatives à la collecte séparée des piles La mise au rebut appropriée des piles aide à prévenir des conséquences potentiellement néfastes pour l environnement et la santé humaine Dans l éventualité impro...

Page 56: ...D o w n l o a d e d f r o m w w w v a n d e n b o r r e b e ...
Page 57: ...els of spatten of plaats geen voorwerpen met vloeistof zoals een vaas op het apparaat Plaats GEEN hete voorwerpen of voorwerpen met een open vlam zoals een aangestoken kaars of nachtlamp op of in de buurt van het apparaat Hoge temperaturen kunnen het plastic doen smelten en brand veroorzaken Gebruik GEEN tijdelijke standaards en maak NOOIT poten met houten schroeven vast om een volledige veilighei...

Page 58: ...er in te schakelen zorg dat het snoer juist is geïnstalleerd De stekker directe plug in adapter wordt gebruikt om het apparaat van de stroom los te koppelen en deze moet steeds makkelijk bereikbaar zijn Stel het apparaat niet bloot aan gedruppel of gespetter en plaats geen voorwerpen gevuld met vloeistoffen zoals vazen op het apparaat Om het apparaat volledig van de stroom los te koppelen haal de ...

Page 59: ...ar behoren werkt schakel het apparaat uit en vervolgens opnieuw in Het typeplaatje bevindt zich onderaan dit apparaat De labelinformatie bevindt zich onderaan het apparaat Laserproduct Dit product is uitgerust met een laser van laag vermogen Voor uw eigen veiligheid verwijder geen enkel deksel of haal het product niet uit elkaar Reparaties mogen alleen door gekwalificeerd personeel worden uitgevoe...

Page 60: ...f geïnstalleerde batterijen nooit bloot aan overmatige warmte zoals zonlicht vuur enz OPGELET Er is ontploffingsgevaar als de batterij op een verkeerde manier wordt geplaatst Vervang de batterij altijd door een batterij van hetzelfde of een gelijkwaardig type Een langdurige blootstelling aan een hoog volume met gebruik van een kop of oortelefoon kan het gehoor van de gebruiker beschadigen WAARSCHU...

Page 61: ...len tot brand of ontploffing Haal gebruikte batterijen uit het apparaat Haal alle batterijen uit het apparaat als u deze gedurende een lange periode niet zult gebruiken Zo niet kunnen de batterijen lekken en schade veroorzaken Gooi batterijen nooit in vuur deze kunnen ontploffen Recycle gebruikte batterijen Gooi deze niet met het gewone huishoudelijk afval weg Probeer niet om gewone batterijen op ...

Page 62: ...15 ECO stroom stand byfuncties 15 In uitschakelen 15 Het systeem op de ECO stroom stand bymodus instellen 15 De klok instellen 15 De klok handmatig instellen 15 De klok automatisch instellen 16 De klok weergeven 16 Geluidskwaliteit 16 Het volume regelen 16 De superbas regelen 16 De geluidssterkte regelen 16 De equalizer vooraf instellen 16 Naar radio uitzendingen luisteren 17 Op een radiostation a...

Page 63: ...len 21 Album selecteren 21 Herhaald afspelen MP3 disc 21 De USB gebruiken 22 Vanaf Bluetooth apparaat afspelen 23 De slaaptimer instellen 23 De dagelijkse timer instellen 24 Specificaties 24 Discs hanteren 25 Voorzorgsmaatregelen bij gebruik 25 Als het oppervlak vuil is B 25 Verkeerde opslag van discs 25 Probleemoplossing 26 D o w n l o a d e d f r o m w w w v a n d e n b o r r e b e ...
Page 64: ... de volgende onderdelen in de verpakking aanwezig zijn Luidsprekers x 2 Afstandsbediening batterij meegeleverd Het apparaat AC adapter Gebruiksaanwijzing Luidsprekerkabels x2 FM antenne D o w n l o a d e d f r o m w w w v a n d e n b o r r e b e ...
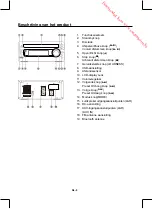
Page 65: ...dssterkte knop LOUDNESS 8 USB aansluiting 9 Afstandssensor 10 LCD display Lens 11 Volumeregelaar 12 Volgende knop G Preset Omhoog knop G 13 Vorige knop H Preset Omlaag knop H 14 Modus knop MODE 15 Luidspreker uitgangsaansluitpunten L R 16 DC aansluiting 17 AUX ingangsaansluitpunten L R AUX IN 18 FM antenne aansluiting 19 Bluetooth antenne D o w n l o a d e d f r o m w w w v a n d e n b o r r e b e...

Page 66: ...uze knop BF 13 Album omhoog knop ALB 14 Album omlaag knop ALB 15 Demping knop MUTE 16 Cijfer knop 0 9 10 17 Open Dicht knop K 18 USB functieknop 19 CD functieknop AUX functieknop AUX 20 A B herhalen knop A B 21 Dimmer knop DIM 22 Superbas knop S BASS 23 Slaap knop SLEEP 24 Timer knop TIMER 25 CD displayknop DISPLAY RDS displayknop DISPLAY 26 Snel doorspoelen knop C Vooruit afstemmen knop C 27 Stop...

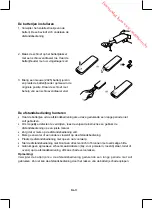
Page 67: ...e defecten te vermijden lees de volgende instructies en gebruik de afstandsbediening op een juiste manier Zorg dat er niets op de afstandsbediening valt Mors geen water of een andere vloeistof op de afstandsbediening Plaats de afstandsbediening niet op een nat voorwerp Stel de afstandsbediening niet bloot aan direct zonlicht of bronnen met overmatige hitte Gebruik geen agressieve schoonmaakmiddele...

Page 68: ...e kamer Opmerking Zorg dat er zich geen obstakel tussen de infrarood afstandssensor van het apparaat en de afstandsbediening bevindt Als u het apparaat in een kast enz installeert is het mogelijk dat het werkingsbereik afneemt door de dikte of kleur van de glazen deur van de kast Stel de infrarood afstandssensor niet bloot aan direct zonlicht of ander fel licht zoals TL verlichting Afstandssensor ...

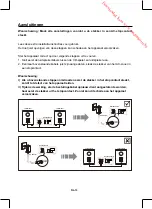
Page 69: ...bovenstaande kabels juist zijn aangesloten steek de stekker van het AC snoer in een stopcontact Waarschuwing i Als u bovenstaande stappen omdraait en eerst de stekker in het stopcontact steekt zal dit tot defect van het apparaat leiden ii Tijdens de werking als de besturingskabel opnieuw dient aangesloten te worden haal eerst de stekker uit het stopcontact Zo niet kan dit schade aan het apparaat v...

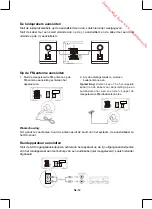
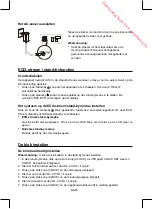
Page 70: ...andapparatuur aansluiten Sluit de AUX ingangsaansluitpunten achteraan het apparaat op de lijn uitgangsaansluitpunten van het randapparaat aan met behulp van een audiokabel niet meegeleverd zoals hieronder afgebeeld 2 Als de ontvangst zwak is sluit een buitenantenne aan Opmerking Alvorens een 75 ohm coaxiale kabel ronde kabel voor aansluiting op een buitenantenne aan te sluiten koppel de meegelever...

Page 71: ...en houd de stand by knop gedurende minstens 2 seconden ingedrukt om naar ECO Stroom stand by of Normaal stand by te schakelen ECO stroom stand bymodus De klok wordt niet weergeven Druk op de CLOCK knop om de klok op de LCD weer te geven Normale stand by modus De klok wordt op de LCD weergegeven De klok instellen De klok handmatig instellen Waarschuwing U kunt de klok alleen in de stand bymodus ins...

Page 72: ...ogen om een rijke volle bas op een laag volume te krijgen Druk op de superbas knop S BASS op de afstandsbediening om het baseffect te krijgen brandt op het frontpaneel Druk nogmaals op de superbas knop S BASS om het effect te annuleren De geluidssterkte regelen Dit apparaat is voorzien van een geluidssterktefunctie deze verhoogt automatisch het basgeluideffect bij een laag volume Deze kan tevens h...

Page 73: ...ing gedurende minstens één sec onde ingedrukt en de frequentie gaat automatisch omlaag of omhoog totdat een radiostation wordt gevonden Handmatig afstemmen Druk herhaaldelijk op de achteruit vooruit afstemmen knop L BF op het apparaat of de achteruit vooruit afstemmen knop D C op de afstandsbediening om de frequentie te wijzigen totdat u de gewenste radiostation hebt gevonden Op voorkeurstations a...

Page 74: ...aal te selecteren zodat u de best mogelijke FM ontvangst krijgt RDS Radio Data System ontvangst Vele FM stations zenden extra gegevens uit die met RDS Radio Data System compatibel zijn Deze radio biedt comfortabele functies om dergelijke gegevens te gebruiken Druk herhaaldelijk op de RDS display knop DISPLAY op de afstandsbediening om volgende weergegeven informatie te selecteren Naam van radiosta...

Page 75: ...afstandsbediening ingedrukt om naar de gewenste startpositie voor afspelen te gaan Tekstweergave tijdens het afspelen Druk herhaaldelijk op de Display knop DISPLAY op de afstandsbediening om het nummer en de resterende tijd van de huidige track het nummer en de verstreken tijd van de huidige track of het totaal aantal tracknummers en de totaal resterende tijd weer te geven Programma afspelen U kun...

Page 76: ...eïnvloed door het type en formaat van de disc of de opnamekwaliteit Als u problemen ondervindt bij het afspelen van een bepaalde disc is het aanbevolen om de USB ingang te gebruiken voor de beste afspeelkwaliteit van MP3 WMA 1 Druk herhaaldelijk op de de functie keuzeknop FUNCTION op het apparaat of druk direct op de CD functieknop op de afstandsbediening om de discbron te selecteren Het woord DIS...

Page 77: ...lfde track te herhalen de woorden TRK en REP knipperen Tweede druk Om het album willekeurig af te spelen het woord TRK blijft branden en REP ALB knippert Derde druk Om alle tracks op een disc herhaaldelijk af te spelen het woord TRK blijft branden en REP ALL knippert Vierde druk Om tracks willekeurig af te spelen het woord TRK blijft branden en SHUF knippert Vijfde druk Om het herhaald afspelen te...

Page 78: ...dt op het frontpaneel weergegeven 3 De muziek die op het USB toestel opgeslagen is wordt automatisch afgespeeld 4 Als er meerdere mappen op de USB flash opgeslagen zijn gebruik de ALB knop op de afstandsbediening om naar de volgende vorige map te gaan Kies vervolgens de track met de H G knop om de map af te spelen Voor apparatuur met een USB kabel 1 Breng een uiteinde van de USB kabel niet meegele...

Page 79: ...ooth apparaat uit Opmerking 1 Als de signaalsterkte zwak is is het mogelijk dat uw Bluetooth ontvanger losgekoppeld wordt de koppelingsmodus wordt echter automatisch opnieuw geopend 2 Dit apparaat ondersteunt A2DP Advanced Audio Distribution Profile De slaaptimer instellen Gebruik de slaaptimer om het apparaat na een bepaald aantal minuten in de afspeelmodus uit te schakelen Door de slaaptimer in ...

Page 80: ... 7 Druk op de TIMER knop en de volume indicator knippert 8 Regel het volume met de VOL button 9 Druk op de TIMER knop de timer wordt ingesteld en ingeschakeld en wordt weergegeven Om een alarmtimer uit te schakelen of opnieuw in te schakelen In de stand bymodus druk op de TIMER knop om de timer in of uit te schakelen wordt weergegeven als de timer ingeschakeld is verdwijnt als de timer uitgeschake...

Page 81: ...ijn doosje op wanneer niet in gebruik Als het oppervlak vuil is B Veeg voorzichtig met een zacht vochtige alleen water doek Tijdens het afvegen van de disc beweeg het doek altijd vanaf het middelste gat naar de buitenrand Als u de disc in cirkelvormige bewegingen afveegt kunnen cirkelvormige krassen ontstaan die geruis kunnen veroorzaken Condensatie op de disc kan zich vormen als de disc vanaf een...

Page 82: ...en de afstandsbediening en het apparaat Breng de batterij volgens de juiste polariteit teken zoals aangegeven in Vervang de batterijen Richt de afstandsbediening rechtstreeks naar de sensor vooraan het apparaat Geen disc gedetecteerd Plaats een disc Controleer of de disc met de bedrukte zijde omhoog ingebracht is Wacht totdat de condensatie op de lens verdwenen is Vervang of reinig de disc Gebruik...

Page 83: ...t batterijen die onder de Europese Richtlijn 2006 66 EC vallen die niet met het gewone huishoudelijk afval mogen worden weggegooid Vraag uw gemeente naar advies over hoe batterijen op een juiste manier weg te gooien De juiste verwijdering van batterijen vermijdt een mogelijke negatieve impact op het milieu en de menselijke gezondheid In het onwaarschijnlijke geval dat er zich een probleem voordoet...

Page 84: ...D o w n l o a d e d f r o m w w w v a n d e n b o r r e b e ...
Page 85: ...ome candele o luci notturne accanto o sopra l apparecchio Le alte temperature possono fondere la plastica e provocare incendi Non utilizzare supporti di fortuna e non fissare MAI le gambe con viti per legno Per garantire la massima sicurezza utilizzare sempre i supporti approvati dal costruttore e montare le gambe con i fissaggi forniti insieme al prodotto seguendo le istruzioni Non utilizzare app...

Page 86: ...scollegare l apparecchio dalla rete elettrica e deve essere facilmente accessibile Non appoggiare oggetti contenenti liquidi ad esempio vasi sopra gli apparecchi elettrici e non esporli a gocce o spruzzi Per scollegare completamente l apparecchio dalla rete elettrica è necessario scollegare il cavo di alimentazione dalla presa di corrente Scollegare l apparecchio dalla presa di corrente durante i ...

Page 87: ...chio L etichetta informativa è posizionata sulla base dell unità La marcatura è riportata sul lato inferiore dell apparecchio Prodotto laser Il prodotto è dotato di sistema laser a bassa potenza Per la propria sicurezza non rimuovere alcun coperchio né smontare il prodotto La riparazione deve essere effettuata da personale qualificato TENSIONE PERICOLOSA Presenza di alta tensione di potenza tale d...

Page 88: ...e contattare un medico Non esporre le batterie installate o confezionate a calore eccessivo ad esempio luce solare diretta fiamme libere o simili ATTENZIONE Se installate erroneamente le batterie possono esplodere Sostituire le batterie esauste con batterie di tipo identico o equivalente L ascolto prolungato del walkman a volume massimo può causare danni all udito AVVERTENZA per proteggere l udito...

Page 89: ...u s t e dall apparecchio In caso di inutilizzo prolungato dell apparecchio rimuovere le batterie In caso contrario le batterie potrebbero subire perdite e danneggiare l apparecchio Non gettare le batterie nel fuoco per evitare il rischio di esplosioni Riciclare le batterie esauste non gettarle insieme ai normali rifiuti domestici Non tentare in alcun caso di ricaricare le batterie normali né con c...

Page 90: ... Standby 15 Accensione e spegnimento 15 Attivazione modalità ECO Power Standby 15 Orologio 15 Impostazione manuale dell orologio 15 Impostazione automatica dell orologio 16 Visualizzazione dell orologio 16 Qualità del suono 16 Regolazione del volume 16 Funzione Super Bass 16 Funzione Loudness 16 Equalizzatori predefiniti 16 Retroilluminazione del display 17 Funzionamento della radio 17 Ricerca di ...

Page 91: ...e le tracce e ricerca 21 Selezione di un album 21 Riproduzione ripetuta dischi MP3 21 Lettura di dispositivi USB 22 Lettura di dispositivi Bluetooth 23 Funzione Spegnimento automatico 23 Funzione Sveglia 24 Specifiche tecniche 24 Manipolazione dei dischi 25 Precauzioni durante la manipolazione 25 Se la superficie è sporca B 25 Conservazione scorretta dei dischi 25 Risoluzione dei problemi 26 D o w...

Page 92: ...ficare che la confezione contenga quanto segue Altoparlanti x 2 Telecomando batteria inclusa Unità principale Adattatore CA Manuale di istruzioni Cavo altoparlanti x 2 FM Antenn D o w n l o a d e d f r o m w w w v a n d e n b o r r e b e ...
Page 93: ...Loudness LOUDNESS 8 Ingresso USB 9 Sensore telecomando 10 Display LCD 11 Manopola Controllo volume 12 Pulsante Successivo G Pulsante Preimpostato su G 13 Pulsante Precedente H Pulsante Preimpostato giù H 14 Modalità MODE 15 Terminali di uscita degli altoparlanti L R 16 Ingresso alimentazione 17 Terminali di ingresso AUX L R AUX IN 18 Presa antenna FM 19 Antenna Bluetooth D o w n l o a d e d f r o ...

Page 94: ...ulsante Riproduci Pausa BF 13 Album su ALB 14 Album Giù ALB 15 Mute MUTE 16 Numeri 0 9 10 17 Apri Chiudi K 18 Funzione USB 19 Funzione Bluetooth Funzione AUX AUX 20 Ripeti A B A B 21 Dimmer DIM 22 Super Bass S BASS 23 Spegnimento automatico SLEEP 24 Timer TIMER 25 Display CD DISPLAY Display RDS DISPLAY 26 Avanti veloce C Sintonizzazione avanti C 27 Pulsante Stop L Appaiamento cancellato PAIRING 28...

Page 95: ...ato Per evitare possibili guasti leggere le seguenti istruzioni e maneggiare il telecomando con cura Evitare che il telecomando subisca urti o cadute Non versare acqua o liquidi sul telecomando Non posizionare il telecomando su un oggetto bagnato Non esporre il telecomando alla luce solare diretta o a fonti di calore eccessivo Non usare detergenti caustici prodotti per la pulizia di porcellana acc...

Page 96: ...rarsi che non siano presenti ostacoli fra il sensore a infrarossi dell unità e il telecomando Se si installa l unità su un rack o simili la portata del telecomando potrebbe ridursi in base allo spessore o al colore dello sportello di vetro del rack Non esporre il sensore a infrarossi alla luce solare diretta o ad altre fonti di illuminazione intensa ad esempio alle luci fluorescenti di un invertit...

Page 97: ... il cavo di controllo 2 A procedura ultimata collegare il cavo di alimentazione alla presa di corrente Attenzione i Invertire i passaggi sopraccitati collegando prima il cavo di alimentazione causerà il malfunzionamento dell unità ii Se durante il funzionamento è necessario ricollegare il cavo di controllo scollegare preliminarmente il cavo di alimentazione In caso contrario l unità potrebbe subir...

Page 98: ...mentazione Collegamento di dispositivi ausiliari Collegare un cavo audio non fornito ai terminali di ingresso AUX sul retro dell apparecchio e ai terminali di uscita dell apparecchio ausiliario come mostrato in figura 2 Se la ricezione è scarsa collegare all antenna esterna Nota prima di collegare un cavo coassiale da 75 ohm cavo circolare collegato a un antenna esterna scollegare l antenna FM cab...

Page 99: ...Standby normale alla modalità Standby ECO Power e viceversa Modalità Standby ECO Power L orologio non è visualizzato Premere il pulsante Orologio CLOCK per visualizzare l orologio sul display Modalità Standby normale L orologio è visualizzato sul display Orologio Impostazione manuale dell orologio Attenzione L orologio può essere impostato solo in modalità Standby 1 In modalità Standby tenere prem...

Page 100: ...ul telecomando Funzione Super Bass È possibile intensificare i bassi per garantirne la riproduzione chiara e nitida anche a basso volume Premere il pulsante Super Bass S BASS sul telecomando per attivare la funzione Super Bass Sul pannello frontale si accenderà Premere nuovamente il pulsante Super Bass S BASS per disattivare la funzione Funzione Loudness L unità è dotata di una funzione di sonorit...

Page 101: ...anti L BF sull unità o sul teleco mando D C per almeno un secondo la frequenza diminuirà o aumenterà fino al rileva mento di una stazione Sintonizzazione manuale Premere ripetutamente il pulsante Sintonizzazione indietro avanti L BF sull unità o sul telecomando D C per modificare la frequenza fino al rilevamento della stazione desid erata Stazioni preimpostate se presenti Premere ripetutamente il ...

Page 102: ... il canale Stereo o Mono e ottimizzare la modalità di ricezione FM Ricezione RDS Radio Data System Molte stazioni FM trasmettono dati aggiuntivi compatibili con il sistema RDS Radio Data System Questa impostazione radio mette a disposizione pratiche funzioni per l uso di tali dati Premere ripetutamente il pulsante Display DISPLAY sul telecomando per selezionare le informazioni visualizzate come se...

Page 103: ...Avanti rapido C sul telecomando per cercare la posizione dalla quale avviare la riproduzione Visualizzazione del testo durante la riproduzione Premere ripetutamente il pulsante Display DISPLAY sul telecomando per visualizzare il numero della traccia corrente e il tempo di riproduzione rimanente il numero della traccia corrente e il tempo trascorso o il numero complessivo delle tracce e il tempo to...

Page 104: ...a pressione consente di selezionare il punto di termine Sul display A B rimarrà accesa Terza pressione consente di annullare la riproduzione ripetuta Dal display scom parirà A B Nota la funzione di ripetizione A B può essere utilizzata solo all interno della stessa traccia Lettura di dischi MP3 WMA Nota La riproduzione di brani musicali MP3 WMA da CD potrebbe essere influenzata dal tipo e dal form...

Page 105: ...nare l album successivo precedente Riproduzione ripetuta dischi MP3 Premendo il pulsante Modalità MODE è possibile ripetere la riproduzione di una traccia o di tutte le tracce Prima pressione consente di ripetere la stessa traccia Sul display lampeggeranno TRK e REP Seconda pressione consente ripetere l album Sul display TRK rimarrà accesa men tre REP ALB lampeggerà Terza pressione consente di rip...

Page 106: ...a parola USB 3 La musica memorizzata sul dispositivo verrà riprodotta automaticamente 4 Se la musica memorizzata sul dispositivo Flash USB è archiviata in più cartelle usare il pulsante Album su giù ALB sul telecomando per selezionare la cartella successiva precedente Quindi selezionare la traccia con il pulsante Precedente Successivo H G per riprodurre la cartella Per dispositivi dotati di cavo U...

Page 107: ...ooth Nota Se il segnale è debole il ricevitore Bluetooth potrebbe scollegarsi ma rientrerà in modalità di appaiamento automaticamente Questa unità supporta il profilo A2DP Advanced Audio Distribution Profile Funzione Spegnimento automatico Usare questa funzione per spegnere l unità dopo un determinato numero di minuti in modalità di riproduzione Impostando il timer è possibile sospendere la musica...

Page 108: ...te VOL 7 Premere il pulsante TIMER finché l indicatore del volume non lampeggia 8 Regolare il volume con il pulsante VOL 9 Premere il pulsante TIMER La sveglia è impostata e attivata ed è visualizzato il simbolo Disattivare o riattivare la sveglia In modalità Standby premere il pulsante TIMER per attivare o disattivare la sveglia Se la sveglia è attivata sul display appare Se la sveglia è disattiv...

Page 109: ...o inutilizzato nella sua custodia Se la superficie è sporca B Strofinare delicatamente con un panno morbido inumidito esclusivamente con acqua Durante la pulizia muovere sempre il panno dal foro centrale al bordo esterno Strofinando con un movimento circolare è possibile apportare graffi circolari sulla superficie con conseguente deterioramento della qualità di riproduzione Se il disco viene spost...

Page 110: ... le polarità segni allineate come indicato Sostituire la batteria Puntare il telecomando direttamente verso il sensore sulla parte anteriore dell unità Nessun disco rilevato Inserire un disco Verificare che il disco sia inserito con il lato stampato rivolto verso l alto Attendere fino alla scomparsa della condensa da umidità formatasi sulla lente Sostituire o pulire il disco Usare un CD finalizzat...

Page 111: ...erie di questo apparecchio non devono essere smaltite insieme ai normali rifiuti domestici come previsto dalla Direttiva Europea 2006 66 EC Per lo smaltimento seguire tutte le normative vigenti in materia di raccolta differenziata dei rifiuti Il corretto smaltimento delle batterie aiuta ad evitare conseguenze potenzialmente negative per l ambiente e la salute pubblica Se si dovesse verificare un p...

Page 112: ...D o w n l o a d e d f r o m w w w v a n d e n b o r r e b e ...
Page 113: ... su vida útil NO permita que el equipo eléctrico quede expuesto a goteos o salpicaduras ni coloque objetos llenos de líquido tales como jarrones de flores encima del equipo NO coloque objetos calientes ni objetos con llamas como velas o lamparillas encima del equipo o cerca del mismo Las altas temperaturas podrían derretir el plástico y provocar incendios NO use soportes improvisados y NUNCA fije ...

Page 114: ...á instalado adecuadamente Cuando el enchufe o adaptador de alimentación se utilice como dispositivo de desconexión deberá ser fácilmente accesible en todomomento Este productono deberá exponerse a goteos o salpicaduras ni se deberán colocar objetos llenos de líquidos tales como jarrones encima del producto Para desconectar totalmente la unidad de la alimentación eléctrica deberá desenchufarlo de l...

Page 115: ...ela unidad y enciéndala de nuevo La etiqueta de especificaciones técnicas está ubicada en la base de la unidad Las marcas de información están ubicadas en la parte inferior del aparato Producto Láser Este producto está equipado con un equipo láser de baja potencia Por su seguridad no retire ninguna de las cubiertas ni extraiga el producto Las tareas de reparación sólo deberán ser realizadas por pe...

Page 116: ...l calor excesivo de la luz directa del sol el fuego o fuentes similares PRECAUCIÓN Peligro de explosión si las pilas no se instalan correctamente Sustituya las pilas únicamente por otras del mismo tipo o equivalente A pleno volumen la escucha prolongada del reproductor portátil puede dañar la capacidad auditiva del usuario ADVERTENCIA Para proteger su capacidad auditiva tenga en cuenta lo siguient...

Page 117: ...tire las pilas del aparato cuando estén gastadas y también cuando no piense utilizarlo durante un período prolongado De lo contrario las pilas podrían presentar fugas de ácido y causar daños en el aparato No deseche nunca las pilas arrojándolas al fuego ya que podrían explotar Recicle las pilas agotadas No las deseche junto con los desperdicios domésticos No intente recargar nunca pilas de tipo es...

Page 118: ... espera y ECO Power 15 Encendido y apagado 15 Cambio del sistema al modo en espera ECO Power 15 Ajuste del reloj 16 Ajuste manual del reloj 16 Ajuste automático del reloj 16 Visualización del reloj 16 Calidad de sonido 16 Ajuste del volumen 16 Ajuste de los supergraves 16 Control de la sonoridad 17 Preajuste del ecualizador 17 Cambio de la luminosidad del panel frontal 17 Cómo escuchar la radio 17...

Page 119: ...roducción repetida discos MP3 21 Utilización del USB 22 Reproducción de un dispositivo Bluetooth 23 Ajuste del temporizador de apagado automático 23 Ajuste del temporizador de encendido diario 24 Especificaciones 24 Manipulación de discos 25 Precauciones de manipulación 25 Si la superficie está sucia B 25 Almacenamiento inadecuado de los discos 25 Resolución de problemas 26 D o w n l o a d e d f r...

Page 120: ...de que se que incluya lo siguiente Altavoces x 2 Mando a distancia pilas incluidas La unidad Adaptador de alimentación CA Manual de instrucciones Cables de altavoces x2 Antena FM D o w n l o a d e d f r o m w w w v a n d e n b o r r e b e ...

Page 121: ...otón de sonoridad LOUDNESS 8 Conector USB 9 Sensor de la señal del mando a distancia 10 Pantalla LCD 11 Mando de control del volumen 12 Botón Siguiente G Botón de presintonía siguiente G 13 Botón Anterior H Botón de presintonía anterior H 14 Botón de modo MODE 15 Terminales de salida de altavoces I D 16 Toma de alimentación CC 17 Tomas de entrada de AUX I D AUX IN 18 Toma de la antena FM 19 Antena...

Page 122: ... de álbum siguiente ALB 14 Botón de álbum anterior ALB 15 Botón de enmudecedor MUTE 16 Botones numéricos 0 9 10 17 Botón de apertura cierre K 18 Botón de USB 19 Botón de Bluetooth Botón de AUX AUX 20 Botón de repetición A B A B 21 Botón atenuador DIM 22 Botón de supergraves S BASS 23 Botón de apagado programado SLEEP 24 Botón de alarma TIMER 25 Botón de información del CD DISPLAY Botón de informac...

Page 123: ...ara evitar posibles fallos lea las siguientes instrucciones y utilice el mando adistancia correctamente No deje que el mando a distancia se caiga ni que reciba algún impacto No derrame agua ni ningún otro líquido sobre el mando a distancia No coloque el mando a distancia sobre objetos mojados No coloque el mando a distancia bajo la luz directa del sol ni cerca de fuentes de calor excesivo No emple...

Page 124: ...Asegúrese de que no haya obstáculos entre el sensor remoto de infrarrojos de la unidad y el mando a distancia Si instala la unidad en una estantería o un lugar similar el alcance del mando a distancia podría reducirse en función del grosor o el color de la puerta de cristal del estante No exponga el sensor remoto de infrarrojos a la luz directa del sol o a otra fuente de luz intensa como pueda ser...

Page 125: ...rectamente los cables podrá conectar el cable de alimentación a la toma de corriente Precaución i Si se invierten los pasos y se conecta en primer lugar el cable de alimentación se podría producir un fallo de funcionamientode la unidad ii Durante el uso de la unidad si fuera necesario volver a conectar el cable de control deberá desconectarse enprimer lugar la alimentación eléctrica De lo contrari...

Page 126: ...ión del equipo externo Conecte las tomas de AUX IN de la parte trasera de la unidad a las tomas de LINE OUT del equipo auxiliar mediante un cable de audio no suministrado como se muestra en la ilustración 2 En caso de una mala recepción conecte la antena exterior Nota Antes de conectar un cable coaxial de 75 ohmios el tipo con un hilo redondo que va a una antena exterior desconecte la antena de al...

Page 127: ...era Pulse el botón de modo en espera para encender la unidad La pantalla mostrará la palabra HELLO Pulse de nuevo el botón de espera para que la unidad vuelva al modo de espera La pantalla mostrarálas palabras BYE BYE en la pantalla Cambio del sistema al modo en espera ECO Power Mantenga pulsado el botónde espera durante 2 segundos o más para cambiar entre el modo de espera ECO Power y el modo de ...

Page 128: ...ad saldrá del modo de ajuste del reloj automáticamente Si se produce un corte eléctrico o se desconecta la alimentación de la red la hora del reloj seperderá Ajuste automático del reloj Sintonice la emisora RDS y mantenga pulsado el botón DISPLAY El reloj se actualizará automáticamente Visualización del reloj En cualquiera de los modos el reloj de la unidad mostrará la hora en la pantalla pulsando...

Page 129: ...oj Pulse repetidamente el botón atenuador DIM del panel frontal o del mando a distancia para ajustar el brillo de la pantalla Cómo escuchar la radio Precaución Antes de escuchar la radio compruebe que la antena FM está conectada correctamente y que la longitud y la dirección son las correctas Sintonización de una emisora 1 Gire el selector de función FUNCTION de la unidad o pulse el botón de funci...

Page 130: ...iona más de 20 el número de presintonía cambiará a 1 automáticamente 4 Pulse el botón de programa PROG del mando a distancia de nuevo para memorizar la emisora 5 Repita los pasos anteriores del 1 al 4 para cada emisora que desee memorizar con su número correspondiente de presintonía Nota Si se desenchufa el sistema o se produce un fallo de alimentación las emisoras presintonizadas no seborrarán Có...

Page 131: ...l disco y lo reproducirá automáticamente Nota Si se encuentra en modo parado pulse el botón de reproducción pausa BF para iniciar la reproducción del disco 4 Pulse el botón de reproducción pausa BF para detener temporalmente la reproducción y púlselo de nuevo para reanudar la reproducción 5 Pulse el botón de parada L para detener la reproducción del disco Búsqueda de canciones y reproducción Pulse...

Page 132: ...l inicio de cada canción en orden Se reproducirán los primeros 10 segundos de cada canción Pulse el botón BF dos veces cuando escuchar la canción completa del previo que se esté reproduciendo Reproducción repetida discos de CD La reproducción repetida ONE una y ALL todas se puede establecer pulsando el botón MODE Pulse una vez La canción se repetirá una vez TRK y REP parpadearán Pulse dos veces Se...

Page 133: ...o durante la reproducción Pulse el botón DISPLAY del mando a distancia para mostrar la información ID3 título de la canción y artista La pantalla mostrará NO ID3 si dicha información no está disponible Pulse de nuevo este botón para mostrar el álbum la canción y el tiempo de reproducción Búsqueda de canciones o de un punto de una canción Pulse el botón H G para seleccionar la canción anterior o si...

Page 134: ...r la música almacenada en el dispositivo a través de la unidad 1 Inserte el conector USB del dispositivo USB al puerto de la parte posterior de la unidad 2 Gire el selector de función FUNCTION de la unidad o pulse el botón de USB del mando a distanciapara seleccionar la fuente USB La pantalla mostrará USB en el panel frontal 3 La música almacenada en el dispositivo se reproducirá automáticamente 4...

Page 135: ...verá a anclarseautomáticamente Esta unidad es compatible con A2DP Perfil de Distribución Avanzado de Audio Ajuste del temporizador de apagado automático Utilice el temporizador de apagado automático para apagar la unidad transcurrido un tiempo determinado cuando se encuentre en el modo de reproducción Al ajustar el temporizador de apagado automático podrá quedarse dormido escuchando música sabiend...

Page 136: ...el botón TIMER el indicador del volumen parpadeará 8 Ajuste el volumen con los botones VOL 9 Pulse el botón TIMER una vez más para que quede activado aparecerá mostrado en la pantalla Para desactivar o volver a activar un temporizador de alarma En el modo de espera pulse el botón TIMER para activar o desactivar el temporizador La pantalla mostrará si el temporizador está activado La pantalla mostr...

Page 137: ...en su estuche cuando no se encuentre en uso Si la superficie está sucia B Limpie el disco con cuidado utilizando un paño suave y húmedo únicamente con agua Cuando limpie discos desplace siempre el paño desde el orificio central hacia el borde exterior Si limpia los discos con un movimiento circular es probable que se produzcan arañazos circulares loque causará ruido Si el disco pasa de manera repe...

Page 138: ...l mando a distancia y la unidad Inserte las pilas con sus polos signos en el sentido correcto indicado Cambie las pilas Apunte el mando a distancia en dirección al sensor frontal de la unidad No se detecta ningún disco Inserte un disco Compruebe si el disco está insertado con la cara impresa hacia dentro Espere hasta que haya disipado la condensación de la lente Sustituya o limpie el disco Utilice...

Page 139: ...que están cubiertas por la Directiva europea 2006 66 CE la cual estipula que no pueden ser desechadas junto con la basura doméstica Por favor infórmese acerca de las normativas locales sobre la recogida selectiva de las pilas La eliminación apropiada de las pilas ayudará a prevenir las posibles consecuencias negativas en el medio ambiente y en la salud humana En el caso improbable de que se produz...

Page 140: ...D o w n l o a d e d f r o m w w w v a n d e n b o r r e b e ...

Page 141: ...eho blízkosti horké předměty a zdroje otevřeného ohně jako např zapálené svíčky nebo noční svítidla Vysoké teploty mohou roztavit plast a způsobit požár NEPOUŽÍVEJTE provizorní stojany ani NEPŘIPEVŇUJTE nohy vruty má li být zajištěna naprostá bezpečnost montujte výrobcem schválený stojan nebo nohy pomocí fixačních šroubů a řiďte se návodem NEPOUŽÍVEJTE přístroje jako např stereofonní aparaturu neb...

Page 142: ...řístupné Přístroj nesmí být vystaven kapající nebo stříkající tekutině a nesmí na něj být pokládány předměty obsahujícítekutiny jako např vázy Chcete li přístroj zcela odpojit od přívodu elektřiny vytáhněte zástrčku ze sítě Přístroj takto vypínejte vždy před bouřkou aby nedošlo k poškození bleskem a výkyvy elektřiny Nesvítí li kontrolka pohotovostního režimu ani světelný indikátor znamená to že sp...

Page 143: ... tlačítek přístroj vypněte a potéjej opět zapněte Typový štítek se nachází na spodní části přístroje Informace o značení jsou umístěny na spodní straně přístroje Laserový produkt Tento produkt je vybaven laserem nízkého výkonu V zájmu vašeho bezpečí neodstraňujte žádné kryty a produkt nerozebírejte Opravy musí být provedeny kvalifikovaným personálem NEBEZPEČNÉ NAPĚTÍ Elektrické napětí uvnitř příst...

Page 144: ...spolknutí baterie vyhledejte lékaře Baterie bateriová balení nebo instalované baterie nesmí být vystaveny nadměrnému teplu jako např slunečnímu záření ohni a pod POZOR Při nesprávné výměně baterie hrozí nebezpečí výbuchu Používejte pouze baterie stejného nebo odpovídajícího typu Na plný výkon může dlouhý poslech poškodit sluch uživatele UPOZORNĚNÍ pro ochranu sluchu Je důležité aby jakékoliv sluch...

Page 145: ...mních případech i požáru či explozi Vybité baterie vyjměte z přístroje Nebudete li jej dlouho používat vyjměte všechny baterie V opačném může dojít k vytékání elektrolytu a následným škodám Neházejte baterie do ohně Mohlo by dojít k výbuchu Vybité baterie nepatří do běžného domovního odpadu ale do speciálních nádob na odpad určený k recyklaci Nepokoušejte se nabíjet běžné baterie ať už pomocí nabí...

Page 146: ...í systému do EKO napájení Pohotovostního režimu 15 Nastavení času 15 Manuální nastavení času 15 Automatické nastavení času 16 Zobrazení času 16 Kvalita zvuku 16 Nastavení hlasitosti 16 Nastavení Super Bass 16 Nastavení hlučnosti 16 Nastavení ekvalizéru 16 Změna jasu předního panelu 16 Poslech rozhlasového vysílání 17 Ladění stanice 17 Programování rozhlasových stanic 17 Změna režimu příjmu FM 18 P...

Page 147: ... přehrávání 20 Volba alba 20 Opakované přehrávání MP3 disk 21 Použití USB 21 Přehrávání z Bluetooth zařízení 22 Nastavení načasovaného vypnutí 22 Nastavení časového spínače 23 Specifikace 23 Kompatibilní CD disky 23 Zacházení s diskem 24 Opatření při manipulaci 24 Dojde li k ušpinění povrchu B 24 Nesprávné skladování disku 24 Řešení problémů 25 D o w n l o a d e d f r o m w w w v a n d e n b o r r...

Page 148: ...e že balení obsahuje tyto části Reproduktory x 2 Dálkové ovládání baterie jsou součástí balení Přístroj Napájecí adaptér Návod k obsluze Kabely reproduktorů x2 FM anténa D o w n l o a d e d f r o m w w w v a n d e n b o r r e b e ...

Page 149: ...or 9 Čidlo dálkového ovládání 10 Čočka displeje 11 Otočný regulátor pro ovládání hlasitosti 12 Tlačítko další G Tlačítko přednastavení nahoru G 13 Tlačítko předchozí H Tlačítko přednastavení dolů H 14 Tlačítko režim MODE 15 Výstupní koncovky pro připojení reproduktoru L R levá a pravá 16 Zdířka pro stejnosměrný proud 17 AUX zdířky pro přídatná zařízení levá pravá AUX IN 18 Zdířka FM antény 19 Blue...

Page 150: ...nahoru ALB 14 Tlačítko album dolů ALB 15 Tlačítko ztlumení MUTE 16 Číselná tlačítka 0 9 10 17 Tlačítko otevřít zavřít K 18 Tlačítko funkce USB 19 Tlačítko funkce Bluetooth Tlačítko funkce AUX AUX 20 Tlačítko opakování A B A B 21 Tlačítko pro nastavení jasu DIM 22 Tlačítko Super Bass S BASS 23 Tlačítko uspání systému SLEEP 24 Tlačítko časovač TIMER 25 Tlačítko CD displej DISPLAY Tlačítko RDS disple...

Page 151: ...ím přečtěte si tento návod ařádně s dálkovým ovládáním zacházejte Dálkový ovladač chraňte před spadnutím a nárazy Dálkový ovladač nepotřísněte vodou ani jinou kapalinou Dálkový ovladač nepokládejte na vlhké či mokré předměty Dálkový ovladač nevystavujte přímému slunečnímu záření ani jej nepokládejte do blízkosti zdroje nadměrného tepla K čištění dálkového ovládání nepoužívejte žíravé čisticí prost...

Page 152: ...a Ujistěte se že mezi infračerveným dálkovým čidlem jednotky a dálkovým ovladačem není žádná překážka Instalujete li jednotku do racku může se vzdálenost pro dálkové ovládání snížit v závislosti na tloušťce a barvě skla dveří racku Nevystavujte infračervené dálkové čidlo přímému slunečnímu svitu nebo silnému světlu např ze zářivky Čidlo dálkového ovladače 6 metrů přímo před přední částí jednotky D...

Page 153: ...esilovačem 2 Jakmile jsou kabely zapojeny můžete teprve teď připojit napájecí kabel do stěnové zásuvky Upozornění i Jestliže kroky obrátíte a nejdříve zapojíte napájecí kabel nebudejednotka fungovat správně ii Jestliže je někdy během provozu potřeba znovu připojit ovládací kabel musíte nejprve odpojitnapájecí kabel ze sítě Jinak by mohlo dojít k poškození jednotky Reproduktor Reproduktor Hlavní je...

Page 154: ...pojení přídavných zařízení Pomocí repro kabelu není součástí balení propojte zdířky na přídatná zařízení AUX na zadní straně přístroje s výstupní zdířkou druhého zařízení dle obrázku 2 Je li příjem špatný připojte vnější anténu Poznámka Než zapojíte 75ohmový koaxiální kabel s kulatým drátem vedoucím do vnější antény odpojte dodanou FM drátovou anténu 1 Připojte dodanou FM anténu do zdířky pro FM a...

Page 155: ...KO pohotovostního režimu nebo normálního pohotovostním režimu EKO pohotovostní režim Hodiny se nezobrazí Stiskněte tlačítko CLOCK pro zobrazení času na displeji Normální pohotovostní režim Hodiny se zobrazí na LCD Nastavení času Manuální nastavení času Upozornění Hodiny lze nastavit pouze v pohotovostním režimu 1 V pohotovostním režimu stiskněte a podržte tlačítko CLOCK na VFD displeji se zobrazí ...

Page 156: ... displeji na předním panelu přístroje se rozsvítí Opětovným stiskem tlačítka S BASS efekt vypnete Nastavení hlučnosti Jednotka má funkci Loudness která automaticky zvýší basový efekt při nízké hlasitosti Můžete také zvýšit basový efekt při vyšších hlasitostech ale takové zvýšení bude poměrně nižší Funkci Loudness zapnete stiskem tlačítka LOUDNESS Na displeji na předním panelu přístroje se rozsvítí...

Page 157: ...te požadované číslo přednastavení Pásmo a frekvence přednastavení se zobrazí na předním panelu Programování rozhlasových stanic Naprogramovat lze maximálně 20 přednastavení rozhlasových stanic FM Automaticky Stiskem a podržením tlačítka PROG na dálkovém ovladači po dobu dvou nebo více vteřin aktivujete automatický programovací režim Zobrazí se AUTO Všechny dostupné stanice jsou naprogramovány Prvn...

Page 158: ...lním času a datu takže není třeba ručně nastavit tyto informace Text Vysílání může obsahovat rolující text který zobrazuje informace o aktuálním programu Frekvence Zobrazuje frekvenci aktuální stanice např 95 30 MHz Obsluha CD Přehrávání CD 1 Funkci CD zvolíte otočením regulátoru funkce FUNCTION na jednotce nebo stisknutím tlačítka CD na dálkovém ovládání Na předním panelu se objeví slovo DISC 2 S...

Page 159: ...ačne blikat 3 Stiskem očíslovaných tlačítek 0 9 10 na dálkovém ovladači zvolte požadované číslo stopy 4 Stiskem tlačítka PROG na dálkovém ovladači potvrdíte číslo stopy prouložení 5 Pro naprogramování všech požadovaných stop opakujte kroky 3 a 4 6 Stisknutím tlačítka BF spustíte přehrávání naprogramovaných stop 7 Jedním stisknutím tlačítka L zastavíte přehrávání naprogramovaných stop Dvojím stiskn...

Page 160: ...aticky načte a začne jej přehrávat Poznámka Je li přehrávání zastaveno spustíte přehrávání disku stiskem tlačítka hrát pauza BF 4 Stiskem tlačítka hrát pauza BF dočasně pozastavíte přehrávání opětovným stiskem tlačítka přehrávání opět spustíte 5 Stiskem tlačítka stop L zcela zastavíte přehrávání disku Zobrazování textu během přehrávání Stiskněte tlačítko DISPLAY na dálkovém ovladači zobrazí se ID3...

Page 161: ...SB S přístrojem lze používat jen flash paměťová zařízení USB Připojíte li k přístroji paměťové zařízení USB včetně USB flash pamětí USB flash přehrávačů nebo paměťových karet můžete si užívat poslech hudby z těchto zařízení skrze přístroj 1 Vložte zařízení USB do USB zdířky na zadní straně přístroje 2 Funkci USB zvolíte otočením regulátoru funkce FUNCTION na jednotce nebo stisknutím tlačítkaUSB na...

Page 162: ...ení Poznámka Pokud je signál slabý může se váš Bluetooth přijímač odpojit ale znovu automatickyspustí párovací režim Tento přístroj podporuje A2DP Advanced Audio Distribution Profile Nastavení načasovaného vypnutí Tato funkce se používá k vypnutí přístroje po uplynutí určitého počtu minut v přehrávacím režimu Díky načasovanému vypnutí můžete bezstarostně usínat při poslechu hudby a být si jisti že...

Page 163: ...itosti začne blikat 8 Tlačítky VOL nastavte hlasitost 9 Stiskněte tlačítko TIMER časovač je nyní nastaven a aktivní a na displeji se ukáže Deaktivace a opětovná aktivace časového spínače V pohotovostním režimu stiskem tlačítka TIMER aktivujete nebo deaktivujete časovač Je li časovač aktivní na displeji je zobrazeno Je li časovač deaktivován z displeje zmizí Upozornění Je li zvolen zdroj disk USB a...

Page 164: ... přechovávejte jej v jeho obalu k tomu určeném Dojde li k ušpinění povrchu B Jemně otřete nečistoty měkkým vlhkým pouze voda hadříkem Při otírání disku vždy postupujte od otvoru uprostřed k vnějšímu kraji Budete li disk otírat krouživými pohyby vzniká velká pravděpodobnost poškrábání povrchu avzniku šumu Pokud je disk náhle přesunut ze studené do teplé oblasti nebude hrát kvůli vlhkosti na povrchu...

Page 165: ...kondenzovaná vlhkost na čočce nevypaří Vyměňte nebo vyčistěte disk Použijte zakončené CD nebo správný formát disku Nelze zobrazit některé soubory z USB zařízení Počet adresářů nebo souborů na zařízení USB přesáhl určitý limit Tento případ není porucha přístroje Formáty souborů nejsou podporovány USB zařízení není podporováno Zařízení USB není kompatibilní s přístrojem Zkuste použít jiné USB zaříze...

Page 166: ...ova Likvidace baterií Součástí tohoto přístroje jsou baterie které podléhají evropské směrnici 2006 66 EC a nemohou být likvidovány společně s běžným domovním odpadem Informujte se prosím o pravidlech likvidace baterií v místě vašeho bydliště Správná likvidace baterií přispívá ke snížení jejich negativního vlivu na životní prostředí a lidské zdraví Pokud by se vyskytla závada obraťte se prosím na ...

Page 167: ...ie a skracuje životnosť zariadenia NEVYSTAVUJTE prístroj kvapkajúcej alebo striekajúcej tekutine a nestavajte naň predmety obsahujúce tekutiny napr vázy NEDÁVAJTE horúce predmety ani zdroje otvoreného ohňa ako sú zapálené sviečky alebo nočné lampy do blízkosti zariadenia Vysoké teploty môžu spôsobiť roztavenie plastu s následkom požiaru NEPOUŽÍVAJTE provizórne stojany a NIKDY nepripevňujte nohy po...

Page 168: ...ím napájania sa uistite že napájací kábel je správne nainštalovaný Hlavným rozpojovacím zariadením prístroja je sieťová zástrčka alebo sieťový adaptér ktorémusia byť vždy ľahko dostupné Prístroj nevystavujte kvapkajúcej alebo striekajúcej tekutine a nestavajte naň predmety obsahujúcetekutiny napr vázy Ak chcete úplne odpojiť napájanie musíte odpojiť sieťovú zástrčku zariadenia od elektrickej siete...

Page 169: ...avy na displeji alebo s tlačidlami vypnite prístroj a potom hoznovu zapnite Typový štítok je umiestnený na základni prístroja Značka prístroja sa nachádza na spodnej strane prístroja Laserový produkt Tento produkt je vybavený nízkoenergetickým laserom Pre vašu vlastnú bezpečnosť neodstraňujte žiadne kryty z prístroja ani ho nerozoberajte Opravy musí vykonávať kvalifikovaný personál NEBEZPEČNÉ NAPÄ...

Page 170: ... myslíte že došlo k prehltnutiu batérie Batérie batériový zväzok alebo nainštalované batérie nesmú byť vystavené nadmernému teplu napr slnečnému žiareniu ohňu a podobne POZOR Pri nesprávnej výmene batérie hrozí nebezpečenstvo výbuchu Používajte iba batérie rovnakého alebo zodpovedajúceho typu Pri vysokej hlasitosti môže dlhé počúvanie poškodiť sluch používateľa UPOZORNENIE pre ochranu sluchu Je dô...

Page 171: ...iu alebo v krajných prípadoch požiaru alebo dokonca výbuchu Vyberte vybité batérie zo zariadenia a všetky batérie ak viete že nebudete zariadenie používať dlhšiu dobu Inak batérie môžu vytekať a spôsobiť poškodenie Nevhadzujte batérie do ohňa pretože to môže spôsobiť ich explóziu Recyklujte vybité batérie Nevyhadzujte ich do bežného komunálneho odpadu Nikdy sa nepokúšajte nabíjať bežné batérie v n...

Page 172: ...tovostný režim 15 Zapnutie a vypnutie 15 Zapnutie systému na ECO napájanie pohotovostný režim 15 Nastavenie času 15 Manuálne nastavenie času 15 Automatické nastavenie času 16 Zobrazenie času 16 Kvalita zvuku 16 Nastavenie hlasitosti 16 Nastavenie Super Bass 16 Nastavenie hlučnosti 16 Nastavenie ekvalizéru 16 Zmena jasu predného panelu 16 Počúvanie rozhlasového vysielania 17 Naladenie stanice 17 Na...

Page 173: ... a prehrávanie 20 Výber albumu 20 Opakované prehrávanie MP3 disk 21 Používanie USB 21 Prehrávanie z Bluetooth zariadenia 22 Nastavenie časovača vypnutia 22 Nastavenie automatického zapnutia 23 Technické parametre 23 Manipulácia s diskami 24 Bezpečnostné opatrenia pri manipulácii 24 Ak je povrch znečistený B 24 Nesprávne uloženie diskov 24 Riešenie problémov 25 D o w n l o a d e d f r o m w w w v a...

Page 174: ... balení prítomné všetky nasledujúce časti Reproduktory x 2 Diaľkové ovládanie batérie sú súčasťou balenia Prístroj Sieťový adaptér Návod na obsluhu Reproduktorové káble x2 FM anténa D o w n l o a d e d f r o m w w w v a n d e n b o r r e b e ...
Page 175: ...sitosť LOUDNESS 8 USB port 9 Snímač diaľkového ovládača 10 Displejová šošovka 11 Ovládač nastavenia hlasitosti 12 Tlačidlo nasledujúci G Tlačidlo pre predvoľbu hore G 13 Tlačidlo predchádzajúci H Tlačidlo pre predvoľbu dolu H 14 Tlačidlo režim MODE 15 Výstupné konektory reproduktorov L a R 16 Jednosmerný konektor 17 Vstupné terminály L a R AUX IN 18 Zásuvka pre FM anténu 19 Bluetooth anténa D o w ...

Page 176: ...Tlačidlo album dolu ALB 15 Tlačidlo pre stlmenie MUTE 16 Číselné tlačidlá 0 9 10 17 Tlačidlo otvoriť zatvoriť K 18 Tlačidlo pre USB 19 Tlačidlo pre Bluetooth Tlačidlo pre externé pripojenie AUX 20 Tlačidlo pre opakovanie A B A B 21 Tlačidlo pre stmievanie DIM 22 Tlačidlo pre Super Bass S BASS 23 Tlačidlo pre vypnutie SLEEP 24 Tlačidlo pre časovač TIMER 25 Tlačidlo pre CD displej DISPLAY Tlačidlo p...

Page 177: ...okyny asprávne manipulujte s diaľkovým ovládaním Nedovoľte aby diaľkové ovládanie spadlo alebo bolo inak vystavené nárazom Zabráňte postriekaniu diaľkového ovládania vodou alebo inými tekutinami Neklaďte diaľkový ovládač na mokrý predmet Nevystavujte diaľkový ovládač priamemu slnečnému žiareniu alebo inému zdroju nadmerného tepla Nepoužívajte žiadne leptavé čistiace prostriedky na porcelán antikor...

Page 178: ...tite sa že medzi infračerveným snímačom prístroja a diaľkovým ovládaním nie je žiadna prekážka Ak inštalujete prístroj do skrinky môže sa dosah diaľkového ovládania znížiť v závislosti na hrúbke a farbe skla dverí skrine Nevystavujte infračervený senzor diaľkového ovládania priamemu slnečnému žiareniu alebo inému silnému svetlu napr žiarivkovému osvetleniu Snímač diaľkového ovládača 6 m priamo od ...

Page 179: ... správnom pripojení vyššie uvedených káblov sa môže sieťový kábel zapojiť do elektrickej zásuvky Pozor i Obrátenie postupnosti krokov pripojením sieťového napájacieho kábla ako prvého spôsobí poruchuprístroja ii Ak je nutné počas prevádzky znovu pripojiť spojovací kábel musí sa najprv odpojiťnapájací kábel V opačnom prípade môže dôjsť k poškodeniu prístroja Reproduktor Reproduktor Hlavná jednotka ...

Page 180: ... Pripojenie externého zariadenia Pripojte vstupné svorky AUX na zadnej strane prístroja na výstupné svorky externého zariadenia cez audio kábel nie je súčasťou dodávky ako je znázornené nižšie 2 Ak je príjem zlý pripojte vonkajšiu anténu Poznámka Pred pripojením 75 ohmového koaxiálneho kábla kábel s drôtom kruhového prierezu ktorý ide k vonkajšej anténe odpojte dodávanú FM drôtovú anténu 1 Pripojt...

Page 181: ...oj do ECO napájania alebo normálneho pohotovostného režimu ECO napájanie pohotovostný režim Čas sa nezobrazuje Stlačte tlačidlo CLOCK ak chcete zobraziť čas na displeji Normálny pohotovostný režim Čas sa zobrazuje Nastavenie času Manuálne nastavenie času Pozor Čas je možné nastaviť len v pohotovostnom režime 1 V pohotovostnom režime stlačte tlačidlo pre nastavenie času CLOCK VFD zobrazí CLOCK SET ...

Page 182: ...či pre dosiahnutie požadovaného efektu Na prednom paneli bude svietiť Znovu stlačte tlačidlo Super Bass S BASS na zrušenie efektu Nastavenie hlučnosti Tento prístroj má funkciu hlučnosti ktorá dokáže automaticky zvýšiť basový zvukový efekt pri nízkej hlasitosti Môže tiež zvýšiť basový zvukový efekt pri vysokej hlasitosti avšak bude relatívne malý Stlačte tlačidlo hlučnosti LOUDNESS pre vyvolanie f...

Page 183: ... pre výber požadovaného čísla stanice Pásmo a frekvencia uloženej stanice sa zobrazia na čelnom paneli Naprogramovanie rozhlasových staníc Môžete naprogramovať maximálne 20 predvolieb rozhlasových staníc FM Automaticky Stlačte a podržte programovacie tlačidlo PROG na diaľkovom ovládači na dve sekundy alebo dlhšie pre zapnutie automatického programovacieho režimu Zobrazí sa AUTO Všetky dostupné sta...

Page 184: ...t Vysielanie môže obsahovať posuvný text ktorý zobrazuje informácie o aktuálnom pro grame Frekvencia Ukazuje frekvenciu aktuálnej stanice napr 95 30MHz CD prehrávač Prehrávanie CD 1 Opakovane stláčajte prepínač funkcií FUNCTION na prístroji alebo hneď stlačte tlačidlo CD na diaľkovom ovládači pre výber zvukového zdroja Na prednom paneli sa zobrazí slovo DISC 2 Stlačte tlačidlo otvoriť zatvoriť K p...

Page 185: ... a začne blikať PROG 3 Pomocou číselných tlačidiel 0 9 10 na diaľkovom ovládači vyberte požadované číslo skladby 4 Stlačte programovacie tlačidlo PROG na diaľkovom ovládači a potvrďte číslo skladby ktorá má byťuložená 5 Pre naprogramovanie ďalších požadovaných skladieb zopakujte kroky 3 a 4 6 Stlačením tlačidla BF spustíte prehrávanie naprogramovaných skladieb 7 Stlačte raz tlačidlo L pre zastaven...

Page 186: ...tvoriť K pre zatvorenie dvierok mechaniky Prístroj prečíta disk a začne automaticky hrať Poznámka Ak je prehrávač zastavený stlačte tlačidlo prehrávanie pauza BF pre spustenie prehrávania disku 4 Stlačte tlačidlo prehrávanie pauza BF na dočasné zastavenie prehrávania Stlačte tlačidlo znova pre pokračovanie v prehrávaní 5 Stlačte tlačidlo stop L pre zastavenie prehrávania disku Textový displej poča...

Page 187: ...k chcete zrušiť opakované prehrávanie písmená A B zmiznú Poznámka Úsek A B je možné nastaviť len v rámci tej istej skladby Používanie USB Pozor Nepoužívajte veľkokapacitné USB pevné disky Môžu sa používať len USB flash pamäte Po pripojení USB veľkokapacitného pamäťového zariadenia vrátane USB flash pamäte USB flash prehrávača alebo pamäťovej karty k tomuto zariadeniu si môžete vypočuť uložené hudo...

Page 188: ...ní 4 Vyberte AXM549BT a v prípade potreby zadajte heslo 0000 5 Ak chcete odpojiť Bluetooth funkciu stlačte a podržte tlačidlo pre vymazanie spárovania PAIRING na diaľkovom ovládaní alebo vypnite funkciu na vašom Bluetooth zariadení Poznámka Ak je signál slabý môže sa váš Bluetooth prijímač odpojiť ale znovu saautomaticky spáruje Tento prístroj podporuje A2DP Advanced Audio Distribution Profile Nas...

Page 189: ...OL 7 Stlačte tlačidlo TIMER Začne blikať indikátor hlasitosti 8 Nastavte hlasitosť tlačidlom VOL 9 Stlačte tlačidlo TIMER Časovač je nastavený a aktivovaný Zobrazí sa Ak chcete deaktivovať alebo znova aktivovať časovač V pohotovostnom režime stlačte tlačidlo TIMER pre aktiváciu alebo deaktiváciu časovača Ak je časovač aktivovaný zobrazí sa Ak je časovač deaktivovaný zmizne Pozor Ak je vybraný zdro...

Page 190: ...eho vlastného obalu Ak je povrch znečistený B Jemne utrite mäkkou navlhčenou handričkou len vodou Pri utieraní diskov vždy pohybujte handričkou od stredového otvoru smerom k vonkajšiemu okraju Ak by ste utierali disk krúživými pohybmi mohli by vzniknúť kruhové škrabance ktorézapríčiňujú skreslenie zvuku Ak je disk prenesený z chladného do teplého prostredia môže sa na disku vytvoriť vlhkosť Pred p...

Page 191: ...iaľ nezmizne vytvorená kondenzácia na šošovke Vymeňte alebo vyčistite disk Použite uzavretý disk CD alebo disk so správnym formátom Nemožno zobraziť niektoré súbory na USB zariadení Počet priečinkov alebo súborov na zariadení USB prekročil určitý limit Tento jav nie je chyba Formáty týchto súborov nie sú podporované USB zariadenie nie je podporované USB zariadenie nie je kompatibilné s prístrojom ...

Page 192: ...ež 0 004 olova Poznámky k likvidácii batérií Váš prístroj obsahuje batérie ktoré podliehajú európskej smernici 2006 66 EC a ktoré nemožno odhadzovať do bežného komunálneho odpadu Informujte sa o miestnych pravidlách pre separovaný zber batérií Správna likvidácia batérií pomáha predchádzať možným negatívnym dopadom na životné prostredie a ľudské zdravie V prípade vzniku problému sa obráťte na preda...

Page 193: ...sı ya da sıçramasına maruz bırakmayın ve vazo benzeri içi sıvı dolu nesneleri cihaz üzerine koymayın Cihazın üzerine veya yakınına sıcak nesneler veya açık alev kaynakları yanmakta olan mum gece lambası vb yerleştirmeyin Yüksek sıcaklıklar plastik aksamı eritebilir ve yangına yol açabilir Derme çatma platformlar kullanmayın ve ayak bağlantılarını ASLA ahşap vidaları ile yapmayın güvenliği tam olar...

Page 194: ...tırmadan önce elektrik kablosunun doğru şekilde takıldığından emin olun Bağlantıyı kesme aracı olarak elektrik fişi kullanılır ve bağlantısı kesilen cihazkolayca çalıştırılabilir durumda kalmalıdır Cihaz su damlaması veya sıçramasına maruz bırakılmamalı ve cihazın üzerinevazo benzeri içi sıvı dolu nesneler konulmamalıdır Güç girişini tamamen kesmek için cihazın elektrik fişi prizden çekilmelidir Ş...

Page 195: ...a veya düğmelerde anormal bir durum oluşursa cihazı kapatın ve daha sonratekrar açın Ürün etiketi cihazın alt kısmında yer alır İşaretleme etiket bilgileri cihazın alt kısmında yer alır Lazer Ürünü Bu ürün düşük güçlü bir lazer cihazı ile donatılmıştır Kendi güvenliğiniz için dış gövde kapaklarını açmayın veya ürünü parçalarına ayırmayın Onarım çalışmaları yetkili personel tarafından gerçekleştiri...

Page 196: ...ya cihaz üzerinde takılı piller güneş ışığı ateş ya da benzeri aşırı ısı kaynaklarına maruz bırakılmamalıdır DİKKAT Pilin yanlış takılması durumunda patlama tehlikesi vardır Pil değiştirirken sadece aynı veya eşdeğer tipte pil kullanın Taşınabilir müzik çalar cihazının tam performansla kullanımı kullanıcının işitme kapasitesini olumsuz yönde etkileyebilir UYARI işitme kapasitenizi korumak için Bu ...

Page 197: ... ömrü dolan pilleri ve uzun süre kullanmayacağınızı bildiğiniz bir cihazda yer alan pilleri çıkarın Aksi takdirde piller sızıntı yaparak hasara neden olabilir Patlama tehlikesi oluşturacağı için pilleri asla ateşe atarak imha etmeyin Kullanım ömrü dolan pillerin geri dönüşümünü sağlayın pilleri normal ev atıkları ile birlikte atmayın Normal şarj edilemeyen pilleri asla bir şarj cihazında veya ısı ...

Page 198: ...da Bekleme Özellikleri 15 Gücün Açılması Kapatılması 15 Sistemin ECO Güç Hazırda bekleme moduna alınması 15 Saatin ayarlanması 15 Saatin manuel olarak ayarlanması 15 Saatin otomatik olarak ayarlanması 16 Saatin görüntülenmesi 16 Ses Kalitesi 16 Sesin ayarlanması 16 Süper Bas ayarı 16 Ses şiddeti kontrolü 16 Ekolayzer ayarı 16 Ön panel parlaklığının değiştirilmesi 17 Radyo yayınlarını dinleme 17 Bi...

Page 199: ...ma veya Arama ve Çalma 20 Albüm Seçme 21 Tekrarlayarak çalma MP3 diski 21 USB kullanımı 21 Bluetooth aygıtından müzik dinleme 22 Uyku zamanlayıcısının ayarlanması 22 Günlük zamanlayıcının ayarlanması 23 Teknik özellikler 23 Disk kullanımı 24 Kullanma ile ilgili alınacak önlemler 24 Yüzeyi kirlendiyse B 24 Hatalı disk saklama 24 Sorun giderme 25 D o w n l o a d e d f r o m w w w v a n d e n b o r r...

Page 200: ...ket içinde aşağıdaki parçaların bulunduğundan emin olun Hoparlör x 2 Uzaktan kumanda pil dahildir Ünite AC adaptör Kullanma Kılavuzu Hoparlör kablosu x2 FM Anteni D o w n l o a d e d f r o m w w w v a n d e n b o r r e b e ...
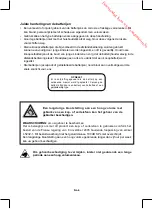
Page 201: ...şiddeti düğmesi LOUDNESS 8 USB jakı 9 Uzaktan kumanda sensörü 10 LCD ekran lensi 11 Ses Kontrol Düğmesi 12 Sonraki düğmesi G Önayar Yukarı Düğmesi G 13 Önceki düğmesi H Önayar Aşağı Düğmesi H 14 Mod düğmesi MODE 15 Hoparlör çıkış terminalleri Sol ve Sağ 16 DC jakı 17 AUX Giriş terminalleri Sol ve Sağ AUX IN 18 FM Anten Soketi 19 Bluetooth anteni D o w n l o a d e d f r o m w w w v a n d e n b o r ...

Page 202: ... Yukarı Düğmesi ALB 14 Albüm Aşağı Düğmesi ALB 15 Sessiz düğmesi MUTE 16 Rakam düğmeleri 0 9 10 17 Açma Kapama düğmesi K 18 USB işlev düğmesi 19 Bluetooth işlev düğmesi AUX işlev düğmesi AUX 20 Tekrar A B düğmesi A B 21 Karartma düğmesi DIM 22 Süper Bas düğmesi S BASS 23 Uyku düğmesi SLEEP 24 Zamanlayıcı düğmesi TIMER 25 CD Ekran düğmesi DISPLAY RDS Ekran düğmesi DISPLAY 26 İleriye doğru arama düğ...

Page 203: ...çin aşağıdaki talimatları okuyun ve uzaktan kumandayı doğru şekildekullanın Uzaktan kumandayı yere düşürmeyin veya darbelere maruz bırakmayın Uzaktan kumandanın üzerine su veya herhangi bir sıvı dökmeyin Uzaktan kumandayı ıslak bir nesne üzerine koymayın Uzaktan kumandayı doğrudan güneş ışığı altına veya aşırı ısı kaynaklarının yakınına yerleştirmeyin Uzaktan kumanda üzerinde aşındırıcı temizlik m...

Page 204: ...an kumanda sensörü ile uzaktan kumanda arasında engel olmadığından emin olun Üniteyi bir raf vb üzerine yerleştirirseniz uzaktan kumanda ile kontrol edilebilen mesafe rafın cam kapak kalınlığına ve rengine bağlı olarak azalabilir Kızıl ötesi uzaktan kumanda sensörünü doğrudan güneş ışığına veya invertörlü floresan lamba gibi güçlü ışıklara maruz bırakmayın Uzaktan kumanda sensörü Ünitenin ön kısmı...

Page 205: ...bloları bağlanmalıdır 2 Yukarıdaki kablolar doğru şekilde bağlandıktan sonra AC güç kablosu elektrik prizine takılabilir Dikkat i Adımlar ters sırada izlenerek önce AC güç kablosu bağlanırsa cihazın arızalanmasısöz konusudur ii Çalışma sırasında kontrol kablosunun çıkarılıp tekrar bağlanması gerekirse önce AC güçkablosunun bağlantısı kesilmelidir Aksi takdirde cihaz hasar görebilir Hoparlör Hoparl...

Page 206: ...anması Bir ses kablosu ile ürünle birlikte verilmez ana birimin arkasında bulunan AUX Giriş terminallerini yardımcı cihaz üzerindeki hat çıkış terminallerine şekilde gösterildiği gibi bağlayın 2 Yayın alımı zayıf ise dış anteni bağlayın Not 75 ohm luk bir koaksiyel kablo takmadan önce yuvarlak bir kablonun dış antene uzandığı tip ürünle birlikte verilen FM anten kablosunun bağlantısını kesin 1 Ürü...

Page 207: ...Bekleme veya normal hazırda bekleme arasında geçiş yapın ECO Güç hazırda bekleme modu Saat görüntülenmez LCD ekranda saati görüntülemek için CLOCK Saat düğmesine basın Normal hazırda bekleme modu LCD üzerinde saat ekranı Saatin ayarlanması Saatin manuel olarak ayarlanması Dikkat Saati sadece hazırda bekleme modunda ayarlayabilirsiniz 1 Hazırda bekleme modunda saat düğmesine CLOCK basın ve basılı t...

Page 208: ...tam bir bas elde etmek için bas sesini güçlendirebilirsiniz Bas efekti için uzaktan kumanda üzerindeki süper bas düğmesine S BASS basın ön panelde yazısı görüntülenecektir Efekti iptal etmek için süper bas düğmesine S BASS tekrar basın Ses şiddeti kontrolü Bu cihazda düşük ses seviyesinde bas ses efektini otomatik olarak artırabilen bir ses şiddeti işlevi bulunmaktadır Yüksek ses seviyesinde de ba...

Page 209: ...Manuel Ayar İstediğiniz istasyonu buluncaya kadar frekansı değiştirmek için ana ünite üzerindeki geri ileri ayar düğmesine L BF veya uzaktan kumanda üzerindeki geri ileri ayar düğmesine D C art arda basın Hafızadan Önayar sadece istasyonlar önceden hafızaya alındığında kullanılabilir İstediğiniz önayar numarasını seçmek için önayar yukarı aşağı düğmesine H G art arda basın Bant ve frekans bilgiler...

Page 210: ...r RDS istasyonu alındığında ekranda RDS ve bu istasyonun adı görüntülenir PTY Program Türü Yayınlanan müziğin Stil veya tarz ını açıklar örn Rock veya Klasik Saat Yayıncı radyo istasyonu otomatik olarak tarih ve saat bilgileri sağlar böylece bu bilgileri manuel olarak ayarlamak gerekmez Metin Yayıncı mevcut program ile ilgili bilgileri gösteren kayar metinler de sunabilir gram Frekans Mevcut istas...

Page 211: ...çalma En fazla 20 adet parçayı programlayarak istediğiniz sırada çalmasını sağlayabilirsiniz Müzik çalar içinde CD takılı olarak durma modunda olmalıdır 1 Bir disk yerleştirin ve çalmaya başladığında L düğmesine basın 2 Uzaktan kumanda üzerindeki PROG düğmesine basın ekranda 01 p 01 ve PROG yanıp sönmeye başlar 3 İstenen parça numarasını seçmek için uzaktan kumanda üzerindeki rakam düğmelerine 0 9...

Page 212: ...anılması önerilir 1 Disk kaynağını seçmek için ana ünite üzerindeki işlev seçim düğmesine FUNCTION art arda basın veya doğrudan uzaktan kumanda üzerindeki CDişlev düğmesine basın Ön panelde DISC yazısı görüntülenir 2 Disk kapağını açmak için K düğmesine basın ve MP3 WMA diskini etiketli yüzü yukarıya bakacak şekilde disk tepsisine yerleştirin 3 Disk kapağını kapatmak için açma kapama düğmesine K b...

Page 213: ...abilir Birinci basış Başlangıç noktasını seçin A sözcüğü yanar durumda kalır İkinci basış Bitiş noktasını seçin A B sözcüğü yanar durumda kalır Üçüncü basış Tekrar çalmayı iptal etmek için A B sözcüğü kaybolur Not A ve B bölümü sadece aynı parça içinde ayarlanabilir USB kullanımı Dikkat Yüksek kapasiteli USB sabit diskleri kullanmayın Sadece USB flash bellek kullanılabilir Bir USB yığın depolama a...

Page 214: ...a modunu seçin 3 Bluetooth aygıtında AXM549BT görüntülenir 4 AXM549BT yi seçin ve gerekirse parola olarak 0000 girin 5 Bluetooth işlevini devre dışı bırakmak için uzaktan kumanda üzerindeki eşleştirme iptal düğmesini PAIRING basılı tutun veya Bluetooth aygıtından işlevi kaldırın Not Sinyal gücü zayıfsa Bluetooth alıcınız bağlantıyı kesebilir ancakeşleştirme moduna otomatik olarak tekrar girer Bu c...

Page 215: ...e veya VOL düğmesine basın 3 TIMER düğmesine basın saat göstergesi yanıp söner 4 VOL düğmesi ile saati ayarlayın 5 TIMER düğmesine basın saat göstergesi yanıp söner 6 VOL düğmesi ile dakikayı ayarlayın 7 TIMER düğmesine basın saat göstergesi yanıp söner 8 VOL düğmesi ile ses düzeyini ayarlayın 9 TIMER düğmesine basın zamanlayıcı ayarlanır ve etkinleştirilir ve simgesi görüntülenir Alarmı devre dış...

Page 216: ...zgün takılmamışsa disk tepsisini kapatmaya çalışmayın Diski kullanmadığınızda özel kutusunda saklayın Yüzeyi kirlendiyse B Yumuşak nemli sadece su ile nemlendirilmiş bir bezle hafifçe silin Diski silerken bezi daima disk merkezinden dış kenara doğru hareket ettirin Diski dairesel hareketlerle silerseniz dairesel çizikler oluşabilir ve bu daparazite yol açabilir Disk soğuk bir ortamdan sıcak bir or...

Page 217: ...ı kayboluncaya kadar bekleyin Diski değiştirin veya temizleyin Sonlandırılmış CD veya doğru biçimli bir disk kullanın U S B a y g ı t ı n d a k i b a z ı d o s y a l a r görüntülenemiyor USB aygıtındaki klasör veya dosya sayısı belirlenen limiti aşmış Bu bir arıza değildir Bu dosyaların biçimleri desteklenmiyor USB aygıtı desteklenmiyor USB aygıtı cihaz ile uyumlu değil Başka bir aygıt deneyin Rad...

Page 218: ... 2006 66 EC no lu Avrupa Direktifi kapsamındadır ve bu piller normal ev atıklarıyla birlikte atılmamalıdır Lütfen pillerin ayrı olarak toplanmasına ilişkin yerel yönetmelikler hakkında bilgi edinin Pillerin doğru şekilde imha edilmesi çevre ve insan sağlığı üzerindeki potansiyel olumsuz etkilerinin önlenmesinde yardımcı olacaktır Beklenmeyen bir sorun oluştuğunda lütfen cihazı satın aldığınız mağa...

Page 219: ...D o w n l o a d e d f r o m w w w v a n d e n b o r r e b e ...
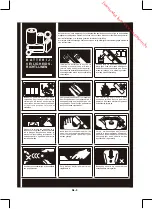
Page 220: ...ag t m vrijdag van 8 00 tot 20 00 uur en zaterdag van 09 00 tot 17 00 ýeská republika Italia Datart International a s Darty Italia Pernerova 35 Kesa Sourcing Limited Filiale Italiana 186 00 Praha 8 Karlin Presso Centro Commerciale Czech Republic Brianza Carrefour Pomoc þíslo Datart Czech Republic Superstrada Milano Meda 44 20037 Paderno Dugnano MI 810 328 278 Per richieste di assistenza o di infor...

Reviews: