182
DP27/27D
STEP
INSTRUCTIONS
IMAGE
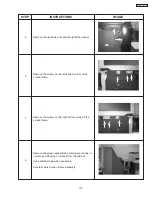
Remove the 4 screws on the front that hold the light
box.
The picture shows the left side.
17
Remove the control panel.
18
Remove the board on top of the light box assembly.
19
Lift the Light box in the center and slide backwards until
it is out.
Use additional help if necessary.
The Light Box is now ready for easy transport to a
designated service and repair facility.
20
Summary of Contents for 51SWX20B
Page 55: ...55 DP27 27D SIGNAL BLOCK ASSEMBLY BACK TO ADJUSTMENTS ...
Page 56: ...56 DP27 27D DEFLECTION P W B BACK TO ADJUSTMENTS ...
Page 57: ...57 DP27 27D POWER SUPPLY P W B BACK TO ADJUSTMENTS ...
Page 58: ...58 DP27 27D CPT P W B BACK TO ADJUSTMENTS ...
Page 59: ...59 DP27 27D CONTROL P W B BACK TO ADJUSTMENTS ...
Page 60: ...60 DP27 27D TROUBLE SHOOTING FLOWCHART 1 NO RASTER AND NO POWER How to check LED s Diagnosis ...
Page 61: ...61 DP27 27D TROUBLE SHOOTING FLOWCHART ...
Page 62: ...62 DP27 27D TROUBLE SHOOTING FLOWCHART ...
Page 83: ...83 DP27 27D DP2X Protection Circuit Block Diagram Deflection Power Supply ...
Page 84: ...84 DP27 27D DP1X Protection Circuit Block Diagram Signal Power Supply ...
Page 96: ......
Page 97: ......
Page 98: ......
Page 99: ......
Page 100: ......
Page 101: ......
Page 102: ......
Page 103: ......
Page 104: ......
Page 105: ......
Page 106: ......
Page 107: ......
Page 108: ......
Page 109: ......
Page 110: ......
Page 111: ......
Page 189: ...DP27 27D ...


