background image

THE GENIUS REMOTE CONTROL (CLU-417UI) 

- 16 - 

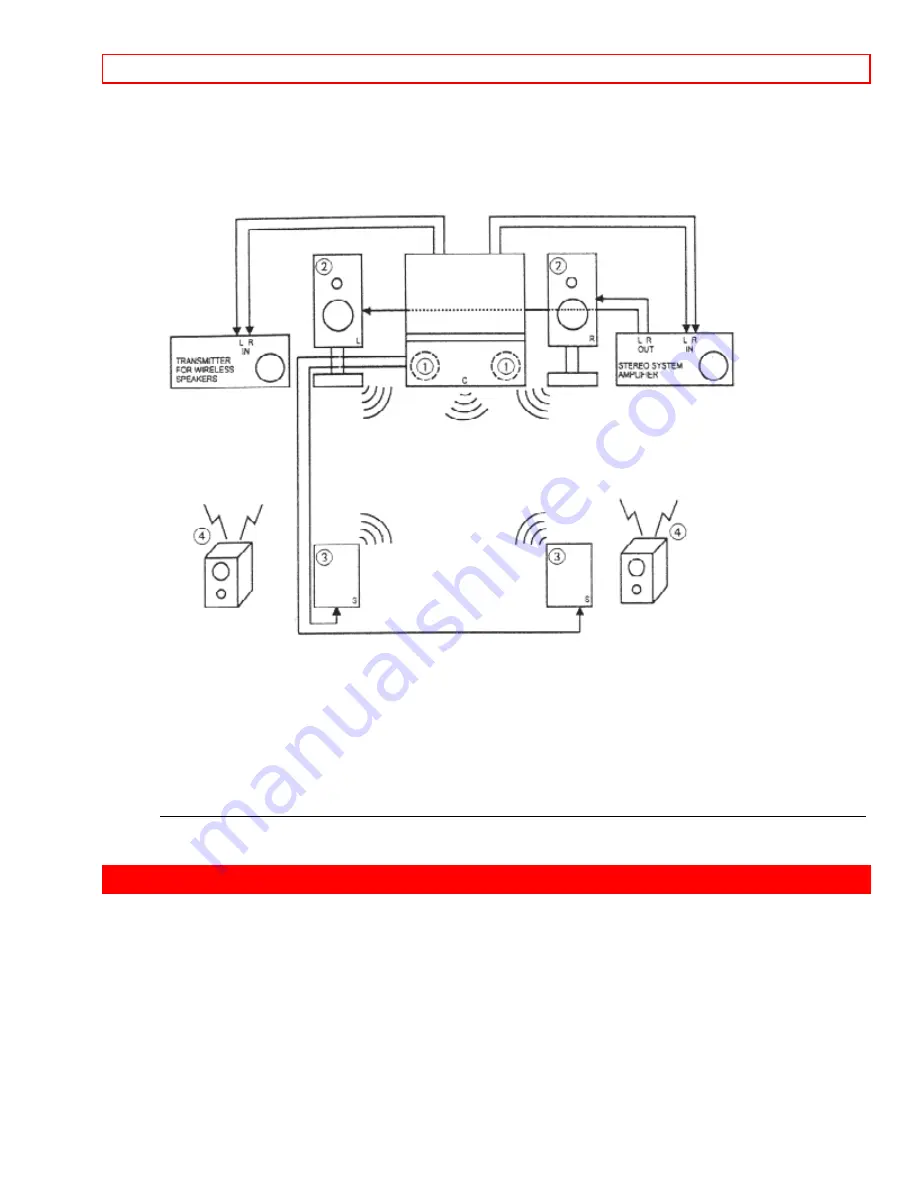
2 These speakers are connected to a separate audio amplifier. Use the "AUDIO TO HI-
FI" output on the TV. 
3 These speakers are connected to the Rear Speaker 8 Ohm output on the TV. 
4 These speakers are controlled by a wireless speaker transmitter. Use the 
"TRANSMITTER OUT" output on the TV. 


SURROUND 

  SURROUND  REQUIRED 

OPTIONAL 

FEATURE 

  SWITCH* 

CONNECTION  CONNECTION   

EFFECT 

OFF 


Sp. Matrix 


2  4 


Receive mono and stereo sound. 

  Surround 

MATRIX 

Sp. Matrix 

1  3 


2  4 


Receive Movie Theater-like sound. 

EXTERNAL 

EXT. 


3  4 


This feature turns off the TV's 

SPEAKERS 

      internal 

speakers. 

* See page 10 for location of Surround Switch. 

THE GENIUS REMOTE CONTROL (CLU-417UI) 

In addition to controlling all the functions on your HITACHI Color TV, the new remote is 
designed to operate different types of VCR's and CATV (Cable TV)/Satellite converters 
with one touch. Basic operation keys are grouped together in one area. 
To operate your TV, point the remote at the remote sensor of the TV and press the TV 
button on the remote. The remote will now control your TV. 
To operate your VCR, point the remote at the remote sensor of the VCR, and press the 
VCR button on the remote. The remote will now control your VCR. (See page 22 for 
instructions on how to program the remote to control your VCR.) 
To operate your Cable/Satellite Box, point the remote at the remote sensor of the 
cable/satellite box and press the CABLE button on the remote. The remote will now 

Summary of Contents for 50FX18B

Page 1: ...or 12 5 POWER button 12 6 POWER light 13 7 AI Artificial Intelligence sensor 13 8 REMOTE CONTROL sensor 13 REAR PANEL JACKS 13 REAR PANEL CONNECTIONS 14 REAR SPEAKER TERMINAL CONNECTIONS 14 TIPS ON REAR PANEL CONNECTIONS 15 AUDIO SYSTEM SETUP 15 THE GENIUS REMOTE CONTROL CLU 417UI 16 HOW TO USE THE GENIUS REMOTE TO CONTROL YOUR TV 17 PICTURE IN PICTURE PIP 20 USING THE GENIUS REMOTE TO CONTROL VCR...

Page 2: ...SETTINGS 47 CONTRAST 48 BRIGHTNESS 48 COLOR 48 TINT 49 SHARPNESS 49 RESET 49 ADVANCED SETTINGS 49 AUDIO SETTINGS 50 BASS 51 TREBLE 51 BALANCE 51 RESET 51 ADVANCED SETTINGS 52 HOME THEATER 53 THEATER MODES 53 WIRELESS SOUND 54 INFO CENTER 55 SPECIAL EVENT REMINDER 55 CALENDAR 56 CARE OF YOUR HITACHI PROJECTION TV AND YOUR REMOTE CONTROL 57 RECEPTION PROBLEMS 57 CHECK HERE BEFORE CALLING FOR SERVICE...

Page 3: ... RAIN OR MOISTURE NOTE There are no user serviceable parts inside the receiver Model number and serial number are indicated on the back side of the set POWER SOURCE This projection color TV is designed to operate on 120 volts 60 Hz AC household current Insert power cord into a 120 volt 60 Hz outlet TO PREVENT ELECTRIC SHOCK DO NOT USE THE TELEVISION S PLUG WITH AN EXTENSION CORD RECEPTACLE OR OTHE...

Page 4: ...uct FOR YOUR PERSONAL SAFETY 1 This television set is equipped with a polarized alternating current line plug a plug having one blade wider than the other This plug will fit into the power outlet only one way This is a safety feature If you are unable to insert the plug fully into the outlet try reversing the plug If the plug should still fail to fit contact your electrician to replace your obsole...

Page 5: ...mage the picture tube surface 10 Unplug this television set from the wall outlet before cleaning Do not use liquid cleaners or aerosol cleaners Use a damp cloth for cleaning 11 1 Do not place this television set on an unstable cart stand or table The television set may fall causing serious injury to a child or an adult and serious damage to the appliance Use only with a cart or stand recommended b...

Page 6: ...ister Never place the set in a built in enclosure unless proper ventilation provided PROTECTION AND LOCATION OF YOUR SET 16 1 If an outside antenna is connected to the television set be sure the antenna system is protected against voltage surges and built up static charges Section 810 of the National Electrical Code NFPA No 70 1975 provides information with respect to proper grounding of the mast ...

Page 7: ...your home consult your television dealer or local power company For television sets designed to operate from battery power refer to the operating instructions 20 If the television set does not operate normally by following the operating instructions unplug this set television set from the wall outlet and refer servicing to qualified service personnel Adjust only those controls that are covered in ...

Page 8: ...manufacturer that have the same characteristics as the original part Unauthorized substitutions may result in fire electric shock or other hazards 27 Upon completion of any service or repairs to the television set ask the service technician to perform routine safety checks to determine that the television is in safe operating condition PICTURE CAUTIONS Continuous on screen displays such as video g...

Page 9: ...mote Control Unit CLU 417UI Part No HL00227 2 Two AA size 1 5 V batteries For Remote Control Unit REMOTE CONTROL BATTERY INSTALLATION AND REPLACEMENT 1 Open the battery cover of the remote transmitter by pushing the notched part of the cover with your fingers 2 Insert two new AA size batteries equivalent for the remote When replacing old batteries push them towards the springs and lift them out 3 ...

Page 10: ... the room to find the best spot for viewing The drawings give several suggestions The best picture is seen by sitting directly in front of the TV and about 6 to 9 feet from the screen During daylight hours reflections from outside light may appear on the screen If so drapes or screens can be used to reduce the reflection or the TV can be located in a different section of the room If the TV s audio...

Page 11: ...or antenna cable must be For connecting RF signals antenna or cable TV connected to an antenna adaptor to the antenna jack on the television 300 Ohm to 75 Ohm Phono Connector S Video Super Video Connector Used on all standard video and audio This connector is used on camcorders VCRs cables which connect to inputs and and laser disc players with an S Video feature outputs located on the Television ...

Page 12: ...his makes it possible to set TV features to your preference without using the remote This button also serves as the EXIT button when in MENU mode 2 INPUT selector Press this button to select the current antenna source VIDEO 1 2 or alternate antenna source Your selection is shown in the top right corner of the screen 3 VOLUME level Press these buttons for your desired sound level The volume level w...

Page 13: ...nnels adjusting volume etc REAR PANEL JACKS 1 Antenna Input Output The remote control allows you to switch between two separate 75 Ohm RF antenna inputs ANT A and ANT B ANT A input can be displayed as a Main Picture or Sub Picture ANT B can only be displayed as a Main Picture ANT B cannot be displayed as a PIP sub picture The antenna output labeled TO CONVERTER allows the ANT A connection to pass ...

Page 14: ...pedance only 7 S Video Input 1 provides S Video Super Video jacks for connecting equipment with S Video output capability 8 Speaker Matrix Surround Switch Use this switch to choose between the surround and external speaker features See page 13 for Audio System Setup The TV s Internal Speakers will be switched off when EXT is selected REAR PANEL CONNECTIONS Typical full feature set up Follow connec...

Page 15: ...ndard video connection if your device has this feature If your device has only one audio output mono sound connect it to the left audio jack on the TV Refer to the operating guide of your other electronic equipment for additional information on connecting your hookup cables A single VCR can be used for VCR 1 and VCR 2 but note that a VCR cannot record its own video or line output INPUT 1 in the ex...

Page 16: ... of Surround Switch THE GENIUS REMOTE CONTROL CLU 417UI In addition to controlling all the functions on your HITACHI Color TV the new remote is designed to operate different types of VCR s and CATV Cable TV Satellite converters with one touch Basic operation keys are grouped together in one area To operate your TV point the remote at the remote sensor of the TV and press the TV button on the remot...

Page 17: ... When the remote is in the TV or VCR mode this is the TV VCR button When the remote is in the CABLE mode this is the A B button HOW TO USE THE GENIUS REMOTE TO CONTROL YOUR TV 1 TV POWER button Press this button to turn the TV set on or off If a Special Event Reminder is set it will be displayed when the TV is first turned on See page 50 2 EXIT RECALL COMMERCIAL SKIP button Press this button when ...

Page 18: ...s Channel selection may also be performed by pressing CH up or down You may also use these buttons for QUICK LIST Press and hold the CH up or down button and a window will appear allowing you to choose the channel you wish to tune Release the CH up or down button when the channel you wish to tune is highlighted and the TV will tune to that channel NOTE The TV may not receive some channels if you a...

Page 19: ...UTE button again or press the VOLUME up button to restore the sound Closed Caption will appear when TV is muted regardless of CLOSED CAPTIONED on off 8 LAST CHANNEL LST CH button Use this button to select between the last two channels viewed Good for watching two sporting events etc 9 PICTURE IN PICTURE See separate section on page 19 for a description 10 HELP button Press this button when a menu ...

Page 20: ...ual Tuner can operate with only one input ANT A only or two inputs ANT A and ANT B ANT A input can be viewed as both main picture and sub picture simultaneously ANT B can only be viewed as a Main Picture To select between Main Picture and PIP sub picture tuning press the PIP CH button on the remote The arrow next to the channel display will move with every press of the PIP CH button When the arrow...

Page 21: ...ted by arrow next to channel number Press the INPUT button when sub picture channel tuning is being controlled to change between VIDEO 1 VIDEO 2 and ANT A antenna source ANT B source cannot be viewed as a sub picture NOTE Since ANT B source cannot be viewed as a sub picture only single PIP mode is possible when ANT B is selected as the Main Channel PICTURE IN PICTURE CONT MULTI CH PIP Press the PI...

Page 22: ... 3 MOVE button To move the sub picture to another corner press the MOVE button The sub picture moves one step counter clockwise every time the MOVE button is pressed Example below illustrates the MOVE operation for initial shipping conditions If you have customized a PIP position the MOVE operation may differ slightly from the example It is also possible to customize one PIP position To do this si...

Page 23: ...s of the picture you are currently viewing Press this button again or PIP to return to normal viewing This feature is useful for viewing a moving picture that has many details for example a close play in a sporting event or golf swing CAUTION A pattern burn may develop if the sub picture is left in the same corner permanently If the PIP feature is used frequently occasionally shift the sub picture...

Page 24: ...r VCR does not have a power function the remote will issue the CHANNEL UP function 5 The MENU button will act as the VCR MENU button for HITACHI VCR s 6 The EXIT button will act as your VCR ENTER button if required 7 The INPUT button will act as your VCR 100 button if required 1 VCR Button This allows the remote to control your VCR by setting it to VCR mode 2 PRECODED VCR buttons These buttons tra...

Page 25: ...cedure stated above 4 If your cable satellite box does not have a power function the remote will issue the CHANNEL UP function 5 The EXIT button will act as the cable satellite box ENTER button if required 6 The INPUT button will act as your cable satellite box 100 button if required 1 CABLE button This button allows the remote to control your cable box by setting it to CABLE mode 2 PRECODED CABLE...

Page 26: ...39 65 Popular Mechanics 57 Pulsar 00 RCA 17 Realistic 44 Recoton 57 Regal 16 49 50 53 Regency 02 Rembrandt 09 36 Runco 00 Samsung 29 39 Scientific Atlanta 04 06 14 52 Signal 13 29 Signature 09 SL Marx 29 Sprucer 17 55 Starcom 03 13 30 Stargate 13 29 Starquest 13 StarSight 58 59 Sylvania 01 Teleview 29 Texscan 01 Tocom 10 11 33 Toshiba 00 Tusa 13 TV86 35 Unika 40 44 United Artists 05 United Cable 0...

Page 27: ...a 00 Aiko 50 Aiwa 00 Akai 14 23 49 America High 09 Asha 48 Audiovox 10 Beaumark 48 Bell Howell 30 Brandt 38 Broksonic 33 37 43 51 52 Calix 10 Canon 09 Capehart 05 Carver 28 CCE 27 50 Citizen 10 50 Colt 27 Craig 10 19 27 48 Curtis Mathes 09 14 22 Cybernex 48 Daewoo 03 05 17 29 50 Daytron 05 Dynatech 00 Electrohome 10 Electrophonic 10 Emerex 06 Emerson 00 01 10 16 23 33 37 40 41 43 44 50 51 52 ...

Page 28: ... KLH 27 Kodak 9 10 Lloyd 00 Lloyd s 40 Logik 27 LXI 10 Magnavox 09 12 28 32 34 Magnin 48 Marantz 09 28 Marta 10 Matsushita 09 MEI 09 Memorex 00 09 10 12 18 19 20 30 48 MGA 16 23 MGN Technology 48 Minolta 15 31 Mitsubishi 16 23 26 36 49 Motorola 09 20 MTC 00 48 Multitech 00 27 NEC 11 13 14 26 30 Nikko 10 Noblex 48 Olympus 09 47 Optimus 10 20 30 Orion 51 Panasonic 09 35 46 47 53 Penney 09 10 11 13 1...

Page 29: ... 15 18 19 21 25 30 31 Sharp 20 Shintom 27 Shogun 48 Singer 27 Sony 06 07 08 09 STS 15 Sylvania 00 09 10 16 28 32 Symphonic 00 Tatung 14 Teac 00 14 Technics 09 35 Teknika 00 09 10 Telefunken 38 TMK 40 48 Toshiba 16 17 25 44 Totevision 10 48 Unitech 48 Vector 17 Vector Research 11 13 Video Concepts 13 17 23 Videosonic 48 Wards 00 09 15 19 20 22 27 34 44 48 XR 1000 00 09 27 Yamaha 11 Zenith 07 08 12 ...

Page 30: ...appear giving a description of that menu MENU LANGUAGE Choose English French or Spanish text PLUG PLAY Optimum hook up for your system SIGNAL SOURCE Select Antenna or Cable TV AUTO CHANNEL SET First time set up for channel buttons CHANNEL MEMORY Channel buttons add skip CHANNEL LIST Check channel name scan and child lock CLOCK SET Set before using timer features CONVERGENCE ADJUST Match red green ...

Page 31: ...ypes of backgrounds CONTRAST Adjust contrast BRIGHTNESS Adjust brightness COLOR Adjust color TINT Adjust tint SHARPNESS Adjust sharpness RESET Set VIDEO settings to factory preset ADVANCED SETTINGS Improve picture performance BASS Adjust bass TREBLE Adjust treble BALANCE Adjust balance RESET Set AUDIO settings to factory preset ADVANCED SETTINGS Improve sound performance THEATER MODES Picture is a...

Page 32: ...s the POWER button on the TV again to end the autodemonstration MENU LANGUAGE This feature will allow you to select any one of 3 different languages for all on screen displays Use CURSOR or to select the MENU LANGUAGE of your choice Press EXIT to quit menu or CURSOR to return to previous menu PLUG PLAY This graphic guide function will help you to properly set up your TV or Home Theater System Simp...

Page 33: ...rrect answers to both questions Press CURSOR to display the graphic guide Press EXIT to quit menu or CURSOR to begin AUTO CHANNEL SET See page 30 SIGNAL SOURCE Select ANTENNA if you are using an indoor or outdoor antenna Select CATV if you have cable TV ...

Page 34: ...each mode are shown at the left Refer to your cable or TV guide for channel identification standards If certain CATV channels are poor or not possible in CATV1 mode set SIGNAL SOURCE to CATV2 AUTO CHANNEL SET This feature will automatically store active TV channels in CHANNEL MEMORY This will allow you to skip over unused channels when using the CHANNEL UP or DOWN buttons ...

Page 35: ...h the INPUT button and repeat AUTO CHANNEL SET for the second antenna input Remember to select the correct SIGNAL SOURCE mode before using AUTO CHANNEL SET for the second antenna input See CHANNEL MEMORY to add or erase additional channels CHANNEL MEMORY Use this function after AUTO CHANNEL SET to add or erase additional channels to the remote control CHANNEL or buttons ...

Page 36: ... and number buttons and then add or erase using the CURSOR button Press EXIT to quit menu or CURSOR to return to previous menu CHANNEL LIST This function allows you to review which channels are labeled in CHANNEL ID NAME which have been added to CHANNEL MEMORY SCAN and which are protected by CHILD LOCK LOCK ...

Page 37: ...SETUP 37 Press CURSOR or to review more channels Press EXIT to quit menu or CURSOR to return to previous menu CLOCK SET The time must be set before you can use 4 EVENT PROGRAM SPECIAL EVENT REMINDER or CALENDAR ...

Page 38: ...is called convergence Over a period of time the picture tubes can drift out of alignment due to normal bumps and vibrations or moving the TV If you move your TV or if after a time you notice color rings or halos around objects in the picture you may want to converge align the colors To simplify convergence the following feature allows you to display a test pattern of horizontal and vertical lines ...

Page 39: ... NOTE Please use the EXIT button on your remote to quit this menu To qui this menu without a remote turn the TV off CUSTOMIZE This selection contains advanced features which will make TV viewing easier and more enjoyable CHANNEL ID Use this feature to give up to 20 channels a name when ANTENNA signal source is selected and up to 60 channels a name when CATV1 signal source is selected ...

Page 40: ...ft corner of the screen Press EXIT to quit menu or CURSOR to return to previous menu The represents a blank space Select ERASE ID to erase a CHANNEL ID NOTE If ANT A and ANT B are in the same SIGNAL SOURCE mode see page 29 the CHANNEL ID for both antenna inputs will be the same CHANNEL ID will be displayed only when channel is displayed as main picture VIDEO ID Use this feature to give a name to a...

Page 41: ...o previous menu The represents a blank space Select RESET to set VIDEO ID to original condition NOTE VIDEO ID will be displayed only when VIDEO input is displayed as main picture FAMILY FAVORITES MENU This function allows you to group your favorite channels into 6 personalized categories that you can rename A total of 24 channels can be stored in the FAMILY FAVORITES function ...

Page 42: ...ory highlight a box below the category title Press CHANNEL or or the number buttons to enter the desired channel Repeat until category has been set with your favorite channels The channel to be added is displayed in the top right corner of the screen Enter channel 00 to erase a favorite channel NOTE This function cannot be access when ANT B is the main channel FAMILY FAVORITES OPERATION Use this f...

Page 43: ...Press EXIT to remove FAMILY FAVORITES OSD from the screen NOTE If a category has some blank channel entries these channels will appear as black sub pictures CHILD LOCK This function will block out the picture and sound of the selected channel or video input It can also be used to keep the TV from being viewed for a scheduled amount of time that you set The code to enter CHILD LOCK is a four digit ...

Page 44: ...hen TV TIME OUT is turned on you can set the BEGIN and END times and the TV cannot be viewed during that time period To change the key number select CHANGE SECRET CODE Enter a new four digit key number you prefer If you forget your key number use the factory code 7777 to erase your key number This will reset the key number back to the factory preset 0000 NOTE If ANT A and ANT are in the same SIGNA...

Page 45: ...ons to set the channel the TV will tune to when it automatically turns on NOTE The OFF Timer will only activate if the TV was turned on or tuned with the ON timer and no channel selection was made after this time If you change the channel after the ON Timer has been activated the OFF Timer will deactivate If no remote control button is pressed after ON timer is activated the TV will automatically ...

Page 46: ...essed This is convenient when you want to record a movie with your VCR and watch it later Select OFF to disable this function Press EXIT to quit menu or CURSOR to return to previous menu CLOSED CAPTION Closed captions are the dialogue narration and or sound effects of a television program or home video which are displayed on the TV screen Your local TV program guide denotes these programs as or DI...

Page 47: ...E If you do not have sound make sure MUTE is not set CCD will display when MUTE is pressed whether CCD is in the ON or OFF mode MENU BACKGROUND This function allows you to choose from 2 MENU BACKGROUNDS Use CURSOR or to change the MENU BACKGROUND setting Select SHADOW and a light background is visible Select CLEAR and no background is visible Press EXIT to quit menu or CURSOR to return to previous...

Page 48: ...ted you are adjusting CONTRAST The additional menu items BRIGHTNESS COLOR TINT and SHARPNESS can be selected and adjusted in the same manner CONTRAST Use this function to change the contrast between black and white levels in the picture This adjustment will only affect the picture when PICTURE SETTINGS AI is OFF See page 45 BRIGHTNESS Use this function to adjust overall picture brightness COLOR Us...

Page 49: ...VANCED SETTINGS Your HITACHI TV has an AI Artificial Intelligence function which automatically adjust picture settings to produce the highest quality picture possible When AI is highlighted use CURSOR to turn the AI on or off Use CURSOR or to select function Use CURSOR to change the function setting Press EXIT to quit menu or CURSOR to return to previous menu AI ARTIFICIAL INTELLIGENCE When the AI...

Page 50: ...utomatically monitors and adjusts the color to maintain constant color levels even after a program or channel changes It also maintains natural flesh tones while preserving fidelity of background colors For best picture performance leave the AUTO COLOR function on NOISE REDUCTION The NOISE REDUCTION function automatically reduces conspicuous noise in the picture without degrading picture quality C...

Page 51: ... is selected you are adjusting BASS The additional menu items TREBLE and BALANCE can be selected and adjusted in the same manner BASS This function controls the low frequency audio to all speakers TREBLE This function controls the high frequency audio to all speakers BALANCE This function will control the left to right balance of the TV internal speakers the AUDIO TO HI FI output and TRANSMITTER O...

Page 52: ...it menu or CURSOR to return to previous menu MTS MODE Multi Channel Television Sound will allow you to select STEREO a stereo broadcast SAP second audio program which may be a secondary language weather report etc or MONO monaural sound used when receiving a weak stereo broadcast The sources received will be displayed below the channel number The source you select will be displayed to the left of ...

Page 53: ... for that channel LOUDNESS This function will improve the quality of both low and high frequency sounds when listening at low volume levels INT SPEAKERS This function is useful when first setting up the external speakers or if you prefer to use only speakers from a separate stereo system HOME THEATER Use this function to choose Picture settings for a true HOME THEATER experience THEATER MODES Use ...

Page 54: ...g Contrast to improve Sports viewing Press EXIT to quit menu or CURSOR to return to previous menu WIRELESS SOUND This feature allows you to choose between 2 possible variable audio outputs for a separate set of wireless speakers or another stereo amplifier The audio output may be either MAIN TV AUDIO or SUB PICTURE AUDIO This feature also allows you to turn the internal speakers on or off when MAI...

Page 55: ...lume control SUB PICTURE AUDIO When set to SUB PICTURE AUDIO mode your wireless speakers will play the PIP sub picture audio program The volume of your wireless speakers will now be controlled by the PIP VOL control which may be varied from 00 min to 32 max If no sub picture is displayed the wireless speakers will play the main channel audio program with the volume being controlled by the TV volum...

Page 56: ...press the MENU button Press EXIT to quit menu or CURSOR to return to previous menu NOTE Special events set into memory will appear as blinking green dates in CALENDAR mode At the selected time the message will appear in CALENDAR mode When the TV is turned on the SPECIAL EVENT REMINDER message will automatically appear at the selected time Each special event message can be a maximum of 20 character...

Page 57: ...y places Remove the plug from the wall outlet if your television will not be used for a long period of time for instance when you go on vacation DO NOT Do not clean your screen or cabinet with strong cleaners polishes or chemically treated cloth Do not place rubber or vinyl products or cellophane tape on your set Do not touch the screen too often Do not subject the remote control to shocks such as...

Page 58: ...ple antenna couplers SNOW If your receiver is located in the fringe area of a television station where the signal is weak your picture may be marred by the appearance of small dots When the signal is extremely weak it may be necessary to install a special antenna to improve the picture RADIO FREQUENCY INTERFERENCE The interference produces moving ripples or diagonal streaks and in some cases cause...

Page 59: ...ut Jacks including S Video Closed Caption Decoder High Resolution Picture in Picture with Freeze Tuned Port Bass Reflex Speakers Digital Convergence Dual Antenna Inputs Auto Link Inputs Power Input AC 120V 60Hz Power Consumption operating 50FX18B 19K 163W 55FX20B 163W Power Consumption Maximum 50FX18B 19K 216W 55FX20B 216W Antenna input impedance 75 Ohm Channel coverage 181 ch VHF Band 2 13 UHF Ba...

Page 60: ...orized Service Facility nearest you Just present proof of purchase and or delivery receipts to the Hitachi Authorized Service Facility and service will be rendered in accordance with the terms of the limited warranty as stated on your warranty card or operating guide Should you have any questions regarding in warranty service operation or technical assistance please contact Hitachi Home Electronic...

Page 61: ...HITACHI SERVICE HOTLINE 61 i Warranty Lifetime lens 2 years CRT 90 days screen 1 year parts 1 year labor ...

Reviews: