background image

Cylinder head assembly

removal

1. Battery ground cable  disconnect

1. Disconnect the battery ground cable from the battery.

Caution

Do not disconnect the battery cable for 1
minute after turning OFF the ignition switch.

2. Coolant  drain

1. Drain coolant from the radiator.

Caution

After draining the coolant, do not forget to
tighten the drain plug.

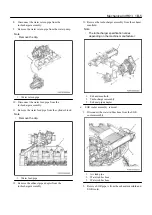
3. Engine harness  disconnect

1. Disconnect the engine harness from the engine

assembly.

Note

Disconnect each connector.

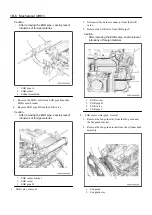
4. Ventilation hose  disconnect

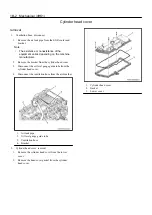
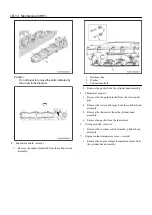
1. Remove the air leak pipe from the EGR cooler and

bracket.

Note

The existence or nonexistence of the
equipment varies depending on the machine
manufacturer.

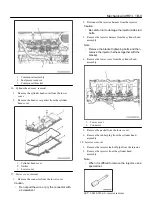
2. Disconnect the ventilation hose from the air breather.

1. Air leak pipe
2. Oil level gauge guide tube
3. Ventilation hose
4. Bracket

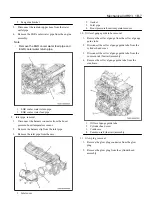
5. Turbocharger assembly  removal

1. Remove the exhaust pipe from the turbocharger

assembly.

2. Remove the air cleaner duct from the air cleaner

assembly and turbocharger assembly.

3. Remove the air intake duct from the turbocharger

assembly and intercooler.

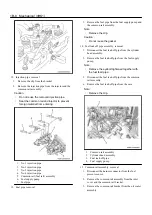
4. Disconnect the oil feed pipe from the turbocharger

assembly.

Note

Remove the clip.

5. Remove the oil feed pipe from the oil port cover.

Note

Remove the clip.

6. Disconnect the oil return pipe from the turbocharger

assembly.

7. Remove the oil return pipe from the flywheel

housing.

1. Oil feed pipe
2. Oil return pipe

1B-4   Mechanical (4HK1)

Summary of Contents for 4HK1

Page 1: ... IN JAPAN K 2015 06 Service Manual consists of the following sections Technical Manual Operational Principle Technical Manual Troubleshooting Workshop Manual Engine Manual EWDCY EN 00 PART NO GB3 EXHAUST EMISSION STANDARDS Engine Manual Workshop Manual URL http www hitachi c m com 4HK1 ...

Page 2: ...Find manuals at https best manuals com Find manuals at https best manuals com ...

Page 3: ...iagram FOREWORD This manual describes the service procedures for the 4HK1 diesel engine GB 3 The contents of this manual are current at the date of issue but may differ slightly from your engine due to specification changes or other modifications made thereafter This manual consists of the following sub sections Publication No Publication Name Sub sections IDE 2820 ENGINE 0 Introduction 14A Servic...

Page 4: ...IDE 2820 前書 4505260 15 1 28 3 19 AM ページ 2 Find manuals at https best manuals com Find manuals at https best manuals com ...

Page 5: ...Introduction Introduction All Table of Contents Introduction 0 2 safety information 0 2 Introduction All 0 1 Find manuals at https best manuals com Find manuals at https best manuals com ...

Page 6: ... occur 7 Always inspect and prepare in advance the instruments special tools and the tools to be used Also do not use tools such as wrenches that have lost their edge hammers with frayed edges or chipped chisels 8 When performing work using a device such as a grinder crane or welder perform the procedure while paying sufficient attention to the handling precautions Furthermore for work besides thi...

Page 7: ...ncluded in service information 14A 2 Plastic gauge 14A 4 Recommended liquid gasket 14A 6 Thread locking adhesive agent 14A 8 Term 14A 9 Abbreviations 14A 10 Standard bolts 14A 13 Service Information Guide All 14A 1 Find manuals at https best manuals com Find manuals at https best manuals com ...

Page 8: ...o each item Disconnection Includes the disconnection procedures for wiring piping etc Connection Includes the connection procedures for wiring piping etc Writing Includes the writing procedure necessary when replacing the ECM or supply pump Setting Includes the setting procedure necessary when replacing the ECM etc Replacement Includes the procedure for replacing parts changing oil etc Prioritized...

Page 9: ...nsion 7 Arrow indicating a cross section 8 Outside air or cold air 9 Gas or warm air 10 Mixing of outside air and gas or mixing of cold air and warm air 11 Rotational direction 12 Apply oil 13 Apply grease 14 Apply liquid gasket Service Information Guide All 14A 3 Find manuals at https best manuals com Find manuals at https best manuals com ...

Page 10: ...g rod and measure the width of the flattened PLASTIGAUGE using the scale printed on the packaging Method for measuring clearance between the crank bearing and the crank journal Clean the bearing as well as the cylinder block and crankcase bearing mounting surfaces and assemble to the cylinder block and crankcase Gently place the crankshaft on the cylinder block and settle it by turning it approxim...

Page 11: ...Service Information Guide All 14A 5 ...

Page 12: ...the mating parts where the liquid gasket was used using a scraper and clean using a waste cloth etc so that any oil moisture dirt etc is removed After cleaning apply the specified liquid gasket to each location and assemble Note If a gasket remover is used to make the operation during cleaning easier it is better to wait approximately 10 minutes after applying before starting the removal operation...

Page 13: ...Caution If the workshop manual specifies an application method follow that method Service Information Guide All 14A 7 ...

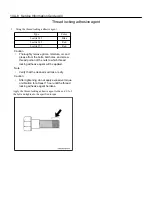
Page 14: ...s and screw thread portion of the nuts to which thread locking adhesive agent will be applied Note Verify that the cleaned sections are dry Caution After tightening do not apply excessive torque or vibration for at least 1 hour until the thread locking adhesive agent hardens Apply the thread locking adhesive agent to the end 1 3 of the bolt and tighten to the specified torque 14A 8 Service Informa...

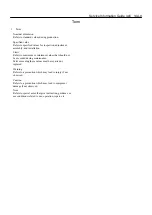
Page 15: ...s that should not be exceeded during maintenance Parts exceeding these values must be repaired or replaced Warning Refers to a precaution which may lead to injury if not observed Caution Refers to a precaution which may lead to equipment damage if not observed Note Refers to special notes that give instruction guidance or use conditions related to use operation repair etc Service Information Guide...

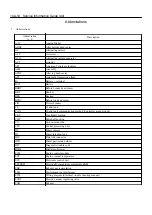
Page 16: ... unit CAN Control unit communication method Controller area network CKP Crankshaft position CMP Camshaft position CO Carbon monoxide CPU Central processing unit DC Direct current DI Direct injection type DLC Data link connector DPD Diesel particulate defuser DTC Diagnostic trouble code DMM Digital multimeter ECM Engine control module ECT Engine coolant temperature ECU Electronic control unit EEPRO...

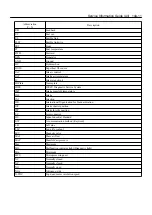
Page 17: ...INL Intake INJ Injection ISO International Organization for Standardization ISP Intake shutter position ITP Intake throttle position J C Joint connector JIS Japan Industrial Standard KW A communication method Keyword LH Left side LLC Long life coolant M V Magnetic valve MAF Mass air flow MAP Manifold air pressure Max Maximum MIL Malfunction indicator light Diagnostic light Min Minimum MPU Micropro...

Page 18: ...tem QWS Quick warming up system RH Right side R L Relay RAM Random access memory REF Reference ROM Read only memory RP Rail pressure RR Rear Rr Rear RWD Rearward SAE Society of Automotive Engineers SBF Slow blow fuse SCV FRP regulator SIG Signal SLD Shield ST Starter Start STD Standard SW Switch TDC Top dead center TEMP Temperature TP Throttle position VB Battery voltage VGS Turbo Variable geometr...

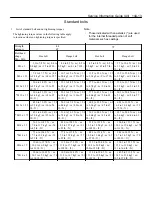
Page 19: ... 3 1 to 5 1 kgf m 22 to 37 lb ft M12 x 1 25 49 0 to 73 5 N m 5 0 to 7 5 kgf m 36 to 54 lb ft 54 9 to 82 3 N m 5 6 to 8 4 kgf m 40 to 61 lb ft 60 8 to 91 2 N m 6 2 to 9 3 kgf m 45 to 67 lb ft 68 1 to 102 1 N m 6 9 to 10 4 kgf m 50 to 75 lb ft M12 x 1 75 45 1 to 68 6 N m 4 6 to 7 0 kgf m 33 to 51 lb ft 51 0 to 76 5 N m 5 2 to 7 8 kgf m 38 to 56 lb ft 56 9 to 84 3 N m 5 8 to 8 6 kgf m 42 to 62 lb ft ...

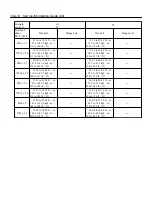
Page 20: ...o 299 lb ft M20 x 2 5 190 2 to 286 4 N m 19 4 to 29 2 kgf m 140 to 211 lb ft 249 1 to 374 6 N m 25 4 to 38 2 kgf m 184 to 276 lb ft M22 x 1 5 251 1 to 413 8 N m 25 6 to 42 2 kgf m 185 to 305 lb ft 362 8 to 544 3 N m 37 0 to 55 5 kgf m 268 to 401 lb ft M22 x 2 5 217 7 to 327 5 N m 22 2 to 33 4 kgf m 161 to 242 lb ft 338 3 to 507 0 N m 34 5 to 51 7 kgf m 250 to 374 lb ft M24 x 2 358 9 to 539 4 N m 3...

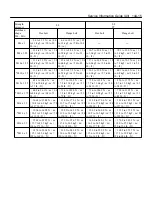
Page 21: ... N m 8 7 to 13 0 kgf m 63 to 94 lb ft M12 x 1 75 64 8 to 96 1 N m 6 6 to 9 8 kgf m 48 to 71 lb ft 71 4 to 107 2 N m 7 3 to 10 9 kgf m 53 to 79 lb ft 71 6 to 106 9 N m 7 3 to 10 9 kgf m 53 to 79 lb ft 79 5 to 119 2 N m 8 1 to 12 2 kgf m 59 to 88 lb ft M14 x 1 5 106 2 to 158 8 N m 10 8 to 16 2 kgf m 78 to 117 lb ft 114 9 to 172 3 N m 11 7 to 17 6 kgf m 85 to 127 lb ft 113 8 to 170 6 N m 11 6 to 17 4...

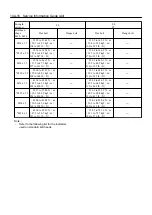
Page 22: ... 29 0 to 48 1 kgf m 209 to 348 lb ft 293 2 to 440 3 N m 29 9 to 44 9 kgf m 216 to 325 lb ft M22 x 1 5 413 6 to 620 5 N m 42 2 to 63 3 kgf m 305 to 458 lb ft 424 6 to 636 5 N m 43 3 to 64 9 kgf m 313 to 469 lb ft M22 x 2 5 385 7 to 578 0 N m 39 3 to 58 9 kgf m 284 to 426 lb ft 394 2 to 592 3 N m 40 2 to 60 4 kgf m 291 to 437 lb ft M24 x 2 490 8 to 810 5 N m 50 0 to 82 6 kgf m 362 to 598 lb ft 554 1...

Page 23: ... Old New Tightening torque for the flare nut Service standard value 4 6 mm 0 181 in 12 8 to 18 6 N m 1 3 to 1 9 kgf m 9 to 14 lb ft 14 mm 0 55 in 14 mm 0 55 in 6 35 mm 0 25 in 23 5 to 49 0 N m 2 4 to 5 0 kgf m 17 to 36 lb ft 17 mm 0 67 in 17 mm 0 67 in 8 0 mm 0 31 in 23 5 to 49 0 N m 2 4 to 5 0 kgf m 17 to 36 lb ft 19 mm 0 75 in 17 mm 0 67 in 10 0 mm 0 39 in 44 1 to 93 2 N m 4 5 to 9 5 kgf m 33 to...

Page 24: ...7 to 29 4 N m 1 5 to 3 0 kgf m 11 to 22 lb ft 29 4 to 39 2 N m 3 0 to 4 0 kgf m 22 to 29 lb ft 29 4 to 58 8 N m 3 0 to 6 0 kgf m 22 to 43 lb ft 58 8 to 98 0 N m 6 0 to 10 0 kgf m 43 to 72 lb ft Note The tightening torque for connectors except brass tapered screws is only applied when the mating side is not made of aluminum Note For the elbow type connector tighten it with the minimum torque shown ...

Page 25: ...23 reassembly 1B 230 installation 1B 232 Camshaft 1B 250 removal 1B 250 disassembly 1B 252 inspection 1B 253 reassembly 1B 255 installation 1B 256 Flywheel 1B 262 removal 1B 262 inspection 1B 264 installation 1B 265 Crankshaft front oil seal 1B 267 removal 1B 267 installation 1B 269 Crankshaft rear oil seal 1B 272 removal 1B 272 installation 1B 274 Rocker arm shaft 1B 277 removal 1B 277 disassembl...

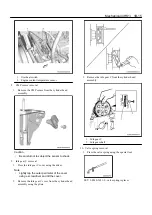
Page 26: ...om the cylinder head cover 3 Disconnect the oil level gauge guide tube from the cylinder head cover 4 Disconnect the ventilation hose from the air breather 1 Air leak pipe 2 Oil level gauge guide tube 3 Ventilation hose 4 Bracket 2 Cylinder head cover removal 1 Remove the cylinder head cover from the lower cover 2 Remove the head cover gasket from the cylinder head cover 1 Cylinder head cover 2 Ga...

Page 27: ...the ventilation hose to the air breather 2 Connect the oil level gauge guide tube to the cylinder head cover tightening torque 19 N m 1 9 kgf m 14 lb ft 3 Install the bracket to the cylinder head cover tightening torque 24 N m 2 4 kgf m 18 lb ft 4 Install the air leak pipe to the bracket and EGR cooler Note The existence or nonexistence of the equipment varies depending on the machine manufacturer...

Page 28: ...ence of the equipment varies depending on the machine manufacturer 2 Disconnect the ventilation hose from the air breather 1 Air leak pipe 2 Oil level gauge guide tube 3 Ventilation hose 4 Bracket 5 Turbocharger assembly removal 1 Remove the exhaust pipe from the turbocharger assembly 2 Remove the air cleaner duct from the air cleaner assembly and turbocharger assembly 3 Remove the air intake duct...

Page 29: ... pipe 12 Remove the exhaust pipe adapter from the turbocharger assembly 13 Remove the turbocharger assembly from the exhaust manifold Note The turbocharger specification varies depending on the machine manufacturer 1 Exhaust manifold 2 Turbocharger assembly 3 Exhaust pipe adapter 6 EGR cooler assembly removal 1 Disconnect the water rubber hose from the EGR cooler assembly 1 Air leak pipe 2 Water r...

Page 30: ...al 1 EGR cooler bracket 2 EGR cooler 3 EGR pipe B 7 EGR valve removal 1 Disconnect the harness connector from the EGR valve 2 Remove the EGR valve from EGR pipe C Caution After removing the EGR valve seal to prevent intrusions of foreign material 1 EGR cooler 2 EGR pipe B 3 EGR valve 4 EGR pipe C 8 EGR cooler water pipe removal 1 Remove the fan guide stay from the fan guide and the fan guide brack...

Page 31: ... from the case 1 Inlet cover 2 Gasket 3 Inlet pipe 4 Boost pressure boost temperature sensor 10 Oil level gauge guide tube removal 1 Remove the oil level gauge from the oil level gauge guide tube 2 Disconnect the oil level gauge guide tube from the cylinder head cover 3 Disconnect the oil level gauge guide tube from the common rail fuel rail assembly 4 Remove the oil level gauge guide tube from th...

Page 32: ... Do not reuse the gasket 14 Fuel leak off pipe assembly removal 1 Disconnect the fuel leak off pipe from the cylinder head assembly 2 Remove the fuel leak off pipe from the fuel supply pump Note Remove the eyebolt tightened together with the fuel feed pipe 3 Disconnect the fuel leak off pipe from the common rail assembly 4 Remove the fuel leak off pipe from the case Note Remove the clip 1 Common r...

Page 33: ...n Be careful not to damage the injector side stud bolts 3 Remove the injector harness from the cylinder head assembly Note Remove the bracket tightening bolts and then remove the injector harness together with the bracket 4 Remove the lower cover from the cylinder head assembly 1 Lower cover 2 Connector 5 Remove the gasket from the lower cover 6 Remove the rubber plug from the cylinder head assemb...

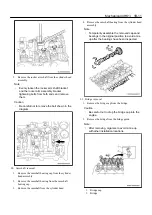
Page 34: ...eeve has not been removed as well 1 Injector 2 Injector sleeve Caution Store each ID code plate on the injector head with the cylinder number tag attached to avoid a mix up Be extremely careful not to damage the injector nozzle 19 Rocker arm shaft removal 1 Loosen the adjust screw using the wrench Note Loosen all valve clearance adjustment screws 1B 10 Mechanical 4HK1 ...

Page 35: ...earing from the camshaft bearing cap 3 Remove the camshaft from the cylinder head 4 Remove the camshaft bearing from the cylinder head assembly Note Temporarily assemble the removed caps and bearings in the original position to avoid a mix up after the bearings have been inspected 21 Bridge removal 1 Remove the bridge cap from the bridge Caution Be careful not to drop the bridge cap into the engin...

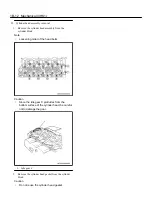
Page 36: ...ote Loosening order of the head bolts Caution Since the idle gear C protrudes from the bottom surface of the cylinder head be careful not to damage the gear 1 Idle gear C 2 Remove the cylinder head gasket from the cylinder block Caution Do not reuse the cylinder head gasket 1B 12 Mechanical 4HK1 ...

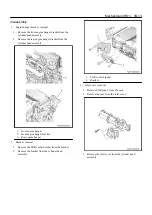
Page 37: ...ront engine hanger 2 Front engine hanger bracket 3 Rear engine hanger 2 Bracket removal 1 Remove the EGR cooler bracket from the bracket 2 Remove the bracket from the cylinder head assembly 1 EGR cooler bracket 2 Bracket 3 Inlet cover removal 1 Remove EGR pipe C from the case 2 Remove the case from the inlet cover 3 Remove the inlet cover from the cylinder head assembly Mechanical 4HK1 1B 13 ...

Page 38: ... Thermostat removal 1 Remove the fan guide bracket from the water outlet pipe 2 Remove the water outlet pipe from the cylinder head assembly 3 Remove the thermostat from the cylinder head assembly 4 Remove the gasket from the thermostat 6 Overheat switch removal 1 Remove the overheat switch from the cylinder head assembly 7 Engine coolant temperature sensor removal 1 Remove the engine coolant temp...

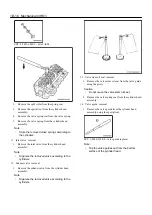
Page 39: ...e gear C cover using the driver Note Lightly tap the outer perimeter of the cover using a screwdriver and tilt the cover 2 Remove the idle gear C cover from the cylinder head assembly using the pliers 3 Remove the idle gear C from the cylinder head assembly 1 Idle gear C 2 Idle gear shaft 10 Valve spring removal 1 Press the valve spring using the special tool SST 5 8840 2621 0 valve spring replace...

Page 40: ...e according to the cylinders 12 Exhaust valve removal 1 Remove the exhaust valve from the cylinder head assembly Note Organize the removed valve according to the cylinders 13 Valve stem oil seal removal 1 Remove the valve stem oil seal from the valve guide using the pliers Caution Do not reuse the valve stem oil seal 2 Remove the valve spring seat from the cylinder head assembly 14 Valve guide rem...

Page 41: ...This as a preview PDF file from best manuals com Download full PDF manual at best manuals com ...

Reviews: