background image

English

   - 27 -

For any help concerning set up and use of your TV please call the Customer Helpline: 0345 604 0105


Connectivity

Wired Connectivity

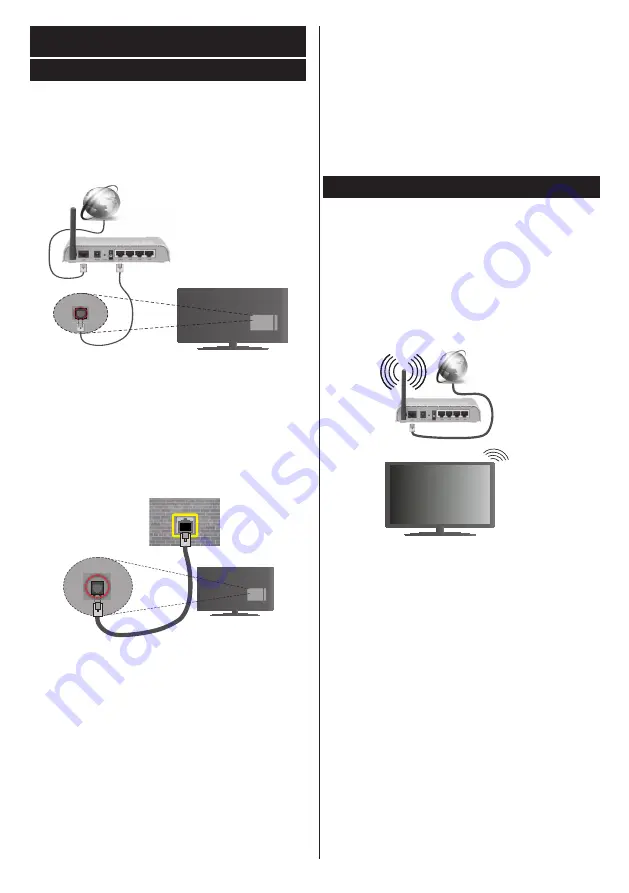
To Connect to a Wired Network

• 

You must have a modem/router connected to an 

active broadband connection.

• 

Connect your TV to your modem/router via an 

ethernet cable. There is a LAN port at the rear 

(back) of your TV.

Broadband ISP connection

LAN (ethernet) cable

LAN input on the rear  

side of the TV

To  configure  wired  settings  please  refer  to  the 

Network/Internet Settings section in the


Settings 

Menu.

• 

You might be able to connect your TV to your LAN 

depending on your network’s configuration. In such 

a case, use an ethernet cable to connect your TV 

directly to the network wall outlet.

LAN input on the rear  

side of the TV

network  

wall socket

Configuring Wired Device Settings

Network Type

The 

Network Type

 can be selected as 

Wired


Device,


Wireless Device 

or 

Disabled

, in accordance with the 

active connection to the TV set. Select this as 

Wired 

Device

 if you are connecting via an ethernet cable.

Internet Speed Test

Highlight 

Internet Speed Test

 and press the 

OK

 but-

ton. TV will check the internet connection bandwidth 

and display the result when complete. 

Advanced Settings

Highlight 

Advanced


Settings

 and press the 

OK


button. On the next screen you can change the IP 

and DNS settings of the TV. Highlight the desired one 

and press Left or Right button to change the setting 

from 

Automatic

 to 

Manual

. Now you can enter the 

Manual IP

 and / or 

Manual DNS

 values. Select the 

related item in the drop down menu and enter the 

new values using the numeric buttons of the remote. 

Press the 

OK

 button to save settings when complete. 

Wireless Connectivity 

To Connect to a Wireless Network

The TV cannot connect to the networks with a hidden 

SSID. To make your modem’s SSID visible, you should 

change your SSID settings via the modem’s software. 

To Connect to a wireless LAN, you should perform 

the following steps:

38. 

To configure your wireless settings please refer 

to the 

Network/Internet Settings

 section in the 

Settings


Menu

.

Broadband 

ISP 

connection

A Wireless-N router (IEEE 802.11a/b/g/n) with 

simultaneous 2.4 and 5 GHz bands is designed to 

increase bandwidth. These are optimized for smoother 

and  faster  HD  video  streaming,  file  transfers  and 

wireless gaming.

• 

The frequency and channel differ depending on the area.

• 

The transmission speed differs depending on the 

distance and number of obstructions between the 

transmission  products,  the  configuration  of  these 

products, the radio wave conditions, the line traffic 

and the products that you use. The transmission may 

also be cut off or may get disconnected depending 

on the radio wave conditions, DECT phones or any 

other WiFi 11b appliances. The standard values of 

the transmission speed are the theoretical maximum 

values for the wireless standards. They are not the 

actual speeds of data transmission.

• 

The location where the transmission is most effective 

differs depending on the usage environment.

Summary of Contents for 43HK15T74U

Page 1: ... available 14 CEC and CEC RC Passthrough 14 TV Menu Contents 15 General TV Operation 19 Using the Channel List 19 Configuring Parental Settings 19 Electronic Programme Guide EPG 19 Teletext Services 20 Software Upgrade 20 Troubleshooting Tips 20 PC Input Typical Display Modes 22 AV and HDMI Signal Compatibility 22 Supported Video File Formats for USB Mode 23 Supported Picture File Formats for USB ...

Page 2: ...age of the device This appliance is not intended for use by persons including children with reduced physical sensory or mental capabilities or lack of experience and knowledge unless they have been given supervision or instructions concerning use of the appliance by a person responsible for their safety Children should be supervised to ensure that they do not play with the appliance Children may n...

Page 3: ... unstable surfaces the TV may tip over To prevent damage to the TV do not place any objects on top of the TV Power cord and plug Do not place the set a piece of furniture etc on the power cord mains lead or pinch the cord Handle the power cord by the plug Do not pull the plug by holding its neck as this could result in damage to the plug Do not unplug the appliance by pulling from the power cord a...

Page 4: ...explosion Do not use unequal batteries old and new Alkaline and carbon etc simultaneously If you will not use the device for a long time remove the batteries and store the device in a dry and dust free place Improper use of batteries may cause an explosion or leakage If the batteries have leaked use gloves and clean the appliance thoroughly with a dry cloth Batteries should not be exposed to heat ...

Page 5: ... as above should be applied WALL MOUNTING WARNINGS Read the instructions before mounting your TV on the wall The wall mount kit is optional You can obtain from your local dealer if not supplied with your TV Do not install the TV on a ceiling or on an inclined wall Use the specified wall mounting screws and other accessories Tighten the wall mounting screws firmly to prevent the TV from fall Do not...

Page 6: ...such a way that it does not require a safety connection to electrical earth the earth connection is used for functional purposes Protective Earth Connection The marked terminal is intended for connection of the protective earthing conductor associated with the supply wiring Hazardous Live Terminal The marked terminal s is are hazardous live under normal operating conditions Caution See Operating I...

Page 7: ... need assistance with Call us today 0 345 604 0105 Local call rates applies Lines open 9am 8pm Monday to Saturday and 10am 4pm Sunday Calls to Argos enquiry lines may attract a charge and set up fee from residential lines depending on your call plan tariff Mobile and other providers costs may vary see www bt com pricing for details For Security and training purposes telephone calls to and from cus...

Page 8: ...SB inputs and over DVB T2 and DVB S2 broadcasts Remote controlled colour TV Fully integrated digital terrestrial TV DVB T T2 HDMI inputs to connect other devices with HDMI sockets USB input OSD menu system Stereo sound system Teletext Headphone connection Automatic programming system Manual tuning Automatic power down after up to eight hours Sleep timer Child lock Automatic sound mute when no tran...

Page 9: ...wer IMPORTANT The TV set is designed to operate on 220 240V AC 50 Hz socket After unpacking allow the TV set to reach the ambient room temperature before you connect the set to the mains Plug the power cable to the mains socket outlet Antenna Connection Connect the aerial plug to the AERIAL INPUT ANT socket located on the rear side of the TV Rear side of the TV License Notification The terms HDMI ...

Page 10: ... I III UHF BAND U HYPERBAND Digital Reception Fully integrated digital terrestrial TV DVB T DVB T2 compliant Number of Preset Channels 1 000 Channel Indicator On Screen Display RF Aerial Input 75 Ohm unbalanced Operating Voltage 220 240V AC 50Hz Audio DTS TruSurround HD Audio Output Power WRMS 10 THD 2 x 8 Power Consumption W 120 Networked Standby W 3 TV Dimensions DxLxH with foot mm 250 x 974 x 6...

Page 11: ...ays the electronic programme guide 22 Mute Completely turns off the volume of the TV 23 Info Displays information about on screen content 24 Exit Closes and exits from displayed menus or returns to previous screen 25 OK Confirms user selections holds the page in TXT mode views channel list DTV mode 26 Programme 27 Directional buttons Helps navigate menus content etc and displays the subpages in TX...

Page 12: ...audio you will need to use the Side AV input with a YPbPr PC audio cable for audio connection using the Side AV connection cable s RED and WHITE inputs When using the wall mounting kit available from third party in the market if not supplied we recommend that you plug all your cables into the back of the TV before mounting on the wall Insert or remove the CI module only when the TV is SWITCHED OFF...

Page 13: ...on the model of your TV and the country selection Privacy Settings menu may appear at this point Using this menu you can set your privacy privileges Highlight a feature and use Left and Right directional buttons to enable or disable Read the related explanations displayed on the screen for each highlighted feature before making any changes You can use Programme buttons to scroll up and down to rea...

Page 14: ...cast from your smart TV using the FollowMe TV feature Install the appropriate Smart Center application to your mobile device Start the application For further information on using this feature refer to the instructions of the application you use Note This application may not be compatible with all mobile devices Both of the devices must be connected to the same network CEC and CEC RC Passthrough T...

Page 15: ...will be available Increase the warmth or coolness of the picture by pressing Left or Right buttons Picture Zoom Sets the desired image size format Film Mode Films are recorded at a different number of frames per second to normal television programmes Turn this feature on when you are watching films to see the fast motion scenes clearly Skin Tone Skin tone can be changed between 5 and 5 Colour Shif...

Page 16: ...select a sound mode If the viewed channel supports AVL Automatic Volume Limiting Sets the sound to obtain fixed output level between programmes Headphone Lineout When you connect an external amplifier to your TV using the headphone jack you can select this option as Lineout If you have connected headphones to the TV set this option as Headphone Please ensure before using headphones that this menu ...

Page 17: ...nd subsequent versions Set as Regular if the connected device is HDMI 1 4 compatible Set acoordingly or disable the related HDMI source by setting as Disabled Network Internet Settings Displays network internet settings Accessibility Displays accessibility options of the TV Hard of Hearing Enables any special feature sent from the broadcaster Audio Description A narration track will be played for ...

Page 18: ...evice to turn on the TV and switch to its input source automatically Press Left or Right button to enable or disable the feature Speakers To hear the TV audio from the connected compatible audio device set as Amplifier You can use the remote control of the TV to control the volume of the audio device Show All Cookies Displays all saved cookies Delete All Coo kies Deletes all saved cookies OSS Disp...

Page 19: ...etting enables or disables access to all menus or installation menus of the TV Guidance This setting enables or disables access some of the MHEG applications Disabled applications can be released by entering the right PIN Set PIN Defines a new PIN number Default CICAM PIN This option will appear as greyed out if no CI module is inserted into the CI slot of the TV You can change the default PIN of ...

Page 20: ...tions displayed on the digital teletext screen When the Text button is pressed again the TV returns to television broadcast BBC Red Button RB While watching BBC channels press the Red button to access Red Button services provided by the BBC On the opening page you can access to BBC s main services such as BBC iPlayer BBC News BBC Sport and many others There are also links to the home pages of the ...

Page 21: ...nd may be coming from only one speaker Check the balance settings from Sound menu Remote control no operation The batteries may be exhausted Replace the batteries Input sources can not be selected If you cannot select an input source it is possible that no device is connected If not Check the AV cables and connections if you are trying to switch to the input source dedicated to the connected devic...

Page 22: ... 1400x1050 59Hz 23 1400x1050 60Hz 24 1400x1050 75Hz 25 1440x900 60Hz 26 1440x900 75Hz 27 1600x1200 60Hz 28 1680x1050 59Hz 29 1680x1050 60Hz 30 1920x1080 60Hz AV and HDMI Signal Compatibility Source Supported Signals Available Side AV PAL O SECAM O NTSC4 43 O NTSC3 58 O YPbPr 480i 480p 60Hz O 576i 576p 50Hz O 720p 50Hz 60Hz O 1080i 50Hz 60Hz O HDMI 480i 60Hz O 480p 60Hz O 576i 576p 50Hz O 720p 50Hz...

Page 23: ...3GPP 3gpp 3gp AVI avi MKV mkv H 264 3840x2160 30fps 1080P 60fps 135Mbps FLV flv MP4 mp4 mov 3GPP 3gpp 3gp MPEG transport stream ts trp tp ASF asf AVI avi MKV mkv Motion JPEG 720P 30fps 10Mbps AVI avi 3GPP 3gpp 3gp MP4 mp4 mov MKV mkv ASF asf VP8 1080P 30fps 20Mbps MKV mkv WebM webm HEVC H 265 4K2K 60fps 100Mbps MP4 mp4 mov MKV mkv MPEG transport stream ts trp tp 1080P 60fps 50Mbps MP4 mp4 mov MKV ...

Page 24: ...m DAT VOB MPG MPEG FLV flv WAV wav SWF swf AC3 32KHz 44 1KHz 48KHz 32Kbps 640Kbps AC3 ac3 AVI avi Matroska mkv mka 3GPP 3gpp 3gp MP4 mp4 mov m4a MPEG transport stream ts trp tp MPEG program stream DAT VOB MPG MPEG EAC3 32KHz 44 1KHz 48KHz 32Kbps 6 Mbps EAC3 ec3 3GPP 3gpp 3gp MP4 mp4 mov m4a MPEG transport stream ts trp tp MPEG program stream DAT VOB MPG MPEG AAC HEAAC 8KHz 48KHz AAC aac AVI avi Ma...

Page 25: ... Subtitle Code dat mpg mpeg vob MPG MPEG DVD Subtitle ts trp tp TS DVB Subtitle mp4 MP4 DVD Subtitle UTF 8 Plain Text mkv MKV ASS SSA UTF 8 Plain Text VobSub DVD Subtitle avi AVI 1 0 2 0 DMF0 1 2 XSUB XSUB External Subtitles Extension Subtitle Parser Remark srt Subrip ssa ass SubStation Alpha smi SAMI sub SubViewer MicroDVD DVDSusbtitleSystem SubIdx VobSub SubViewer 1 0 2 0 Only txt TMPlayer ...

Page 26: ...ons When connecting devices to your TV s connectors by using DVI converter cable DVI to HDMI cable not supplied you can refer to the following resolution information 56Hz 60Hz 66Hz 70Hz 72Hz 75Hz 640x480 þ þ 800x600 þ þ þ 1024x768 þ þ þ 1280x768 þ þ 1280x960 þ 1360x768 þ 1366x768 þ 1280x1024 þ þ þ 1400x1050 þ 1600x900 þ 1920x1080 þ ...

Page 27: ...t button to change the setting from Automatic to Manual Now you can enter the Manual IP and or Manual DNS values Select the related item in the drop down menu and enter the new values using the numeric buttons of the remote Press the OK button to save settings when complete Wireless Connectivity To Connect to a Wireless Network The TV cannot connect to the networks with a hidden SSID To make your ...

Page 28: ... the connection is established correctly you will be able to access the shared files from your mobile device via the Media Browser of your TV Enter the Media Browser menu and the playback device selection OSD will be displayed Select your mobile device and press the OK button to continue If available you can download a virtual remote controller application from the server of your mobile device app...

Page 29: ...r PC with an authorized username password and also ensure that your domain is active prior to sharing any files in your media server program on your PC If the domain is invalid this might cause problems while browsing files in Audio Video Sharing mode Using Audio Video Sharing Network Service Audio Video Sharing featureusesastandardthateases the viewing process of digital electronics and makes the...

Page 30: ... dependent problems may be caused by the content service provider Portal service content and the interface may be changed at any time without prior notice Third party internet services may change be discontinued or restricted at any time iPlayer Application You can access BBC iPlayer using your TV Select BBC iPlayer application among the portal options Press the OK button on your remote control to...

Page 31: ...nt is available When you select a programme Freeview Play will directly launch the catch up service If you wish to watch Demand 5 on Freeview Play please use the other options listed below to access the catch up service 2 Freeview Play via the FPlay button Click Freeview Play button on your remote control This will bring up the Freeview Play portal where you can choose the channel and programme to...

Page 32: ...if your TV doesn t have internal wifi feature To be able to use internet based features your modem router must be connected to the internet IMPORTANT Make sure the TV and mobile device are connected to the same network For media sharing feature Audio Video Sharing option should be enabled if available Press the Menu button on the remote select Settings More menu and press OK Highlight Audio Video ...

Page 33: ...the content from any other selected TV sources and Media Browser Notes Note that only digital DVB T C S SD and HD channels are supported Multilanguage audio support and subtitle on off features are not functional The streaming performance may change depending on the quality of your connection Media Share Page To access the Media Share widget tap on the Up arrow on the bottom left side of the scree...

Page 34: ... For advice on where to purchase accessories please contact the store where you purchased your equipment Internet Portal functionality information The content and services available through the SmarTVue portal are provided by third party providers and may be altered suspended or discontinued at any time without notice Hitachi is not responsible for any of the content or services and does not warra...

Page 35: ...with the instructions contained in this manual It must be used solely for domestic purpose The guarantee will be rendered invalided if the product is re sold or has been damaged by inexpert repair Specifications are subject to change without notice The manufacturer disclaims any liability for the incidental or consequential damages The guarantee is in addition to and does not diminish your statuto...

Page 36: ... Brand HITACHI Product No 10113642 Model No 43HK15T74U Energy efficiency class A Visible screen size diagonal approx inch cm 43 inches 109 cm On mode average power consumption Watt 54 W Annual energy consumption kWh annum 78 kWh Standby power consumption Watt 0 5 W Off mode power consumption Watt 0 W Display resolution px 3840 x 2160 ...

Page 37: ...lowing internet address https estadoc hitachi eu estadoc index htm Hitachi Europe Ltd Whitebrook Park Lower Cookham Road Maidenhead Berkshire SL6 8YA UK English 37 For any help concerning set up and use of your TV please call the Customer Helpline 0345 604 0105 2017 HITACHI 43HK15T74U 78 54 109 43 50423562 50423562 Standby Power Consumption approx 0 5 W Screen Resolution 3840 x 2160 ...

Page 38: ... mm Ruuvinkoot Pituus x Kierre Y Norsk VESA VEGGMONTERINGSMÅL Hullmønster størrelser mm Skruestørrelser Lengde x Tråd Y Dansk VESA VÆGMONTERINGS MÅL Hulmønster størrelser mm Skruestørrelser Længde X Tråd Y Русский РАЗМЕРЫ НАСТЕННОГО КРЕПЛЕНИЯ VESA Размеры системы отверстий Размеры винтов Длина Х Резьба Y беларуская ПАМЕРЫ НАСЦЕННАГА МАЦАВАННЯ VESA Памеры сістэмы адтулін Памеры вінтоў Даўжыня X Раз...

Reviews: