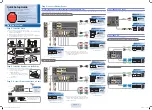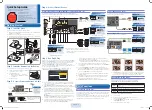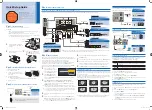
QUICK REFERENCE REMOTE CONTROL
In addition to controlling all of the functions on your HITACHI Plasma TV, the remote control is designed to operate different types of
devices, such as, DVD Players, Cable Boxes (CBL), set-top-boxes, satellite receivers, PVRs/VCRs and audio devices. The remote
control must be programmed to control the chosen device. Refer to Instruction Book for detailed programming instructions.
LEGEND
TV - Television
DVD - Digital Video Disc Player
CBL - Cable Box
STB - Set-Top-Box/Satellite Receiver
PVR - Personal Video Recorder
VCR - Video Cassette Recorder/Player
AMP/CD - Amplifier/Compact Disc
Player, Audio Devices
NOTES:
1. VCR precode is included in the PVR mode.
2. CD precode is included in the AMP mode.
3. Pressing any buttons will illuminate the backlight for 4 seconds while in
Automatic mode (Default).
27
TM
POWER BUTTON
(TV, DVD, CBL, STB, PVR/VCR, AMP/CD)
Turns the selected device on and off.
SOURCE ACCESS BUTTONS
(TV, DVD, CBL, STB, PVR/VCR, AMP/CD)
Changes the mode of the Universal Remot
e
Control to control the device selected.
DVD/VCR CONTROL BUTTONS
(DVD, PVR/VCR, AMP/CD)
Controls the functions of your VCR, DVD
and audio devices.
DAY/NIGHT
(TV)
Toggles picture mode settings between
DAY and NIGHT mode.
ASPECT BUTTON
(TV)
Changes the aspect ratio of the TV.
PIP CONTROL BUTTONS
(TV)
Press to show and change the Picture-in-Picture mode.
MENU BUTTON
(TV, DVD, CBL, STB, PVR/VCR)
Accesses the OSD menu system.
(-) BUTTON
(TV,STB)
The (-) button is used when the remote is in
Set-Top-Box (STB) mode or when the TV uses
a digital input.
NUMERIC BUTTONS
(TV, DVD, CBL, STB, PVR/VCR, AMP/CD)
Used to manually enter the TV channel, and used
for numeric entry when navigating through the OSD,
INPUTS, and AV NET menu systems.
GUIDE BUTTON
(TV, STB, CBL, PVR)
Accesses the TV Guide On Screen system (see page 54)
of the TV or the program guide of other devices.
EXIT BUTTON
(TV, CBL, STB, PVR/VCR)
Exits out of the OSD, INPUTS or AV NET menu
systems if their menu is displayed.
LAST CHANNEL BUTTON
(TV, CBL, STB, PVR)
Switches between the current and last channel viewed.
LIGHT BUTTON
(TV, CBL, STB, PVR)
Press to use the back light feature. Can
also be used to change backlight mode.
INFO BUTTON
(TV, STB, CBL, PVR)
Displays various information on the screen,
such as channel information.
CHANNEL WHEEL
(TV, CBL, STB, PVR/VCR, AMP/CD)
Scroll up or down to change channel. Push down on
the wheel to access (FAV) Favorite Channel mode.
(Favorite channel is only available for TV mode.)
CURSOR PAD/SELECT BUTTON
(TV, DVD, CBL, STB, PVR/VCR)
The Cursor Pad is used as a cursor to navigate
through the OSD and INPUT menu systems.
The Select button is used to Select/Activate
highlighted menu items.
VOLUME WHEEL
(TV, AMP/CD)
Scroll up and down to adjust the audio level of your
TV. Push down on the wheel to mute.
PAUSE BUTTON
(TV,PVR/VCR, DVD, AMP/CD)
Press to show and change the Freeze mode of the TV.
Also used to pause other devices when the remote is in
DVD, PVR/VCR, or AMP/CD mode.
INPUTS BUTTON
(TV, AMP)
Accesses the INPUTS menu system.
MODE INDICATOR
Turns on or blinks to show remote control
mode when the SOURCE ACCESS buttons
are pressed.
CURSOR UP & DOWN /CH + & CH - BUTTON
(TV, CBL, STB, VCR)
The CH+ or CH- is used to change channels up or down.
The Cursor UP or DOWN to navigate through the OSD
and INPUT menu systems.
55
HDT79 and
55
HDX99 Models Only
Summary of Contents for 42HDT79 - UltraVision CineForm - 42" Plasma TV
Page 62: ...DW2U 59 FINAL WIRING DIAGRAM TABLE OF CONTENTS ...
Page 64: ...QUICK DISASSEMBLE GUIDE Back Cover 2 61 DW2U BACK COVER Remove Screw M3D_4 10BD 34 Pcs ...
Page 66: ...QUICK DISASSEMBLE GUIDE Chassis Block 63 DW2U Remove Screw M3E 4 10 2 Pcs CHASSIS BLOCK ...
Page 68: ...QUICK DISASSEMBLE GUIDE POD PWB 65 DW2U Remove Screw M3E 3 8 Remove POD PWB Assy ...
Page 70: ...FINAL ASSEMBLY GUIDE TABLE OF CONTENTS 67 DW2U ...
Page 71: ...FINAL ASSEMBLY GUIDE 68 DW2U ...
Page 72: ...FINAL ASSEMBLY GUIDE 69 DW2U ...
Page 73: ...FINAL ASSEMBLY GUIDE 70 DW2U ...
Page 74: ...FINAL ASSEMBLY GUIDE 71 DW2U ...
Page 75: ...FINAL ASSEMBLY GUIDE 72 DW2U ...
Page 76: ...FINAL ASSEMBLY GUIDE 73 DW2U ...
Page 77: ...FINAL ASSEMBLY GUIDE 74 DW2U ...
Page 78: ...FINAL ASSEMBLY GUIDE 75 DW2U ...
Page 79: ...FINAL ASSEMBLY GUIDE 76 DW2U ...
Page 118: ......


