background image

HOOK-UP CABLES AND CONNECTORS 


20

receptacle 


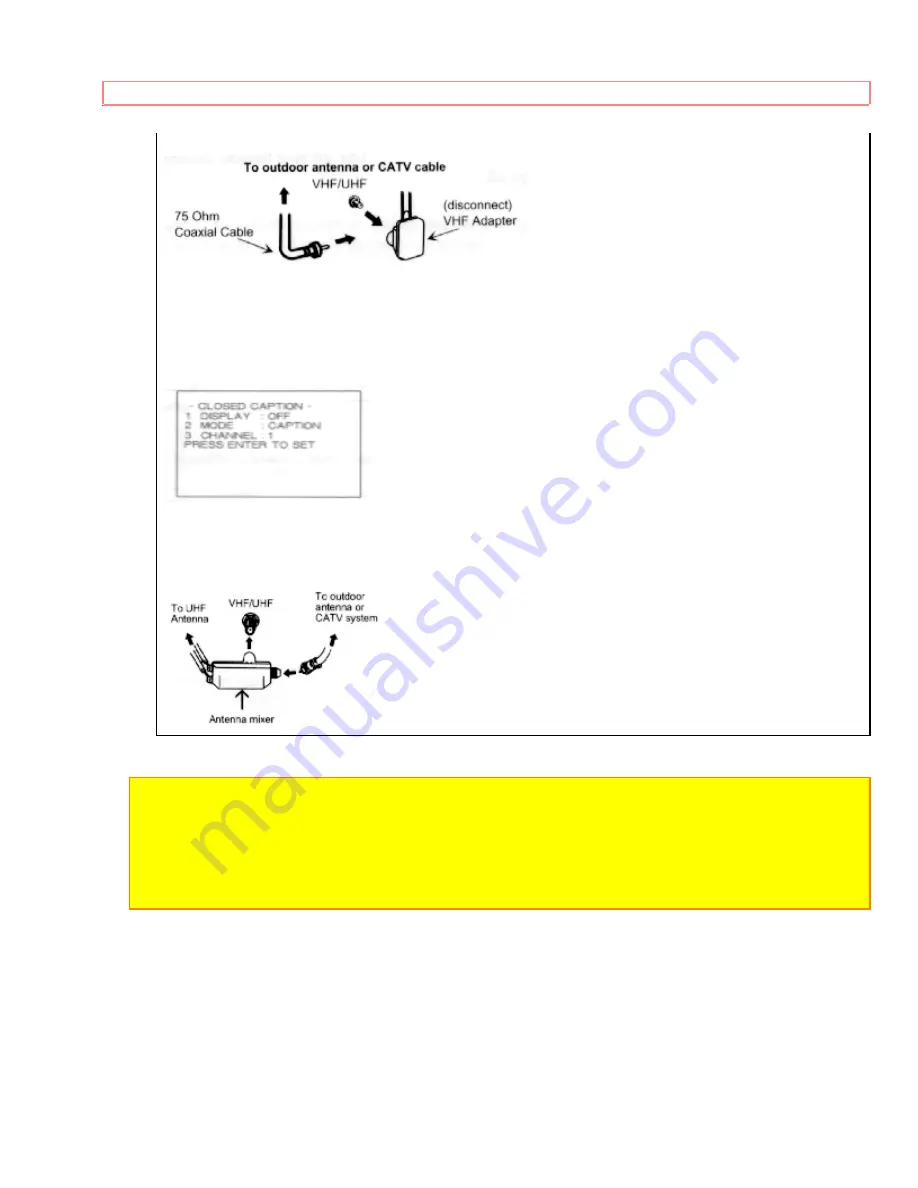
2. VHF (300-Ohm) antenna/UHF antenna 

When using a 300-Ohm twin lead from an outdoor antenna, disconnect the (VHF or 
UHF) indoor antenna leads from screws of the (VHF or UHF) adapter, and connect 
outdoor (VHF or UHF) antenna leads to these screws of a (VHF or UHF) adapter. 


3. When both VHF and UHF antennas are connected 

Attach an optional ANT. MIXER to the TV antenna terminal, and connect the cables to 
the ANT. MIXER. 


Notes: 

1. If an outdoor antenna/CATV is to be used, disconnect the indoor antenna. Do not leave 
both the indoor and outdoor antennas/CATV connected at the same time, since ghosting 
and poor reception may result. 
2. Consult your dealer or service store for the ANT. MIXER and (VHF or UHF) adaptor. 
3. The special converter (decoder) will be supplied by the cable company. 

Summary of Contents for 35TX10B

Page 1: ...TABLE OF CONTENTS 1 1 HITACHI SOLID STATE COLOR TELEVISION 35UX60B 35TX10B OPERATING GUIDE ...

Page 2: ...35 AUDIO SYSTEM SET UP FOR 35UX60B 36 AUDIO SYSTEM SET UP FOR 35TX10B 37 THE GENIUS REMOTE CONTROL CLU 850GR 38 MULTI PAGE WINDOWS 40 THE GENIUS REMOTE CONTROL CLU 692GR 41 HOW TO USE THE GENIUS REMOTE TO CONTROL YOUR TV 43 PICTURE IN PICTURE P IN P 47 USING THE GENIUS REMOTE TO CONTROL VCR FUNCTIONS 49 USING THE GENIUS REMOTE TO CONTROL CABLE BOX FUNCTIONS 51 VCR AND CABLE BOX CODES 52 TABLE 1 VC...

Page 3: ...TIMER 72 AUTOMATIC MESSAGE 73 VIDEO FOR 35UX60B 75 PREFERENCE ADJUST 75 PREFERENCE SETTING 76 VIDEO FOR 35TX10B 77 AUDIO 78 PREFERENCE ADJUSTMENT 78 PREFERENCE SETTING 78 AUDIO FOR 35TX10B 82 SURROUND 82 AUDIO FOR 35UX60B 84 SURROUND 84 CARE OF YOUR HITACHI COLOR TV AND YOUR REMOTE CONTROL 87 RECEPTION PROBLEMS 88 CHECK HERE BEFORE CALLING FOR SERVICE 90 SPECIFICATIONS 91 NOTES 93 ...

Page 4: ...lateral triangle is intended to alert the user to the presence of uninsulated dangerous voltage within the product s enclosure that may be of sufficient magnitude to constitute a risk of electric shock to persons The exclamation point within an equilateral triangle is intended to alert the user to the presence of important operating and maintenance servicing instructions in the literature accompan...

Page 5: ...5 119 of the FCC rules CAUTION Never remove the back cover of the set as this can expose you to very high voltages and other hazards If the set does not operate properly unplug the set and call your dealer or service shop HITACHI s 35UX60B employ state of the art computer circuits to enhance picture performance Should your color TV become unplugged from the AC wall outlet or lose AC power due to a...

Page 6: ...your warranty card at once and mail it to HITACHI This will enable HITACHI to notify you promptly in the improbable event that a safety problem should be discovered in your model of product FOR YOUR PERSONAL SAFETY 1 This television set is equipped with a polarized alternating current line plug a plug having one blade wider than the other This plug will fit into the power outlet only one way This ...

Page 7: ...age points or short out parts that could result in a fire or electric shock Never spill liquid of any kind on the television set 7 If the television set has been dropped or the cabinet has been damaged unplug this television set from the wall outlet and refer servicing to qualified service personnel 8 If liquid has been spilled into this television set unplug it from the wall outlet and refer serv...

Page 8: ... AND LOCATION OF YOUR SET 12 Do not use this television set near water for example near a bathtub washbowl kitchen sink or laundry tub in a wet basement or near a swimming pool etc Never expose the set to rain or water If the set has been exposed to rain or water unplug the set from the wall outlet and refer servicing personnel 13 Choose a place where light artificial or sunlight does not shine di...

Page 9: ...ding diagram 16 2 Note to CATV system installer Only for the television set with CATV reception This reminder is provided to call the CATV system installer s attention to Article 820 40 of the NEC that provides guidelines for proper grounding and in particular specifies that the cable ground shall be connected to the grounding system of the building as close to the point of cable entry as practica...

Page 10: ...ensive work by a qualified technician to restore the television set to normal operation 21 When going on a holiday If your television set is to remain unused for a period of time turn the television set off and unplug it from the wall outlet IF THIS SET DOES NOT OPERATE PROPERLY 22 If you are unable to restore normal operation by following the detailed procedure in your operating instructions do n...

Page 11: ... service technician has used replacement parts specified by the manufacturer that have the same characteristics as the original part Unauthorized substitutions may result in fire electric shock or other hazards 27 Upon completion of any service or repairs to the television set ask the service technician to perform routine safety checks to determine that the television is in safe operating conditio...

Page 12: ...NOT COVERED by your Hitachi Factory Warranty When using the Picture in Picture function the sub picture should not be left permanently in one corner of the screen or a pattern burn may develop over a long period of time This Color television receiver was intended mainly for the private viewing of programs broadcast by TV stations and cable companies and programs from other video sources Public vie...

Page 13: ...00 448 2244 for your nearest HITACHI Authorized Parts Distributor in the continental United States For Alaska and Hawaii please contact your nearest HITACHI Regional office Chart of Remotes and Television Stand CAUTION The television stand model SP350G is designed for use only with HITACHI TV models 35UX60B and 35TX10B Use with other television equipment may result in instability causing possible ...

Page 14: ... instance when you go on a vacation unplug the television set from the wall outlet 2 Do not subject the Remote transmitter to shocks such as dropping it on the floor etc Precision parts may be damaged 3 Do not allow the remote transmitter to become wet and avoid placing it in areas of high humidity Don t leave it on or near a heater Excess heat or moisture may cause the unit to cease operation 4 I...

Page 15: ...REMOTE CONTROL BATTERY INSTALLATION AND REPLACEMENT 15 3 To operate your TV point the Remote transmitter at the remote sensor of the TV ...

Page 16: ... of the HITACHI Color Television is its viewing screen To see this screen at its best test various locations in the room to find the best spot for viewing The drawings give several suggestions The best picture is seen by sitting directly in front of the TV and about 3 to 6 feet from the screen During daylight hours reflections from outside light may appear on the screen If so drapes or screens can...

Page 17: ...ACHI COLOR TV 17 CAUTION The magnetic field of external speakers may cause the TV picture to distort if the speakers are placed too close to the television Move the speakers away from the TV until there is no picture distortion ...

Page 18: ...s required by the various components Also make sure the cables are the correct length 300 Ohm Twin Lead Connector This outdoor antenna cable must be connected to an antenna adaptor 300 Ohm to 75 Ohm F Type 75 Ohm Coaxial Antenna Connector For connecting RF signals antenna or cable TV to the antenna jack on the television Phono Connector Used on all standard video and audio cables which connect to ...

Page 19: ...sing a 300 Ohm twin lead from an outdoor antenna connect the VHF or UHF antenna leads to screws of the VHF or UHF adaptor Plug the adaptor into the antenna terminal on the TV When both VHF and UHF antennas are connected Attach an optional antenna cable mixer to the TV antenna terminal and connect the cables to the antenna mixer Consult your dealer or service store for the antenna mixer FOR 35TX10B...

Page 20: ...er 3 When both VHF and UHF antennas are connected Attach an optional ANT MIXER to the TV antenna terminal and connect the cables to the ANT MIXER Notes 1 If an outdoor antenna CATV is to be used disconnect the indoor antenna Do not leave both the indoor and outdoor antennas CATV connected at the same time since ghosting and poor reception may result 2 Consult your dealer or service store for the A...

Page 21: ...lustration AVX Audio Video selector Press this button to select the current antenna source or VIDEO 1 2 or 3 Your selection is shown in the top right corner of the screen VOLUME level Press these buttons for your desired sound level The volume level will be displayed on the TV screen ...

Page 22: ...ns to the same Video if not Power is OFF AI Artificial Intelligence sensor This Artificial Intelligence sensor will make automatic picture adjustments depending on the amount of light in the room to give the best picture See page 55 REMOTE CONTROL sensor Point your Genius Remote at this area when selecting channels adjusting volume etc FRONT INPUT JACKS for VIDEO 3 Use these audio video jacks for ...

Page 23: ...mcorder or VCR as shown in the following examples Front Panel Jacks Examples NOTE Completely insert the connections cord plugs when connecting to front panel jacks If you do not the played back picture may be abnormal If you have an S VHS VCR use the S INPUT cable in place of the standard video cable Model 35TX10B does not have Front Panel S Video connector ...

Page 24: ... etc Output These jacks provide fixed audio and video signals which are used for recording Audio to Hi Fi These jacks provide variable audio output to a separate stereo system amplifier With this connection the audio to the stereo can be controlled by the television s remote control Use these jacks for the SURROUND Left and Right channels See page 19 23 and 24 Rear Speaker Terminals These terminal...

Page 25: ... always a signal coming out from this connection INT EXT SPEAKER connection is connected in parallel with the factory built in speaker By using an optional external speaker you can select to use which speaker you want by switching the switch located at the rear panel to INT Internal for Factory built in speaker or EXT External for optional consumer connected speakers this is On Screen Display cont...

Page 26: ...REAR PANEL JACKS 35TX10B 26 REAR PANEL JACKS 35TX10B Rear Panel Jacks 35TX10B ...

Page 27: ...et up Follow connections that pertain to your personal entertainment system NOTE The Dolby speaker output connection is for Dolby Surround This is always ON wether the Int Ext Speaker output is ON or OFF The Int Ext Speaker output will only have a sound reproduction when switch is on EXT and Int Speaker On Screen Display is ON ...

Page 28: ...REAR PANEL CONNECTIONS FOR 35TX10B 28 REAR PANEL CONNECTIONS FOR 35TX10B Rear Panel Connections 35TX10B ...

Page 29: ...of an external audio amplifier with the remote transmitter connect the system as shown below in Fig 1 FIG 1 NOTE To prevent damage to the speaker and distorted sound set the volume control of the audio amplifier lower and adjust the sound level using the volume control on the remote transmitter of the TV set ...

Page 30: ...every time the AVX button is pressed as shown below Connect External source to the INPUT terminal then press the AVX button as necessary to view the input source NOTE When TV is set to VIDEO and a video signal is not received from VIDEO INPUT JACK on the jack panel of the TV i e VCR Video Disc Player etc is not connected or the video device is OFF the screen will be black CONNECTING MONAURAL AUDIO...

Page 31: ...ect the cable from the AUDIO OUT R of the VCR or the Video Disc Player to the INPUT AUDIO R jack Fig 1 3 Connect the cable from the AUDIO OUT L of the VCR of the Video Disc Player to the INPUT AUDIO L jack Fig 1 4 Press the AVX button to view the program from the VCR or Video Disc Player The video mode VIDEO disappears automatically after approx 8 seconds 5 Press the AVX button to return to the pr...

Page 32: ...RCES 32 NOTE Completely insert the connection cord plugs when connecting to REAR panel jacks If you do not the played back picture may be abnormal If you have an S VHS VCR use the S INPUT cable in place of the standard video cable ...

Page 33: ...eaker A Dolby Surround External Connection This is used for DOLBY Surround sound signal is always ON B INT EXT SPEAKER CONNECTION This is controlled by the remote transmitter thru the on screen display It can be turned ON or OFF with the INT EXT switch that could be set to factory built in Internal speaker or to an optional Ext Speaker CAUTION Do not connect Speakers simultaneously to the REAR SPE...

Page 34: ...REAR SPEAKER TERMINAL CONNECTIONS FOR 35UX60B 34 ...

Page 35: ...this feature If your device has only one audio output mono sound connect it to the left audio jack on the TV Refer to the operating guide of your other electronic equipment for additional information on connecting your hook up cables A single VCR can be used for VCR 1 and VCR 2 but note that a VCR cannot record its own video or line output INPUT 1 in the example on p 17 Refer to your VCR operating...

Page 36: ...fer to the table for the different surround sound requirements See page 62 for SURROUND functions The television s internal speakers These speakers are connected to a separate audio amplifier Use the Audio to Hi Fi output on the TV These speakers are connected to the Rear Speaker 8 Ohm output on the TV Audio system setup illustration ...

Page 37: ...rs below to the diagram for speaker placement and refer to the table for the different surround sound requirements See page 61 for SURROUND functions The television s internal speakers These speakers are connected to a separate audio amplifier Use the Audio to Hi Fi output on the TV ...

Page 38: ... making operation simple when multiple functions are to be controlled To operate your TV point the Genius Remote at the remote sensor of the TV To operate your VCR point the remote at the remote sensor of the VCR Click here to see Remote CLU 850GR READY indicator light Refer to page 38 SEND LEARN indicator light Refer to page 38 LEARN USE select switch Located on rear side of remote control LEARN ...

Page 39: ...THE GENIUS REMOTE CONTROL CLU 850GR 39 buttons shown in The light will stay on for about 8 seconds if no button is pressed The buttons will not appear to light if the room is too bright ...

Page 40: ...MULTI PAGE WINDOWS 40 MULTI PAGE WINDOWS Click to see Multi Page Windows of CLU 850GR ...

Page 41: ...ecoded buttons below will control HITACHI TV only when the MULTI PAGE SELECT SWITCH below is set to TV mode To operate your TV point the Genius remote at the remote sensor of the TV To operate you VCR point the remote at the remote sensor of the VCR To operate your cable box point the remote at the remote sensor of the cable box Click here to see Multi Page Windows of CLU 692GR MULTI PAGE SELECT S...

Page 42: ...i Page select switch is in the VCR of MENU CATV position LIGHT BUTTON When you are in a dark room press this button on to light up the Channel Keys Volume Up and Down Keys The light will stay on for about 8 seconds if no button is pressed The buttons will not appear to light if the room is too bright ...

Page 43: ...s this button to turn the TV set on or off If an automatic message is set it will be displayed when the TV is first turned on See page 53 RECALL button When you want to check the channel being received or if it has a stereo ST or second audio program SAP press the RECALL button You can also check the time and if the ON TIME or OFF TIME has been set See page 52 You can also use the RECALL button to...

Page 44: ...ifferent features These buttons are also used for FAVORITE CHANNELS See page 47 The ENTER button will set features to your preference CHANNEL SELECT buttons are used to set the time for channel memory etc CHANNEL SELECTOR buttons Enter two or three numbers to select channels Enter a 0 first for channels 1 to 9 Use the 100 button for channels 100 and higher Channel selection may also be performed b...

Page 45: ...sired sound level To turn the sound OFF instantly to answer the telephone etc press the MUTE button Press the MUTE button again or press the VOLUME up button to restore the sound The word MUTE will remain displayed if the CLOSED CAPTION feature is turned OFF The word MUTE will not be displayed if the CLOSED CAPTION feature is ON ...

Page 46: ... for watching two sporting events etc PICTURE IN PICTURE buttons See separate section on page 32 for a description LIGHT button When you are in a dark room press this button to light up the volume and channel buttons The light will stay ON for about 8 seconds if no buttons is pressed The buttons will not appear to light if the room is too bright ...

Page 47: ...sub picture appears in one corner of the screen Press the button a second time to remove the sub picture from the screen Press the AVX button when the sub picture is on to change between VIDEO 1 VIDEO 2 and VIDEO 3 The TV channel will always be either the main picture or the sub picture P IN P BUTTON 35UX60B Press the P IN P button and a sub picture appears in one corner of the screen To remove th...

Page 48: ...r P IN P to return to normal viewing The EXCHNG picture in picture function will not work with this FREEZE function CAUTION A pattern burn may develop if the sub picture is left in the same corner permanently If the PIP feature is used frequently occasionally shift the sub picture to a different corner NOTE 1 Only sound from the main picture can be heard 2 P IN P will not work with a CHILD LOCK ch...

Page 49: ...ls do not change after 5 seconds try a different Genius Remote button 6 Release both buttons when the VCR starts to change channels The Genius Remote will now control your VCR Click here to see the CLU 850GR in the VCR position NOTES 1 If your VCR cannot be operated after performing the above procedures this means that your VCR s codes have not been precoded into the GENIUS REMOTE Please store you...

Page 50: ...USING THE GENIUS REMOTE TO CONTROL VCR FUNCTIONS 50 EXCLUSIVE TV BUTTONS These buttons are for operating the TV ...

Page 51: ...n this occurs the Genius Remote Control is programmed for your cable box If the cable box channels do not change after 5 seconds try a different Genius Remote button 6 Release both buttons when the cable box starts to change channels The Genius Remote will now control your cable Click here to see the CLU 850GR in the CATV position NOTES 1 If your cable box cannot be operated after performing the a...

Page 52: ... Curtis Mathis 2 6 dbx VOLUME Dimensia 2 Emerson 100 ENTER Fisher VOLUME GE 2 6 Goldstar 0 Hitachi 1 Instant Replay 6 JC Penny 1 6 9 VOLUME JVC 0 VOLUME Kenwood 0 VOLUME Magnavox 4 6 Marantz 9 VOLUME Marta 0 Memorex 6 VOLUME MGA 7 Minolta 1 Mitsubishi 7 Montgomery Wards CHANNEL NEC 9 VOLUME Panasonic 6 Pentex 1 Philco 4 6 Philips 4 6 Pioneer 1 ProScan 2 Quasar 6 RCA 1 2 Realistic 6 9 CHANNEL VOLUM...

Page 53: ...recoded remote controls for Hitachi GR111 Remote CLU 850GR Press SELECT and this CATV brand button General Instrument 0 1 2 3 Hamlin 4 Jerrold 1 2 3 3 Magnavox 9 Panasonic 8 Philips 9 Pioneer 7 Regal 4 Scientific Atlantic 6 Viewstar 9 Zenith 5 TABLE 3 VCR Precoded remote controls for Hitachi GJ111 Remote CLU 692GR Press SELECT and this VCR BRAND button Canon 6 Citizen 0 Curtis Mathis 2 6 Dimensia ...

Page 54: ...rex 6 MGA 7 Minolta 1 Mitsubishi 7 Montgomery Wards CHANNEL NEC 9 Panasonic 6 Pentex 1 Philco 4 6 Philips 4 6 Pioneer 1 ProScan 2 Quasar 6 RCA 1 2 Realistic 6 9 CHANNEL Sanyo 9 Scott 7 8 Sears 1 9 Sharp CHANNEL Sony 5 VOLUME VOLUME Sylvania 4 6 Tashiko 0 Technics 6 Toshiba 1 8 Wards CHANNEL Yamaha 9 Zenith 3 5 ...

Page 55: ...BLE 4 Cable Box Precoded remote controls for Hitachi GJ111 Remote CLU 692GR Press SELECT and this CATV brand button General Instrument 0 1 2 3 8 Hamlin 4 Jerrold 0 1 2 3 8 Pioneer 7 Regal 4 Scientific Atlantic 6 Viewstar 9 Zenith 5 ...

Page 56: ...of the device VCR Cable Converter etc If you do not do this the device may work unexpectedly The power could be turned on an important tape could be erased the volume could increase too much etc Click to see CLU 850GR in the USER position LEARNABLE BUTTONS These buttons can learn the codes of other remote control transmitters when the MULTI PAGE select switch is set to the USER mode MULTI PAGE key...

Page 57: ...ndicator will flash at this time The light will remain lit for approximately 15 seconds If no other function is performed at this time the operation is canceled The Genius Remote is ready to receive an infrared code from another remote Press and hold the button down on the other transmitter which contains the code to be stored while the READY light is flashing on the Genius Remote Release the butt...

Page 58: ...etters on an empty label with a ballpoint pen Example of User s Labels NOTE 1 To operate your TV be sure to point the Genius Remote at the remote sensor on the television To operate other electronic equipment like a VCR point the remote at the sensor on the device 2 Refer to the instruction manual of the VCR for operation on the buttons exclusively for the VCR 3 Be sure to keep the original remote...

Page 59: ...magenta purple color Press the CURSOR buttons to highlight a different feature Press ENTER on the remote control to select a feature NOTE Press the CURSOR buttons first to view FAVORITE CHANNELS See Page 47 NOTE For CLU 692GR slide multi page select to MENU CATV mode to work on MENU ENTER and cursor up down left and right Slide to TV mode to use channel buttons or number buttons ...

Page 60: ... etc CHILD LOCK Block channel picture sound PROGRAM LIST Check channel name scan childlock VOLUME CORRECTION Lower volume on selected channels CLOCK SET Set before using timer features ON OFF TIMER Turn TV on or off one time or daily AUTOMATIC MESSAGE 1 Set for one time or daily AUTOMATIC MESSAGE 2 Set for one time or daily FOR 35UX10B Adjust Contrast Color Tint Sharpness and White Control FOR 35U...

Page 61: ...EASY GRAPHIC GUIDE 61 PREFERENCE ADJUST Adjust balance bass and treble PREFERENCE SETTING Improve sound performance SURROUND Special sound effects ...

Page 62: ...o highlight the function desired AIR CABLE AIR Select AIR if you are using an indoor or outdoor antenna Select CATV if you have cable TV Press the CURSOR buttons to highlight the correct AIR CABLE mode and press MENU to exit Your choice will be shown on the display Reception channels for each mode are shown at the right ...

Page 63: ...ed switch antenna inputs with the ANT button and repeat auto programming for the second antenna input Remember to set the correct AIR CABLE mode before using auto programming for the second antenna input See CHANNEL MEMORY to add or erase additional channels CHANNEL MEMORY Using this function after AUTOPROGRAM to add or erase additional channels by the remote control CHANNEL buttons Your Choice wi...

Page 64: ...s reports or a TV program guide This information covers the entire screen and viewing the TV program is not possible TEXT may not be available with every program CHANNEL 1 is used for the primary language usually English CHANNEL 2 is sometimes used for a second language may vary by region Use the CURSOR or to highlight the function to change press ENTER to change the function and press MENU to exi...

Page 65: ...er channel 00 to erase a favorite channel Highlight ACTION and press ENTER to use your favorite channels Use the CURSOR buttons to highlight a favorite channel and the TV will automatically tune to the channel Highlight CH SET and Press ENTER to add or erase more favorite channels FAVORITE CHANNEL PREVIEW For 35UX60B Highlight a topic MOVIE SPORT NEWS or CHOICE and press ENTER to get a preview of ...

Page 66: ...FAVORITE CHANNELS 66 change the channel and moving picture for the Favorite Channel Preview The Favorite Channel Preview is removed when the cursor is pressed ...

Page 67: ...reset to change your preferred video and audio adjustments to factory settings NOTE This RESET Selection will not change your preferred adjustments To change back to your adjustments see VIDEO Page 54 and 56 or Audio Page 57 ...

Page 68: ...RESET 68 NOTE This RESET Selection will not change your preferred adjustments To change back to your adjustments see VIDEO Page 54 and 56 or Audio Page 57 ...

Page 69: ...SOR to change position Press ENTER to set the CHANNEL CAPTION and it will appear in the top left corner of the screen Press CHANNEL or the number buttons to select and label additional channels Press MENU to exit The represents a blank space Select CANCEL to erase a CHANNEL CAPTION PROGRAM LIST This function allows you to view which channels are labeled in CHANNEL CAPTION NAME which have been adde...

Page 70: ...t for this channel Repeat the same steps to cancel the CHILD LOCK To change the key number select key number change Enter the old number factory preset 000 for first time use then enter a new three digit key number you prefer If you forget your key number use the factory code 777 to erase your key number This will reset the key number back to the factory preset 000 VOLUME CORRECTION Use this funct...

Page 71: ...tment is for the channel displayed in the top right corner of the screen To adjust a different channel you must select the channel with the channel or number buttons and press ENTER 2 If the channel has been corrected before use the cursor to highlight that channel then use the cursor to change the level 3 To erase a channel from the volume correction select channel 00 and press ENTER 4 The volume...

Page 72: ... will automatically turn the TV on or off one time only or everyday The step to change will be in magenta Press the number buttons to select the time the TV will turn ON or OFF AM 1 PM 2 Press the CURSOR buttons for MODE ONCE one time only or MODE DAILY TV will turn on off at the same time every day Press CHANNEL or the NUMBER buttons to set the channel the TV will tune to when it automatically tu...

Page 73: ...are away from home AUTOMATIC MESSAGE Use this function to set one or two personal messages every day or one time only Use the CURSOR to select a letter or other character Use the CURSOR to change position Press ENTER when message is finished The asterisk represents a blank space Move the CURSOR until CANCEL is magenta and press ENTER to erase message Use CURSOR to choose MODE or TIME Use CURSOR to...

Page 74: ...CLOCK 74 Press ENTER to start and MENU to exit NOTE Automatic Message 2 is the same cursor operation ...

Page 75: ...e the contrast between black and white levels in the picture This adjustment will only affect the picture when the PICTURE SETTING AI is OFF See page 55 TINT Use this function to adjust flesh tones so they appear natural COLOR Use this function to adjust the level of color in the picture BRIGHT Use this function to adjust overall picture brightness SHARPNESS Use this function to adjust the amount ...

Page 76: ... a more natural picture 2 Automatically monitor and adjust color levels and maintain natural flesh tones 3 Automatically compensate for weak or strong TV signals to produce a clear picture The SHARPNESS function is automatically adjusted Turn the AI function off to control other PREFERENCE SETTINGS AUTOCOLOR The AUTOCOLOR function automatically monitors and adjusts the color to maintain constant c...

Page 77: ...e picture COLOR Use this function to adjust the level of color in the picture TINT Use this function to adjust the flesh tones so they appear natural BRIGHT Use this function to adjust overall picture brightness SHARPNESS Use this function to adjust the amount of fine detail in the picture WHITE CONTROL Use this function to adjust the white balance hue of the picture to your own color preference W...

Page 78: ... in magenta BALANCE This function will control the left and right balance of the TV internal speakers the AUDIO TO HIFI output and the surround speakers The balance control is also found in the Dolby Surround function See Page 63 BASS This function controls the low frequency audio to all speakers TREBLE This function control the high frequency audio to all speakers RESET When RESET in selected pre...

Page 79: ...on when both stereo and second audio are received monaural is always received DYNAMIC BASS This function allows you to enjoy spectacular bass sound that would normally be heard only with expensive home speaker systems LOUDNESS This function will improve the quality of both low and high frequency sounds when listening at low volume levels INT SPEAKERS This function is useful when first setting up t...

Page 80: ...SION ON SCREEN DISPLAY AND REAR SPEAKER CONNECTION A On Screen Display Int Speaker ON and Rear Switch to Int Internal Speaker is ON or Rear Switch to Ext Connect Ext Speaker first or no sound will be heard External speaker in ON B On Screen Display Int Speaker OFF and Rear Switch Int or Ext Int or Ext Speaker are OFF ...

Page 81: ...witch either the TV sets built in internal speaker or to a consumer connected external speakers This switch located at the rear of the TV set beside the external speaker connection can be switched to ON for a consumer connected external speaker sound reproduction or to OFF to use the factory built in speaker for sound reproduction Please refer to Int Ext Speaker Connection on page 22 ...

Page 82: ...t simulating a stereo or more louder reproduction Use the CURSOR buttons to select surround settings SURROUND OFF Use this for normal stereo mono broadcasts NOTE If the sound is noisy when a stereo broadcast is received and the TV is set to the Surround mode decrease the Treble control or turn the Surround Off MOVIE SURROUND Listener is surrounded by many sound sources such as a movie theater repr...

Page 83: ...AUDIO FOR 35TX10B 83 Your play VCR must be a HI FI or stereo unit See page 18 For stereo VCR connection Set must be outputting stereo See MTS mode stereo See page 58 ...

Page 84: ...rround setting The FRONT volume is the same as the main TV volume SURROUND OFF Use this for normal stereo mono broadcasts NOTE If the sound is noisy when a stereo broadcast is received and the TV is set to the Surround mode decrease the treble control or turn the Surround Off MATRIX SURROUND Listener is surrounded by many sound sources such as a sporting event etc NOTE Some TV systems do not trans...

Page 85: ... of the Surround program material adjust the input balance control such that any dialogue heard from the Surround speakers is minimized When this adjustment is complete restore the front channel volume setting to its original setting and enjoy optimized Dolby Surround decoding USING REAR SPEAKERS DOLBY SURROUND EXTERNAL SPEAKER Only certain Surround sound formats can be enjoyed from the TV s built...

Page 86: ...AUDIO FOR 35UX60B 86 front speakers ...

Page 87: ...tance when you go on vacation DO NOT Do not clean your screen or cabinet with strong cleaners polishes or a chemically treated cloth Do not place rubber or vinyl products or cellophane tape on your set Do not touch the screen too often Do not subject the Remote Control to shocks such as dropping it on the floor etc Physical damage to the precision parts may result Avoid placing the Remote Control ...

Page 88: ...ts Changing the direction or position of the antenna may improve reception Ghosting may also be caused by defects in the antenna system such as unshielded leads or connecting several sets to the same antenna without using multiple antenna couplers SNOW If your receiver is located in the fringe area of a television station where the signal is weak your picture may be marred by the appearance of sma...

Page 89: ...RECEPTION PROBLEMS 89 causes loss of contrast in the picture ...

Page 90: ...or internal voltage or power surges IF YOUR SET SHOULD APPEAR TO HAVE A LOSS OF POWER PLEASE FOLLOW THIS PROCEDURE 1 Push the power switch ON OFF switch once 2 If there is still no power wait 30 seconds and push the power switch again 3 If there is still no power unplug the power cord from the wall Wait thirty seconds and plug the power cord back in Push the power switch again This protective tech...

Page 91: ...resolution Picture in Picture 35UX60B Picture in Picture 35TX10B Comb Filter Wide Band Video Amp and White Control MTS Multi Channel Television Sound Stereo Broadcast Reception 3D Surround Sound 3 Way 35TX10B Dolby Surround Sound 35UX60B Velocity Scan Modulation 35UX60B Screen Size 35V 35 inches measured diagonally Inputs Power Input AC 120V 60 Hz Power consumption ave 35UX60B 165W 35TX10B 135W Po...

Page 92: ...deo 1 0Vp p 75 Ohm Audio fixed 0 470mVrms 1k Ohm Dimensions 35UX60B 35TX10B Height in 30 1 16 30 1 16 Width in 35 31 32 35 31 32 Depth in 24 13 16 24 13 16 Weight lbs 184 184 NOTE Due to improvements specifications in this operating guide are subject to change without notice Manufactured under License from Dolby Laboratories Licensing Corporation ...

Page 93: ...ll provide you with convenient and expedient assistance Our service Hotline operator will direct you to the Hitachi Authorized Service Facility nearest you Just present proof of purchase and or delivery receipts to the Hitachi Authorized Service Facility and service will be rendered in accordance with the terms of the limited warranty as stated on your warranty card or operating guide Should you h...

Page 94: ...NOTES 94 ...

Reviews: