background image

USER'S MANUAL

MANUEL UTILISATEUR

BEDIENUNGSANLEITUNG

READ THE INSTRUCTIONS INSIDE CAREFULLY.
KEEP THIS USER'S MANUAL FOR FUTURE REFERENCE.

For future reference, record the serial number of your monitor.

SERIAL NO.

The serial number is located on the rear of the monitor.

This monitor is 

ENERGY STAR

® compliant when used with a computer equipped with

VESA DPMS.
The 

ENERGY STAR

® emblem does not represent EPA endorsement of any product or

service.
As an

ENERGY STAR

® Partner, Hitachi,Ltd. has determined that this product meets

the 

ENERGY STAR

® guidelines for energy efficiency.

LCD Colour Television

Model   

17LD4200

MANUAL DE USUARIO

MANUALE D'USO

BRUKSANVISNING

Summary of Contents for 17LD4200

Page 1: ...mber is located on the rear of the monitor This monitor is ENERGY STAR compliant when used with a computer equipped with VESA DPMS The ENERGY STAR emblem does not represent EPA endorsement of any product or service As an ENERGY STAR Partner Hitachi Ltd has determined that this product meets the ENERGY STAR guidelines for energy efficiency LCD Colour Television Model 17LD4200 MANUAL DE USUARIO MANU...

Page 2: ...ngineered and manufactured with the highest priority on safety However improper use can result in electric shock and or fire In order to prevent potential danger please observe the following instructions when installing operating and cleaning the product To ensure your safety and prolong the service life of your LCD colour TV product please read the following precautions carefully before using the...

Page 3: ... can result in fire electric shock and or other danger Safety checks Upon completion of service or repair work request the service technician to perform safety checks to ensure that the product is in proper operating condition Polarization This AC adapter may be equipped with a polarized alternating current line plug a plug having one blade wider than the other This plug will fit into the power ou...

Page 4: ...ushed chafed or subjected to excessive wear and tear or heat DON T remove any fixed cover as this may expose dangerous voltages DON T obstruct the ventilation openings of the equipment with items such as newspapers tablecloths curtains etc Overheating will cause damage and shorten the life of the equipment DON T allow electrical equipment to be exposed to dripping or splashing or objects filled wi...

Page 5: ...coming from PC can pass through to PC speakers at any circumstance z Full screen true colour display z TV systems PAL Secam z Built in TV tuner for receiving terrestrial or cable TV z Easy operation With one button to switch signals coming from composite VIDEO S VIDEO COMPONENT VIDEO CABLE TV or PC z Automatic channel scan to detect the program channels z On screen display operation with IR remote...

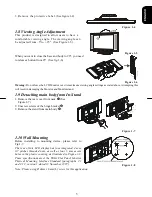
Page 6: ...maging the Monitor and Monitor stand 1 9 Detaching main body from Its Stand 1 Remove the rear cover from neck n See Figure 1 7 2 Unscrew screws of the hinge bracket o 3 Remove the stand from main body p Figure 1 7 1 10 Wall Mounting Before installing to mounting device please refer to Fig 1 7 The rear of this LCD display has four integrated 4 mm 0 7 pitches threaded nuts as well as four 5 mm acces...

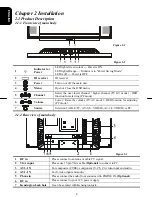
Page 7: ...ction for selecting PC mode 6 Volume Lower Raise the volume TV AV mode OSD function for adjusting PC mode 7 Source Selection CABLE TV AV 1 S VIDEO AV 2 C VIDEO or PC 2 1 2 Rear view of main body Figure 2 3 1 RF in Please connect to antenna or cable TV signal 2 VGA input Please use 15 pin VGA cable Optional to connect to PC 3 AV2 IN For composite CVBS component Y Cb Cr video input and audio 4 AV1 I...

Page 8: ...e RCA audio L R connector For video connection please choose either RCA video connector or s video connector Moreover for connection to monitor alone please omit those connections associated with PC Scart to 3 phono lead supplied can be used to connect devices with a scart socket to the LCD TV via AV2 Yellow plug to yellow socket red to red and black or white plugs to white socket ...

Page 9: ...own Turn on off the OSD menu TV AV PC Select input sources of TV AV1 AV2 and PC Adjust the selected item on menu or adjust the volume SLEEP Select timer to turn power off The default timer is 10 20 30 40 50 60 and 90 minutes Only enable in TV function Press to select desired item on the menu Press to select desired page on the text mode LAST CH Teletext colour Keys Turn back the last select channe...

Page 10: ...t TOP text or FASTEXT mode press the MODE button to switch to LIST mode Four teletext page numbers of your choice can be coloured and easily selected by pressing the corresponding coloured button on the remote control handset 1 Press a coloured button 2 Using the NUMBER buttons to select the page you wish to program 3 Press the button Then the selected page is stored as the selected page number wi...

Page 11: ...four options shown as below AUDIO Treble Bass and Balance PICTURE Bright Contrast Colour and Sharpness SETUP Language Sleep Channel search Channel memory Fine Tune Channel Swap and Recall SYSTEM PAL SECAM SECAM L Sound NICAM LANGUAGE When you start using your set for the first time you must select the language which will be used for displaying menus and indications Press on remote control button t...

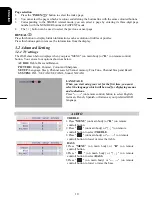
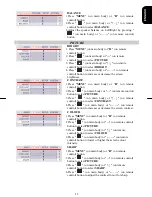
Page 12: ... Press on main body or on remote control button to select PICTURE 3 Press on main body or on remote control button to select CONTRAST 4 Press on main body or on remote control button to increase or decrease the screen contrast COLOUR 1 Press MENU on main body or on remote control button 2 Press on main body or on remote control button to select PICTURE 3 Press on main body or on remote control but...

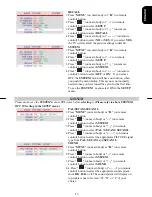
Page 13: ...the channel as this is done automatically during the search and store operation If however the signal is weak or distorted you may have to fine tune the channel manually 1 Press MENU on main body or on remote control button 2 Press on main body or on remote control button to select SETUP 3 Press on main body or on remote control button to select FINE TUNE 4 Press on main body or on remote control ...

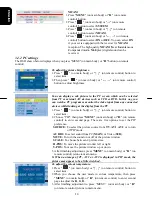
Page 14: ...uned the set in for the first time To see the SYSTEM menu select ON in the SETUP menu SYSTEM Please make sure the SYSTEM menu is ON status before selecting it Please refer to above SYETEM OFF ON setting in the SETUP menu PAL SECAM SECAM L 1 Press MENU on main body or on remote control button 2 Press on main body or on remote control button to select SYSTEM 3 Press on main body or on remote control...

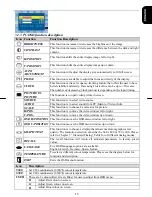
Page 15: ... from any connected devices whilst looking at the display from the PC 1 Press on main body or on remote control button to select item 2 Choose PIP then press MENU on main body or on remote control to enter second page There are five options to set the PIP preference SOURCE To select the picture source from TV AV1 AV2 or to turn off PIP mode AUDIO To select sound from PC MAIN or Video SUB MUTE To t...

Page 16: ... Video Sub SCALE This function is to choose 4 scales size for picture H POS This function is to move the video window left or right V POS This function is to move the video window up or down OSD H POSITION This function moves the OSD menu window left or right OSD V POSITION This function moves the OSD menu window up or down GRAPH TEXT This function is to choose a display that allows maximum graphi...

Page 17: ...ated Component Type Y Cb Cr Level 0 7Vpp Impedance 75 ohm terminated Audio In put In put level 0 7Vp Vp Response 120 Hz 20Khz Audio Out put Std 2 5 Watt 0 2 distortion Max 3 0 watt 10 distortion Control Power switch hard and soft types On Off switch with LED indicator OSD Brightness Digital Contrast Digital Horizontal Position Digital Vertical Position Digital Phase Digital Clock Digital Display M...

Page 18: ...e below this LCD monitor will use the most suitable available timing Nominal Frequency KHz Sync Polarity Nominal Freq Hz Sync Polarity Mode Resolution Total Horizontal Vertical Nominal Pixel Clock MHz VESA MODES 640x480 60Hz 800 x 525 31 469 N 59 940 N 25 175 640x480 72Hz 832 x 520 37 861 N 72 809 N 31 500 VGA 640x480 75Hz 840 x 500 37 500 N 75 00 N 31 500 800x600 56Hz 1024 x 625 35 156 N P 56 250...

Page 19: ...s until those bars disappear 3 Move to Phase function in OSD menu again and adjust the monitor screen to its most clear display 4 Click No on Shut Down Windows and back to the normal PC operating environment PROBLEM There is no picture on LCD Monitor If there s no picture on the LCD Monitor please perform the following steps 1 Make sure the power indicator on the LCD Monitor is ON all connections ...

Page 20: ...19 ENGLISH Also if the signal cable is not connected to LCD monitor at all or properly the monitor screen will display a message No Signal ...

Page 21: ......

Page 22: ...red maintained or modified by any person other than an Hitachi authorised engineer iii The product serial number has not been removed or altered This guarantee does not apply to product acquired second hand or for commercial or communal use This guarantee does not cover the replacement of exhausted batteries the adjustment of user controls or aerial alignment Any parts replaced under this guarante...

Page 23: ...47 Milano Italia ITALY Tel 39 02 487861 Tel 39 02 38073415 Servizio Clienti Fax 39 02 48786381 2 Email customerservice italy hitachi eu com HITACHI Europe AB Box 77 S 164 94 Kista SWEDEN Tel 46 0 8 562 711 00 Fax 46 0 8 562 711 13 Email csgswe hitachi eu com HITACHI EUROPE S A S Lyon Office B P 45 69671 BRON CEDEX FRANCE Tel 04 72 14 29 70 Fax 04 72 14 29 99 Email france consommateur hitachi eu co...

Reviews: