Hisense RL170D4BC2 User'S Operation Manual Download Page 6

For electrical connection 
carefully, follow the 
instructions given in this 
manual.
Unpack the appliance and 
check if there are damages 
on it. Do not connect the 
appliance if it is damaged. 
Report possible damages 
immediately to the place you 
bought it. In this case retain 
packing.
It is advisable to wait at least 
four hours before connecting 
the appliance to allow the oil 
to flow back in the 
compressor.
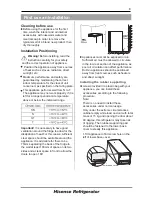
Adequate air circulation 
should be around the  
appliance, lacking this leads 
to overheating. To achieve

Do not clean the appliance 
with metal objects, steam 
cleaner, ethereal oils, organic 
solvents or abrasive 
cleansers.
Do not use sharp objects to 
remove frost from the 
appliance. Use a plastic 
scraper.

Installation Important!

caution!
Care and cleaning

Before maintenance, switch 
off the appliance and 
disconnect the mains plug 
from the mains socket.

 sufficient ventilation, follow 

the instructions relevant to 
installation.
Wherever possible the back 
of the product should not be 
too close to  a wall to avoid 
touching or catching warm 
parts (compressor, 
condenser) to prevent the 
risk of a fire, follow the 
instructions relevant to 
installation.
The appliance must not be 
locate close to radiators or 
cookers.

Service

Any electrical work required 
to do the servicing of the 
appliance should be carried 
out by qualified electrician or 
competent person.
This product must be 
serviced by an authorized 
Service Center, and only 
genuine spare parts must be 
used.

Make sure that the mains 
plug is accessible after the 
installation of the appliance.

1)If the appliance is Frost 
Free.
2)If the appliance contains 
freezer compartment.

6

Summary of Contents for RL170D4BC2

Page 1: ...RL170D4BC2 ...

Page 2: ...onsible for damages caused by omission This appliance can be used by children aged from 8 years and above and persons with reduced physical sensory or mental capabilities or lack of experience and knowledge if they have been given supervision or instruction concerning use of the appliance in a safe way and understand the hazards involved Children shall not play with the appliance Cleaning and user...

Page 3: ...ronments farm houses and by clients in hotels motels and other residential type environments bed and breakfast type environments catering and similar non retail applications WARNING Do not store explosive substances such as aerosol cans with a flammable propellant in this appliance WARNING If the supply cord is damaged it must be replaced by the manufacturer its service agent or similarly qualifie...

Page 4: ...l power The power cord must not crushed crushed access the main Electrical safety blowing gas are flammable When disposing of the appliance do so only at an authorized waste disposal centre Do not expose to flame The refrigerant isobutene R600a is contained withi n the refrigerant circuit of the appliance a natural gas with a high level of environmental compatibility which is nevertheless flammabl...

Page 5: ...eezer compartment Do not place the appliance in direct sunlight Keep buring candles lamps and other items with naked flames away from the appliance so that do not set the appliance on fire The appliance is intended for keeping food stuff and or beverages in normal household as explained in this instruction booklet The appliance is heavy Care should be taken when moving it Do not remove nor touch i...

Page 6: ...llation Important caution Care and cleaning Before maintenance switch off the appliance and disconnect the mains plug from the mains socket sufficient ventilation follow the instructions relevant to installation Wherever possible the back of the product should not be too close to a wall to avoid touching or catching warm parts compressor condenser to prevent the risk of a fire follow the instructi...

Page 7: ...knob is located on the left side of the refrigerator compartment Setting 0 means off Turning in a clockwise direction the refrigeration unit turns on it will then operate automatically Setting 1 means Highest temperature warmest setting Setting 7 end stop means Lowest temperature coldest setting Important Important High ambient temperatures e g on hot summer days and a cold setting position 6 to 7...

Page 8: ...pliances should be positioned away from heat sources such as heaters and direct sunlight screw provided in a plastic bag with your appliance you can install these accessories according to the following procedure Note There is no need to install these accessories under normal usage Only under the extreme circumstances cabinet empty while load on door with total mass of 15 kg and opening the door ab...

Page 9: ...vibration To make the appliance level it should be upright and both adjusters should be in stable contact with the floor You can also adjust the level by unscrewing the appropriate level adjustment in the front use your fingers or a suitable spanner Leveling Caution Any electrical work required to install this appliance should be carried out by qualified or authorized personnel Warning This applia...

Page 10: ...age shelves or wire trays are included with your appliance different models have different combinations and different models have different features The walls of the refrigerator are equipped with a series of runner so that the shelves can be positioned as desired Movable shelves trays Remove door rack Hold the left side of the door rack inward press the other side and lift this side until it sepa...

Page 11: ...agram shows the correct combination for the drawers crisper and shelves do not adjust the combination as it would produce an effect on energy consumption Hints for fresh food refrigeration Do not store warm foods or evaporating liquids in the appliance Do cover or wrap the food particularly if it has strong flavor or odor Position food so that air can circulate freely around it Hints for refrigera...

Page 12: ...c parts Ethereal oils and organic solvents can attack plastic parts e g lemon juice or the juice from an orange peel butyric acid or cleansers that contain acetic acid Do not use any abrasive cleansers Clean the appliance and the interior accessories with a cloth and lukewarm water Commercially available dish washing detergents may also be used After cleaning wipe with fresh water and a clean dish...

Page 13: ... is not air tight possibly after reversing the door Carefully warm the leaking sections of the door seal with a hair dryer on a cool setting At the same time shape the warmed door seal by hand so that it sits correctly Unusual noises Appliance is not level The appliance is touching the wall or other objects A component e g a pipe on the rear of the appliance is touching another part of the applian...

Page 14: ...ing the bolts Then transfer them to another side Note 1 You need move hinge axis from hole to before transfer 2 You need install the rubber supporting on the side which haven t hinge 4 Set the door into its new place making sure the pin enters the bushing at the lower frame section Replace the lid by fitting the upper hinge core into the upper door s hole securing it with the 2 screws Replace anot...

Page 15: ...ic bag with your appliance you can install it as follows 1 Remove the screw on the door Keep or install the screw covers on the side which have hinge 2 Match the handle hole to the door then fix the screw which you removed from the door to make the handle fixed firmly on the door 15 ...

Page 16: ... Cut off the main cable and discard it This marking indicates that this product should not be disposed with other household wastes throughout the EU To prevent possible harm to the environment or human health from uncontrolled waste disposal recycle it responsibly to promote the sustainable reuse of material resources To return your used device please use the return and collection systems or conta...

Page 17: ......

Reviews: