Hisense LTDN32K560HK3D Manual Download Page 23

19


Basic Features

       USER MANUAL

Basic Features

EPG

Functions: 

You will get to know the programs of different 

channels by using this menu, then you can book these 

programs.

Enter the EPG: 

You can press 

EPG button

 or select the 

EPG option of main menu to enter this menu.

Interface Instructions: 

1

Channel List

2

Program List

3

Date List: Select day of the week, the day's program 

information will display on the Program List.

Operations:

Select Channel: 

press 

▲/


to select the Channel.

Select Program: 

Press 

/


to select the Program 

List, press 

▲/


to select the Program.

Book: 

Select the program then press 

OK

 to display the 

Book menu. Select then Book option then press 

OK

 to 

confirm. 

Book Manage: 

Press 

OK

 to display the Book menu 

after selected program. Select Book Manage then 

press 

OK

 to enter the Book Manage menu. You can 

check and manage the reserved program in this menu.

Return: 

Complete booking or reservation management, 

select the icon, press the 

OK

 or 

Return

 to return to the 

program.

NOTE

The E-program guide information is provided by the 

broadcasting company. Because the broadcasting 

information is provided on the specified channel, the 

program entries are possibly displayed as null or the date 

fails to be displayed. The display will automatically renew 

when new information are available for use.

NOTE

The only way to booking the program successfully is 

the start time of the program you have booked must 

be later than the Current time. The same time period 

can only respond to one program. When booking 

conflicts, it responds the highest priority program, 

according to the priority you have chosen.
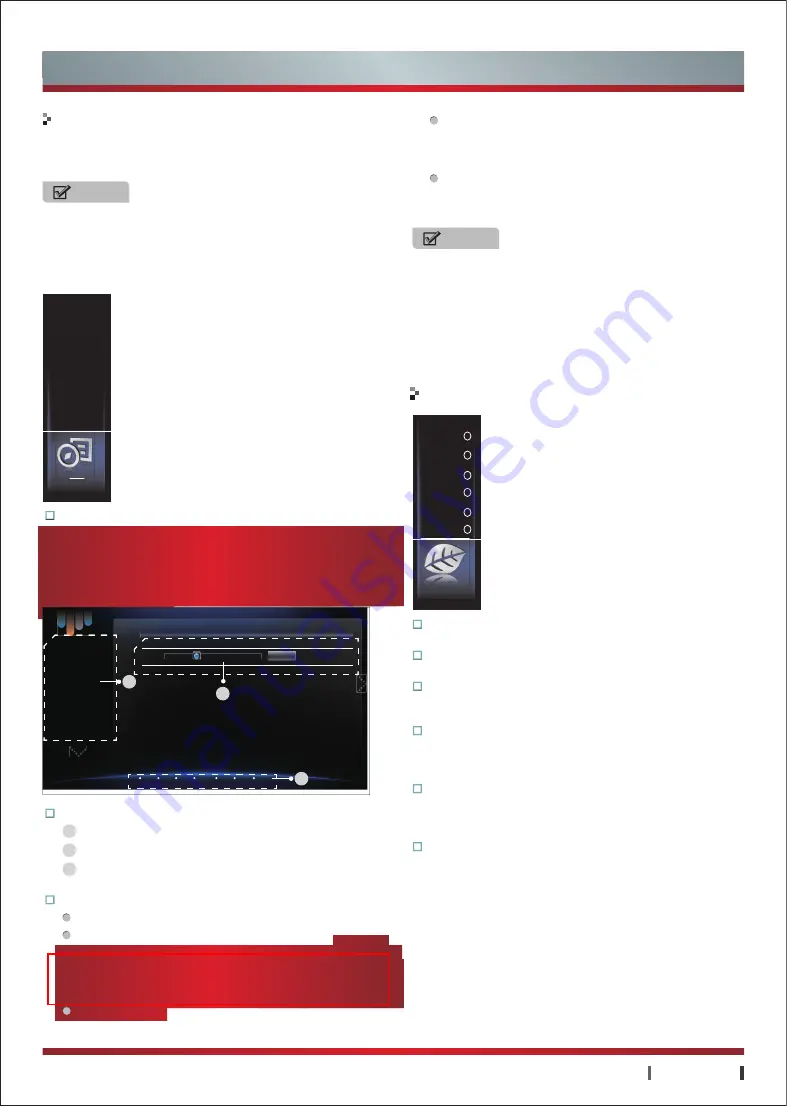
Program Weekly

EGP

Book Manage

Today

  Play Time       Program Name 

  2012/03/28   Thursday  

10 CCTV-1
11 CCTV-2
12 CCTV-7
13 CCTV-10
14 CCTV-11

16:38 Business
19:00           News Broadcast

Return

3

2

1

Book Man

Book

Bright Light: 

Maximum backlight brightness, with 

optimum picture expression.

Soft Light: 

Minimum backlight brightness, suitable for use 

in night time.

Auto 1: 

Backlight brightens with the brightening of 

the external environment; and becomes dim with the 

darkening of external environment. 

Auto 2: 

The backlight brightness increases with the 

increase of picture image brightness. The backlight 

brightness decreases with the decrease of picture image 

brightness.

Dynamic: 

The backlight brightness decreases with 

the increase of picture image brightness. The backlight 

brightness increases with the decrease of picture image 

brightness.

User: 

The function enables any adjustment of backlight 

brightness

PwSave (Power Save)

Auto1

SoftLight

Auto2

Dynamic

Energy Setting


BrightLight

User

Summary of Contents for LTDN32K560HK3D

Page 1: ...pany does not assume any liability for any accident arising from violation of the matters of attention and instruction on use in this manual The TV set is a Type II equipment and used without requirin...

Page 2: ...gh Quality LED Backlight 3D Liquid Screen Built in WiFi wireless network function Small to Big Big to Small Family share Hisense Community Magnitude Application SRS TruSurround XT sound effect Multi M...

Page 3: ...TDN55K560HK3D Dimension W H D mm Without stand With stand Weight kg LCD Panel Minimum size Diagonal Screen resolution Power supply Power consumption Audio power Standard Receiving systems RF AV Channe...

Page 4: ...st pay attention to the following items Alerts Before using the product please read the following clauses carefully Product Watching TV Others Antenna isolator Power and signal Maintenance LCD display...

Page 5: ...1 Contents Getting Started 1 9 15 Advanced Features 21 33...

Page 6: ...2 Please make sure the following items are included with your TV If any items are missing contact your dealer Getting Started Accessories List...

Page 7: ...3 To install the base stand To install the stand Getting Started Installing the Stand 2 3 1 NOTES...

Page 8: ...and may cause damage to your TV or cause a fire Leave at least this much space around the set Install with stand Install on the wall Leave at least this much space around the set Wall Wall Air circula...

Page 9: ...tem Operations Description Power button Standby indicator Remote receiver MENU VOL V CH V SOURCE ENTER Standby button Power button Standby indicator Remote receiver Menu button Volume up Enter Volume...

Page 10: ...t support The unit does not support Sleep button The unit does not support Display button Special function buttons Menu button Favorite button EPG button Radio button Return button Audio I II button Z...

Page 11: ...ion buttons Mute button Sleep button Weibo button Picture button Sound button NOTE OK Display Return button Display button Display button Display button Subtitle button Getting Started Remote Control...

Page 12: ...8 OK button button OK Channel List Sound Track button Getting Started Functions Operations Enter the List FAV button Favorite List NOTE...

Page 13: ...inal Connections ETHERNET VGA AUDIO IN COMPONENT AV COAXIAL HDMI HDMI AV OUT VGA ETHERNET AV OUT HDMI 2 AUDIO IN COMP AV 2 HDMI 3 COAXIAL HDMI USB USB AUDIO L AUDIO R SD Antenna USB HEADPHONE AV ANT 7...

Page 14: ...g Connections NOTES EXTERNAL DEVICES EXTERNAL DEVICES TV JACK TV JACK WARNING USB DC5V 0 5A MAX or ANT OUT EXTERNAL DEVICES TV JACK ANT 75 Connections Connecting an Antenna or Cable Connecting a USB D...

Page 15: ...ES DVD VCD Video Camera Set top box Satellite Receiver VCR A V OUT Video Audio L Audio R With the AV Cable With the Component Cable Video Video Video Audio L Audio L Audio L Audio R Audio R Audio R NO...

Page 16: ...0i 1080p YUV 60Hz 480i 480p 720p 1080i 1080p EXTERNAL DEVICES DVD Set top Box With the HDMI Cable Connecting an A V Device PR PR PB PB Y Y R L PR PB Y COMP AUDIO IN DVD VCD Video Camera EXTERNAL DEVIC...

Page 17: ...JACKS Audio L Audio R EXTERNAL DEVICES Connecting a PC Making Connections Connecting an Ex Speaker VGA VGA AUDIO IN VGA Input Format Resolution Frequency Audio L Audio R TV JACKS Powerless Bass Speake...

Page 18: ...onnections Selecting the Input Source Making Connections A V IN Video Audio L Audio R NOTES Video Video Audio L Audio L Audio R Audio R White Yellow Red TV JACK TV Monitor EXTERNAL DEVICES VCR Connect...

Page 19: ...ns Menu is a easy interactive window to achieving most of the basic functions of the TV Basic Features Using the TV for the First Time Using the Menu Turning the TV On or Off Changing the Channel and...

Page 20: ...g Channel Manual Tuning Auto Install Manual Tune Search channel in ATV signal Channel Video System Audio System Fine Tune Manual Tuning Auto Install Picture Mode Brightness Contrast Color Sharpness Co...

Page 21: ...tures Sound Screen Sound Mode Balance EQ Auto Volume SRS Effect H Position V Position H Size V Size Display Area Phase Clock Auto Adjust Functions Zoom button Full screen Normal Zoom 1 Zoom 2 Smart Zo...

Page 22: ...3D button Before you or your child uses 3D function please read the following alarm WARNING The parents shall watch and consult whether the child has the above symptoms for the children and youth may...

Page 23: ...ton Book Manage Program Weekly Interface Instructions 1 2 3 Operations Select Channel Select Program Select the day Return Book OK OK Book Manage OK OK Return OK Return NOTE NOTE 3 2 1 Bright Light So...

Reviews: