background image

13

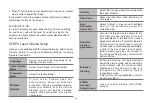
STEP 4  Use Your Remote

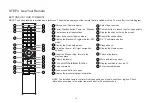
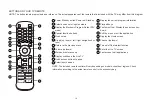
BUTTONS ON YOUR TV REMOTE

NOTE: The button labels are provided as a reference. The actual appearance of the remote that is included with the TV, may differ from this diagram.

1

Microphone / Power indicator

14

Select input sources

2

Power Standby button: Power on / Standby

15

Custom button to launch input or apps quickly

3

Fast access to all applications

16

Display the channel list on the screen

4

Select a channel or input numbers


17

Special function buttons

5

Display the Electronic Program Guide (DTV 

mode

)

18

OK / Confirmation button

6

Display the Quick setup menu

19

Playpad keys

7

D-pad (up / down / left / right navigation 

buttons)

20

Display the Home screen

8

Under the Menu or App, return to the 

previous place 

21

Channel (up/down)

9

Volume (up/down)

22

Mute and restore sound

10

Turn on/off the teletext function

23

Display subtitles in the Live TV

11

Voice command

24

Enter the media mode 

12

Quick access buttons to apps

13

Display the present program information

NOTE: The included remote control will vary depending on models, countries / regions. Check 

information according to the actual remote control in the accessory bag.

2
3

20

6

14

5

16

8

10

12

17

21

1

4

7

9

11

15

18

13

19

24

23

22

APP

APP

APP

Summary of Contents for Laser Cinema 120

Page 1: ...QUICK SETUP GUIDE Read the manual carefully and ensure you have fully understood its contents before operating this device for the first time English ES A2113Z1 1 ...

Page 2: ...compatible devices or apps The recording and playback of content on this or any other device may require permission from the owner of the copyright or other such rights in that content It is your responsibility to ensure that your use of this or any other device complies with applicable copyright legislation in your country Please refer to that legislation for more information on the relevant laws...

Page 3: ...be used in rooms with a high level of humidity or dust concentration The warranty is only valid if used as intended by the manufacturer WARNING High humidity and dust concentration may lead to current leaks in the device To reduce the risk of fire or electrical shock Do not expose this unit to rain moisture dripping or splashing water and do not place objects filled with liquids such as vases cups...

Page 4: ...Power plug and power cable Do not touch the power plug with wet hands Do not place heavy objects on the power cable Route the cable so that it is not kinked or laid over sharp edges walked on or exposed to chemicals A power cable with damaged insulation can cause electric shock and fire Pull the power plug NOT on the cable when disconnecting The cable can become damaged and cause a short circuit i...

Page 5: ...ersible damage to your ears Avoid extreme volume especially over long periods and when using headphones If you hear a drumming noise in your ears turn down the volume or temporarily stop using headphones Thunder Storms Pull out the power plug and all connected antenna cables from the device during a thunderstorm Overvoltage caused by lightning strikes can damage the device via the antenna system a...

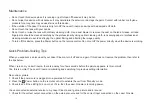
Page 6: ...tteries Incorrect installation may cause battery leakage corrosion and explosion Replace only with the same or equivalent type Do not mix old and new batteries Do not mix different battery types Do no use rechargeable batteries Do not burn or break up batteries Be sure to dispose of batteries correctly Do not expose batteries to excessive heat such as sunshine fire or the like Outdoor Antenna Grou...

Page 7: ...ght Keep air vents on both sides clear from any objects to prevent the device from overheating inside To avoid a short circuit product damage or electric shock do not use any sharp object or metal to touch the ports or other openings on the Laser Cinema If this device has been in a warm environment allow any built up condensation to evaporate first BEFORE you switch the device on Do not allow a ch...

Page 8: ...STEP 6 Laser Cinema Setup 18 Maintenance Quick Problem Solving Tips 19 Product Specifications 21 Recycling Licenses 23 Congratulations on the purchase of your new Laser Cinema This Manual will walk you through a few easy steps to set up your Laser Cinema Please visit Hisense official website for more details Product image is only for reference actual product may vary in appearance Parts of the sof...

Page 9: ...the lens 1 Do not allow a child to stand on or climb up this device Do not place any object above or in front of the lens because the laser light could cause the object to become flammable Clean the lens periodically with a clean cloth and make sure the Laser Cinema is turned off before you start Accessories List NOTE The accessories may be different from the list above due to different models cou...

Page 10: ...ver Air vents Eye protection sensor Power button Lens with laser We strongly recommend that two people handle this device when moving it from one place to another Be sure to protect the lens when you handle this device Laser Cinema Diagram ...

Page 11: ...another Be sure to protect the lens when you handle this device We recommend to connect all cables to the ports on the back of the Laser Cinema before positioning the Laser Cinema Audio video Ethernet cables and external devices are not included Check to ensure that you have selected the right cables for the ports and that they are connected securely Loose connections can affect the quality of the...

Page 12: ... ensure that the Laser Cinema is switched off Then insert the CI card into the CI module in accordance with the Service Provider s instructions Do not repeatedly insert or remove the Common Access Module as this may damage the interface and cause a malfunction You must obtain a CI module and card from the service provider of the channels you want to watch Insert the CI module with the SmartCard in...

Page 13: ...extension cable included for easier connection and disconnection When connecting a hard disk or a USB hub always connect the mains adapter of the connected device to the power supply Exceeding a total current consumption may result in damage The USB1 1 and USB2 0 devices maximum current consumption are 500mA For individual non standard high capacity mobile hard disk if its impulse current is great...

Page 14: ...ema set Laser Cinema PORT Modem Cable LAN Cable LAN Cable External Modem ADSL VDSL Cable TV IP Sharer Router with DHCP server LAN NOTE You must use the built in Wireless LAN Adapter to use a wireless network because the set doesn t support external USB network adapter If the wireless router supports DHCP your Laser Cinema can connect more easily to the wireless network If you apply a security syst...

Page 15: ...the air vents or place any object on this device Do not place this device in any narrow enclosed or poorly ventilated space At a minimum leave the amount of space shown in the diagram below for this device to have proper ventilation 1 Plug the power cord into a wall outlet 2 Press the POWER button to turn on the Laser Cinema Power Cord ...

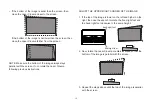
Page 16: ... your situation NOTE Before adjusting fold the wall mount bracket wands so that screen is vertically level Rotate feet from an overlooking view but do not look directely at the lens when the Laser Cinema is on because the laser light may damage your eyes PARALLEL THE BOTTOM OF THE IMAGE WITH THE SCREEN If the bottom of the image is lower on the left and higher on the right rotate the device counte...

Page 17: ...e image is parallel with the screen 3 Repeat the steps above until the top of the image is parallel with the screen If the bottom of the image is wider than the screen then move the Laser Cinema closer to the screen If the bottom of the image is narrower than the screen then move the Laser Cinema farther from the screen NOTE Make sure the bottom of the image always stays parallel with the screen I...

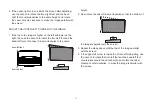
Page 18: ...inema counterclockwise to make the image is parallel with the screen 4 If the upper right corner is inside the screen after adjusting use the wrench to rotate the front right foot and the back right foot counterclockwise to the same height and rotate the Laser Cinema clockwise to make the image parallel with the screen ADJUST THE UPPER LEFT CORNER OF THE IMAGE 1 If the top of the image is higher o...

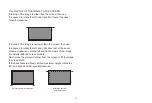
Page 19: ... move the projector further from the screen to fill the image to screen width If the back feet are already at their maximum height rotate the left and right front feet counterclockwise Rotate the back feet clockwise Rotate the front feet counterclockwise FILL THE TOP OF THE IMAGE TO THE SCREEN If the top of the image is wider than the screen then use the wrench to rotate the left and right front f...

Page 20: ...Program Guide DTV mode 18 OK Confirmation button 6 Display the Quick setup menu 19 Playpad keys 7 D pad up down left right navigation buttons 20 Display the Home screen 8 Under the Menu or App return to the previous place 21 Channel up down 9 Volume up down 22 Mute and restore sound 10 Turn on off the teletext function 23 Display subtitles in the Live TV 11 Voice command 24 Enter the media mode 12...

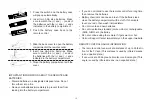
Page 21: ...nu or exit the application 5 Quick setup 17 Display the Home screen 6 D pad up down left right navigation but tons 18 Channel up down 7 Return to the previous menu 19 Turn on off the teletext function 8 Volume up down 20 Enter the Live TV screen 9 Mute and restore sound 21 Fast access to all applications 10 Display subtitles in the Live TV 11 Quick access buttons to apps 12 Select input sources NO...

Page 22: ...pport Center immediately on the support website REMOTE CONTROL RANGE INFORMATION The remote control can work at a distance of up to 26 feet in front of the TV set This distance is used by infrared means in an unpaired state It can work at a 30 degree horizontal or vertical angle This angle is used by infrared means in an unpaired state 1 Press the switch and the battery case will pop up automatica...

Page 23: ... If it did not pair successfully then an unsuccessful message will display Repeat step 1 NOTE If an unknown error occurred with the remote then it could have been caused by interference Try to remove what s causing the interference and pair it again If an unknown error occurred in the remote control while the battery power is normal you can take out the batteries and press any key for 1 2 seconds ...

Page 24: ...tric correction When the app loads the Laser Cinema will display an alignment grid 4 Click on your mobile device to take a photo of the entire screen and image For best results stand about 10 feet away from the screen and use landscape mode 5 Click upload on your mobile device to complete the automatic geometric correction MANUAL GEOMETRIC CORRECTION Select points and move to fit the projected ima...

Page 25: ...on Auto Geometric Correction Select Confirm to clear current settings and run the automatic geometric correction app End User License Agreement Your use of this device is subject to the End User License Agreement lack of your acceptance of the End User License Agreement will turn off all smart features of this device You can choose to turn on off each type of smart features separately a click to t...

Page 26: ...n on the external source and for the correct input connection on the Laser Cinema Maintenance Do not touch this device when it is running or just turned off because it may be hot Do not wipe this device with oil because it may deteriorate the exterior or damage the paint Contact with rubber or ethylene products for a long time may cause stains on this device If the outside of the Laser Cinema is d...

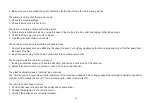
Page 27: ...t are nearby and move it farther away from the Laser Cinema 2 Insert the power plug of the Laser Cinema set into another power outlet The sound and picture is blurry or cuts out 1 If using an external antenna check the direction position and connection of the antenna 2 Adjust the direction of your antenna or reset or fine tune the channel The plastic cabinet makes a clicking type of sound The clic...

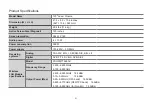
Page 28: ... 15 W Power consumption 350 W Power supply 120 240V 50 60Hz Receiving systems Analog PAL D K B G I SECAM D K B G L L Digital DVB T T2 DVB C DVB S S2 Wireless LAN Module specifications Model ZDGFMT7668AU Frequency Range 2 400 2 4835GHz 5 150 5 850GHz Output Power Max 2 400 2 4835GHz 18 5dBm 5 15 5 25GHz 14 5dBm 5 25 5 35GHz DFS band 14 5dBm 5 490 5 710GHz DFS TPC band 14 5dBm 5 725 5 850GHz for Non...

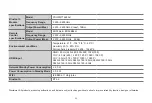
Page 29: ...6A64 ERF6B64H Frequency Range 2 400 2 4835GHz Output Power Max 2 400 2 4835GHz 5dBm Environmental conditions Temperature 41 F 104 F 5 C 40 C Humidity 20 80 RH Atmospheric pressure 86 kPa 106 kPa HDMI Input RGB 60 Hz 640 480 800 600 1024 768 YUV 60 Hz 480 I 480 P 720 P 1080 I 1080 P YUV 50Hz 576 I 720 P 1080 I 1080 P 3840 2160 24Hz 3840 2160 25Hz 3840 2160 30Hz 3840 2160 50Hz 3840 2160 60Hz Network...

Page 30: ...cled in a manner that protects human health and the environment For more information about where you can drop off your waste equipment for recycling please contact your local city office your household waste disposal service or the shop where you purchased the product The terms HDMI and HDMI High Definition Multimedia Interface and the HDMI Logo are trademarks or registered trademarks of HDMI Lice...

Page 31: ...24 ...
Reviews: