


5
|
Getting Started
USER MANUAL
Getting Started
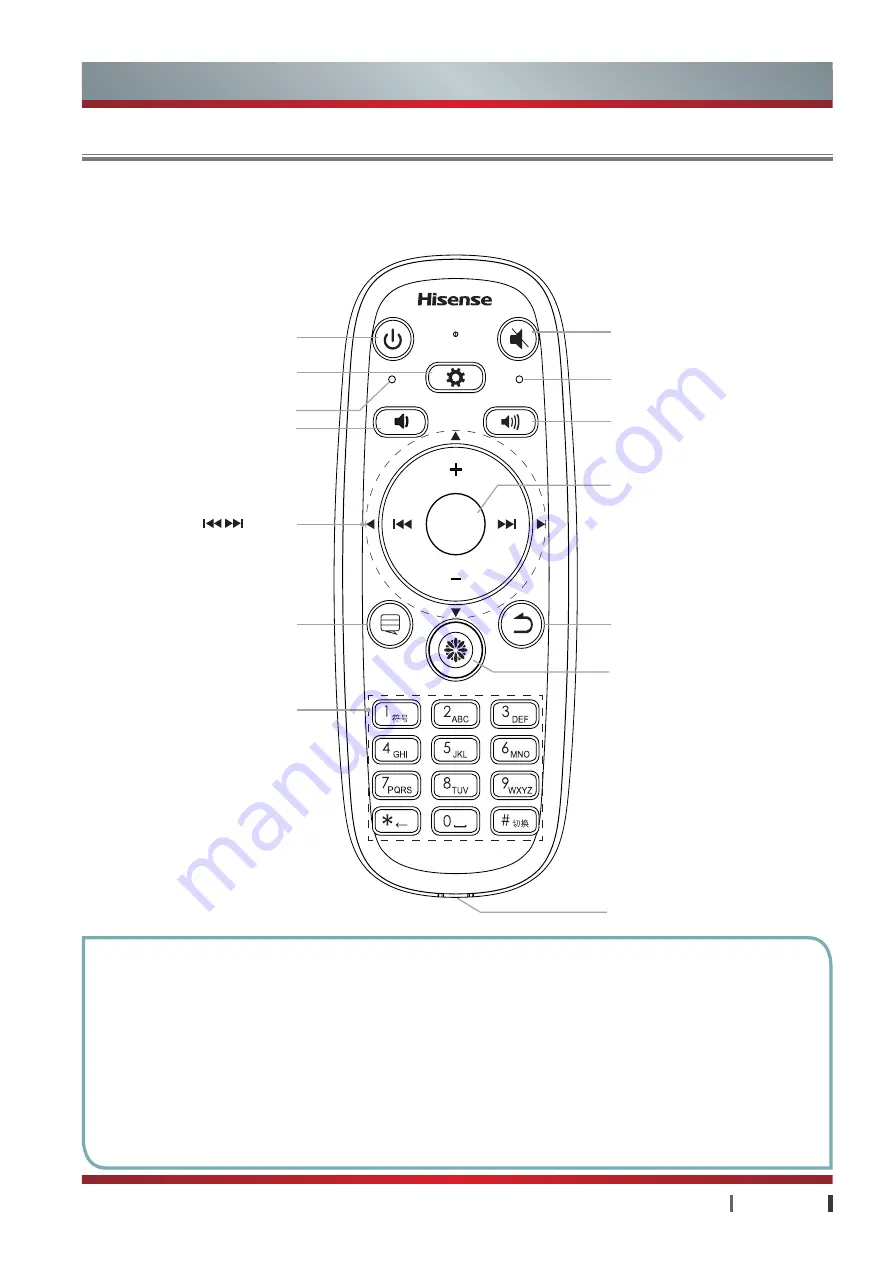
Remote Control
Standby button
Enter standby/exit standby
Setting button
Start/stop quick setup menu
Power indicator
Cute button
Return button
Exit the current menu
Home button
Enter the television's Home page
Micro-USB port
OK button /OFN
Confirm /pause or play/sliding
screen
Display the Channel List in DTV /
ATV
Mute button
Start/Exit the mute state
Volume increasing button
Code matching indicator
Numeric buttons
Select channel/Input character
▲/▼/◄/► button
Up/down/left/right button
+/– button
Channel up/channel down button
/ button
Rewind/fast-forward button
(see "Advanced Features")
NOTE: This region for reuse button
CRF6B16 is a kind of multi-functional remote controller for the network TV set as a complex of keyboard, air mouse
and OFN touch panel. It is to control other functions through the RF (radio frequency) mode. RF receiving terminal
(dongle) is embedded in TV set. The controller cannot be used before code matching. For the code matching
operation's detailed steps, please see "code matching" later.
Quantity description
When the battery is low, the power indicator
light (red) will shining, please charging the
battery. When the battery shortage is serious,
all indication lamps are off, and press any
button, there will no any reaction.
Charging the battery
The remote control is embedded with
rechargeable lithium battery. To charge the
battery, use the Micro-USB cable to connect
the Micro-USB port of the remote control to
USB port of external device. When charging,
the power indicator light (red) will be on for
long, after the complete on of charging, the
power indicator will be off.
Attention
· Because of the limitation of rechargeable
battery charging cycle, after being used for a
long time, if after the battery is fully charged,
the time is obviously shortened, please call
Hisense's authorized service provider for
checking, the user cannot disassemble it
automatically to replace the battery, if the
battery replacement is improper, there will be
danger of explosion.
· The charging voltage of remote control is DC
5V.
· When it is used for the first time, there is
need to charge the device for 8 hours, then it
will be charged as needed.
· If you do not use the remote control for
long time or the battery runs out, please
charge, the power indicator light (red) may be
suspended for shining, during charging, please
stop using.
· While charging or long time use of device, the
surface may be heating, which is a normal
phenomenon.
· If the remote control encounters malfunction,
please re-match the code according to the
explanation.
Volume down button
CRF6B16
All manuals and user guides at all-guides.com


