7
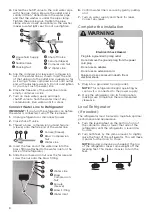
Move Near Water Supply
WARNING
Fire or Explosion Hazard
Do not puncture refrigerant tubing.
Follow handling instructions carefully.
Flammable refrigerant used.
Failure to do so can result in death, explosion or fire.
IMPORTANT:
The refrigerator must be located
on a solid, level surface that is strong enough to
support the refrigerator fully loaded.
•
Before moving, retract the leveling legs to
avoid scraping the floor.
•
The refrigerator has wheels, which should
be used for only forward and backward
movement.
NOTE:
Trying to move the refrigerator sideways
may damage your floor.
Connect the Water Supply
Read all directions before you begin.
IMPORTANT:
•
The water connection must be made by a
qualified plumber.
•
Plumbing must be installed in accordance with
the International Plumbing Code and any local
codes and ordinances.
•
Use ONLY NEW Copper or PEX tubing.
•
Install tubing only in areas where temperatures
will remain above freezing.
Connect Water Line to Household Water
Supply
Following are two methods of connecting to your
household water supply. Use the instructions
specific to your installation.
IMPORTANT:
Turn off main water supply. Turn on
nearest faucet long enough to clear the line of
water.
Method 1: Quarter-turn Shutoff Valve
Gather the required tools and parts before starting
installation.
•
1/2
" Wrench or 2 Adjustable Wrenches
•
Quarter-turn Shutoff Valve
•
1/4
" Compression Nut
•
Ferrule (sleeve)
1.
Use a quarter-turn shutoff valve or the
equivalent served by a household supply line.
NOTE:
To allow sufficient water flow to the
refrigerator, a minimum
1/2
" household supply
line is recommended.
2.
Using the ferrule (sleeve) and compression nut,
connect the
1/4
" water line to the shutoff valve.
NOTE:
Do not overtighten.
c
b
a
e
d
a
Quarter-turn
Shutoff Valve
b
Ferrule
(Sleeve)
c
Compression
Nut
d
1/4
" Water Line
e
Household
Supply Line
3.
Place the free end of the water line into an
empty container or sink.
4.
Turn on main water supply and open
shutoff valve to flush the water line of any
contaminants. Run water until it is clear.
Method 2: Saddle Valve
NOTE:
Do not use a piercing-type or
3/16
" (4.76 mm)
saddle valve which reduces water flow and clogs
easier.
Gather the required tools and parts before starting
installation.
•
Flat-blade Screwdriver
•
1/2
" Wrench or 2 Adjustable Wrenches
•
Cordless Drill
•
1/4
" Drill Bit
•
1/4
" Compression Nut
•
Ferrule (sleeve)
1.
Find a
1/2
" to 1
1/4
" (12.7 mm to 31.8 mm) vertical
cold water pipe near the refrigerator.
IMPORTANT:
•
Make sure it is a cold water pipe.
•
Horizontal pipe will work, but the following
procedure must be followed: Drill on the top
side of the pipe, not the bottom. This will
help keep water away from the drill. This also
keeps normal sediment from collecting in
the valve.
2.
Determine the length of water line you need.
Measure from the connection on the rear of the
refrigerator to the water pipe. Add 7 ft (2.1 m)
to allow for cleaning. Use
1/4
" (6.35 mm) O.D.
(outside diameter) water line.
3.
Using a cordless drill, drill a
1/4
" hole in the cold
water pipe you have selected.

