Hisense HL46T39PZLN3D User Manual Download Page 18

Initial Setup

Selecting the Input Source

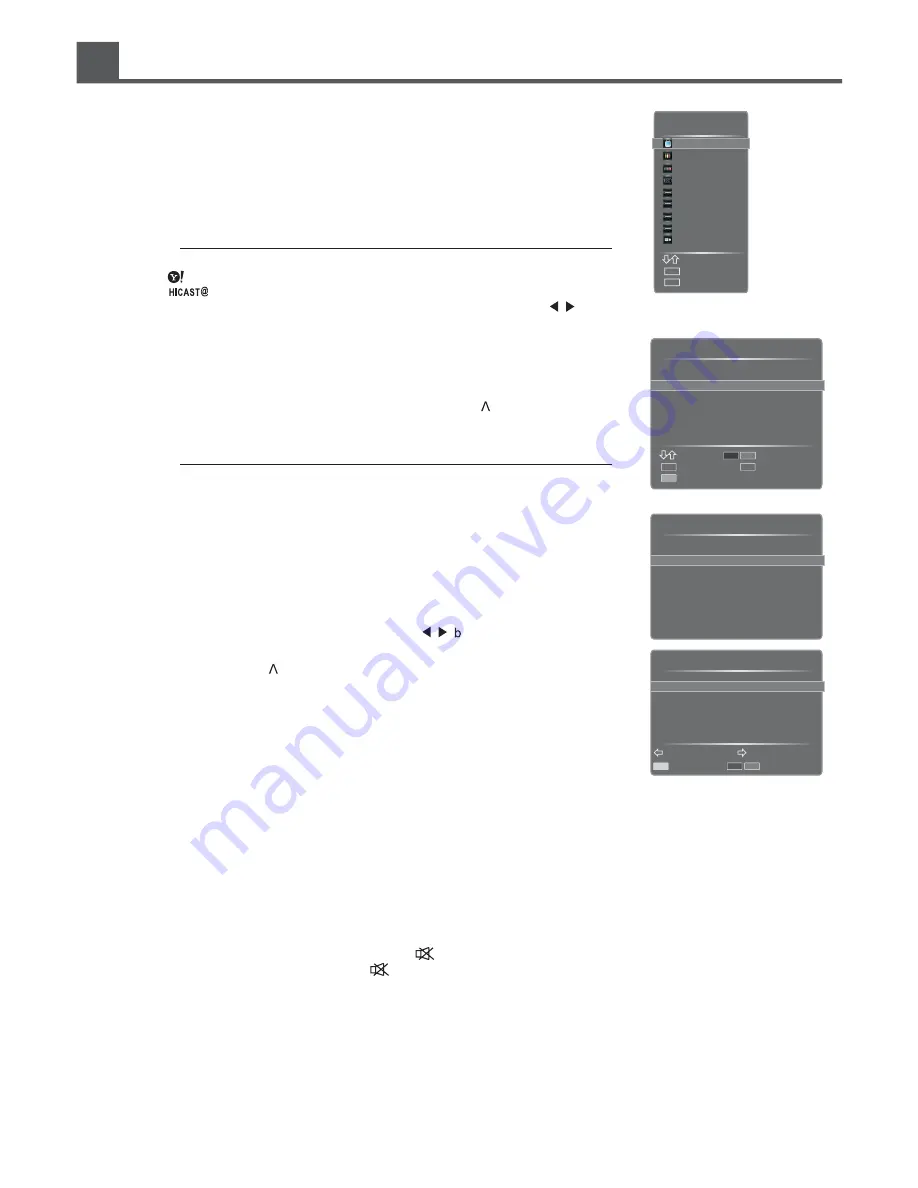
1. Press the Source button to display the input source list.

2. Press the 

̵

/

̷

 buttons to select the input source that you want to view.

3. Press the OK button to confirm your selection.

Select

Enter

OK

Exit

Menu

Source

AV

Component

VGA

HDMI

HDMI

HDMI

HDMI

DMP

TV

Alternative

- Press the      button to switch to yahoo interface directly if the network is normal.
- Press the            button to display the disclaimer and operate according to the 
  menu remote

   until the main menu displays on the screen, then press 

/

 t o 

  switch to Yahoo! Widgets/DMP/Opera Browser/User Manual/Network Setting/
  TV Menu selection interface.
- Press Media to switch to DMP mode directly.  

Channel Selection

s0

ress the CH

 buttons on the front panel of the TV or CH /V buttons 

    on the remote control repeatedly or the 0~9 buttons to select channels.

̵

/

̷

Alternative

- Press OK button to display the Channel List when there is no menu on
  the screen. Press Red/Green buttons to turn to the last /next page. Press 

̵

/

̷


  buttons to select  a channel and then press OK button to view the selected 
  channel. 
  Press the Yellow button to display the list type selection.
  Press 

̵

/

̷

 to select the type and press OK to confirm.


Channel List - All

Select

Enter

OK

Select List

Exit

MENU

Page up/down

1.     Dt29 1080i

3.     Dt29 576p
901  a
902  b
903  c
904  d

2.     Dt29 576i

s0

ress the FAV button to view the Favorites. Press 

/V buttons to switch to the channel and then press

    Yellow button to add it. If you want to erase a channel,  press Red/Green buttons 

    to page up/down and press 

̵

/

̷G

buttons to select the channel on the list, then 

    press Yellow button to erase it. If you want to view a channels, press 

̵

/

̷

 buttons

    to select a channel and then press OK button to view the selected channel if you 

    have previous preset your favourite channels.

s0

ress the Last button to return to the previously viewed channel.

Display Channel Information

s0

ress the Info button to display the current information.

Volume Adjustment

s0

ress the VOL

̵

/

̷

 buttons on the front panel of the TV or the VOL+/- buttons on the remote control to adjust the

    volume.

s)

f you want to switch the sound off , just press the       button.

    You can restore the sound by pressing the       button again.


Selecting Picture Mode

s0

ress the Picture button repeatedly to select the picture mode among Soft, User, Bright and Standard. In User

    mode, you can adjust the image in PICTURE menu to suit your personal preferences.

Selecting Sound Mode

s0

ress the Sound button repeatedly to select the sound mode among Standard, Speech, User and Music. In User

    mode, you can adjust the sound in SOUND menu to suit your personal preferences.

/

uttons to select the

    favourite list. Then press Yellow button to Add the channel. If you want to add

    another channel, press CH

Channel List Selection

All
Digital
Radio
Analogue

18

Favourites 1

Add/Erase

Page up/down

Channel 1

Favourites 2

Favourites 4

Summary of Contents for HL46T39PZLN3D

Page 1: ...User s manual Please read this manual carefully before operating your TV set and retain it for further reference Model Number Part Number Http www hisense com au T39 series HL46T39PZLN3D ES G112207...

Page 2: ...2...

Page 3: ...3...

Page 4: ...ment Selecting Picture Mode Selecting Sound Mode PVR Selecting the Aspect Ratio Freezing a Picture Setting the Sleep Timer Audio Function ATV Mode EPG DTV Mode Time Shift Changing the TV Settings Tuni...

Page 5: ...articular purpose accuracy quiet use and non violation of any third party s rights to the maximum extent permitted by applicable law Hisense gives no guarantee on the accuracy validity timeliness legi...

Page 6: ...ctrical goods should be recycled appropriately and not treated as household waste Please dispose of this equipment at your applicable collection point for the recycling of electrical electronic equipm...

Page 7: ...e dealer or local power company 9 Grounding or Polarization This TV is equipped with a polarized alternating current line plug This plug will fit into the power outlet only one way This is a safety fe...

Page 8: ...mpletion of any service or repair to the TV ask the service technician to perform safety checks to determine that the TV is in safe operating condition 20 Heat The product should be situated away from...

Page 9: ...s very fragile and must be protected at all times when removing the base stand Be sure that no hard or sharp object or anything that could scratch or damage the LCD display comes into contact with it...

Page 10: ...U Displays the OSD on screen display menu 5 SOURCE Toggle between all the input sources In the OSD menu use this button as you would use the OK button on the remote control 3D spectacle synchronized s...

Page 11: ...t to a PC or other devices with a VGA interface 4 ANT Connect to the aerial socket on the wall with the RF coaxial cable 7 USB1 2 Allows the insertion of a USB storage device to play video audio photo...

Page 12: ...PC AUDIO Connecting an A V Device with Composite Cable 1 Use the audio and video cables to connect the external A V device s composite video audio jacks to the Tv s Video yellow Audio Left white and...

Page 13: ...gnal to be set to output in the device s settings Please consult your device user manual for instructions What is HDMI HDMI or high definition multimedia interface is a next generation interface that...

Page 14: ...ocket before switching on the TV 3 Select the corresponding source from the TV Use a optical cable to connect the A V device s OPTICAL jack to the TV s OPTICAL jack Connecting the Aerial Connect one e...

Page 15: ...ot mix battery types or combine used batteries with new ones 3 Remove depleted batteries immediately to prevent battery acid from leaking into the battery compartment 4 If you do not intend to use the...

Page 16: ...information such as the current channel and the input source 23 Use to advance or reverse playback rapidly Return to the last viewed program in TV mode or as the back key in Yahoo Widgets application...

Page 17: ...step 6 Press enter the next wizard and the TV will start to search the programs automatically 8 After scan the wizard will display congratulations and then you can press OK button to exit the wizard T...

Page 18: ...V button to view the Favorites Press V buttons to switch to the channel and then press Yellow button to add it If you want to erase a channel press Red Green buttons to page up down and press Gbuttons...

Page 19: ...Press to move to the position you want to set and then press 0 9 to input the numbers Schedule type you can select between Remind and Record Repeat type You can select among Once Daily and Weekly If W...

Page 20: ...this to automatically search and store all available channels Press Gbutton to select it and press OK to start to search Channel Edit Allows you to edit the TV programs Press Gbutton to select the pro...

Page 21: ...ss Backlight Advanced Settings 50 50 50 10 Adjust image to suit personal preferences PICTURE 50 Adjust backlight mode Backlight Mode Manual Backlight Adjust PICTURE 3D SWITCH 3D Mode Off L R Switch Le...

Page 22: ...nformation contact the retailer where you purchased this TV In SG Shutter Glasses 3D Mode the left eye and right eye of glasses switch on in turns according to the 3D image sync from TV Some 3D image...

Page 23: ...fer External Subwoofer Internal Speaker Internal Speaker or External Speaker Boost bass Press buttons to select Internal Subwoofer External Subwoofer or Off Subwoofer Bass Boost Adjusts the effect of...

Page 24: ...on Adjusts the horizontal position of the image V Position Adjusts the vertical position of the image Phase Adjusts the VGA phase to match the PC VGA mode only Clock Adjusts the VGA clock to match the...

Page 25: ...manually when it is set to Off Select On to output the time information from digital signal DTV b Power On Timer When On Allows you to set the time when the TV turns on automatically c Power Off Timer...

Page 26: ...network configuration information e IP Setting Allows you to set IP address subnet mask gateway and DNS Press OK to enter the submenu and press to select the options Address Type Press to set the add...

Page 27: ...ected the T shift on the remote control are not available Version Info Press OK to enter the submenu to view the software version information Yahoo Version Info Press OK to enter the submenu to view t...

Page 28: ...28 Master Reset Reset TV set After reset all channels and image settings will be erased and you need perform a tuning Auto scan...

Page 29: ...Windows system display setting is as illustrated 1 Right click anywhere on your display select Properties 2 Find the Settings tab on the dialogue box set the screen Resolution 3 See above details abou...

Page 30: ...so let you use Static IP addresses The Modem Port on the Wall Stand Rear Panel Modem Cable External Modem ADSL VDSL Cable TV LAN Cable LAN Cable LAN Cable Modem Cable The Modem Port on the Wall Stand...

Page 31: ...nection values on most windows computers follow these steps 1 Right click the Network icon on the bottom right of the screen 2 In the pop up menu that appears click Status 3 On the dialog that appears...

Page 32: ...ss IP sharer is currently being used by another device nearby this will result in interference and communication failure If you apply a security system other than the systems listed below it will not...

Page 33: ...ual for directions 8 If set Address Type to Manual enter IP Setting Then press to select IP Address and press to move the cursor to the entry field Then press 0 9 buttons to enter the numbers 9 Press...

Page 34: ...en Add to Library 3 The Add To Library will pop up on the screen Click Add 4 Select a folder and click OK button 5 Click Close to close the dialog 34 If your computer can not support DLNA you need ins...

Page 35: ...to select Media Sharing 2 Click the box before Share my media to select it 3 An equipment icon will appear on the white area if the DLNA Settings has been correctly set Select the sign and then click...

Page 36: ...2 Play Pause You can press II directly to play pause when there is no control bar on the screen 3 Play the previous video You can press directly to achieve the function when no control bar display on...

Page 37: ...Media Video V7 VC 1 MP 2 MP HL EG1 MPEG Resolution 1920X1080 1920X1080 1920X1080 1920X1080 768X576 1920X1080 1920X1080 1920X1080 1920X1080 1920X1080 1920X1080 320X240 1920X1080 1920X1080 1920X1080 192...

Page 38: ...ou want to view 3 Press OK to play the music All Video Picture Book Music Select OK Enter Exit Return Media Type Page Up Down DMP C Information Return F1 F2 F3 a1 mp3 a2 mp3 a3 mp3 a4 mp3 a3 mp3 00 04...

Page 39: ...You can press directly when no control bar on the screen 7 Zoom in the picture 8 Zoom out the picture 9 Option Set Press to select the options and press to set them Speed Allows you to browse the pict...

Page 40: ...ers move the cursor to Clr key and press OK to confirm 4 Move the cursor to Enter key and press OK to confirm if you have completed the input s If you want to enter it directly without register next t...

Page 41: ...n and press OK to enter it Alternative You can press button to enter the interface directly How to modify the password After entering the network main menu interface according to How to enter the netw...

Page 42: ...e the cursor to the icon and press OK to add the website to the favorite folder Address bar Input the website you want to view Move the cursor to the icon and press OK to search the website Move the c...

Page 43: ...Move the cursor to the folder bookmark directly and there will be two icons on the right of it Move the cursor to one of the icons and press OK to display a pop up menu Move the cursor to the Name URL...

Page 44: ...ites in the folder will appear in the following lines 3 Move the cursor to the website you want to view and press OK to confirm If the website is in the root folder you can select it directly And do n...

Page 45: ...ce or electric tools Thise happens due to room temperature change causing the television cabinet to expand or contract This is nomal and shouldn t cause alarm Images music and video files which were m...

Page 46: ...60Hz VGA 640 480 60Hz SVGA 800 600 60Hz XGA 1024 768 60Hz SXGA 1280 1024 RGB 60Hz 640 480 800 600 1024 768 YUV 50Hz 576I 576P 720P 1080I 1080P Y 400mm 400mm UV 60Hz 480I 480P 720P 1080I 1080P Model Na...

Page 47: ...Http www hisense com au...

Reviews: