background image

7

Remote Control

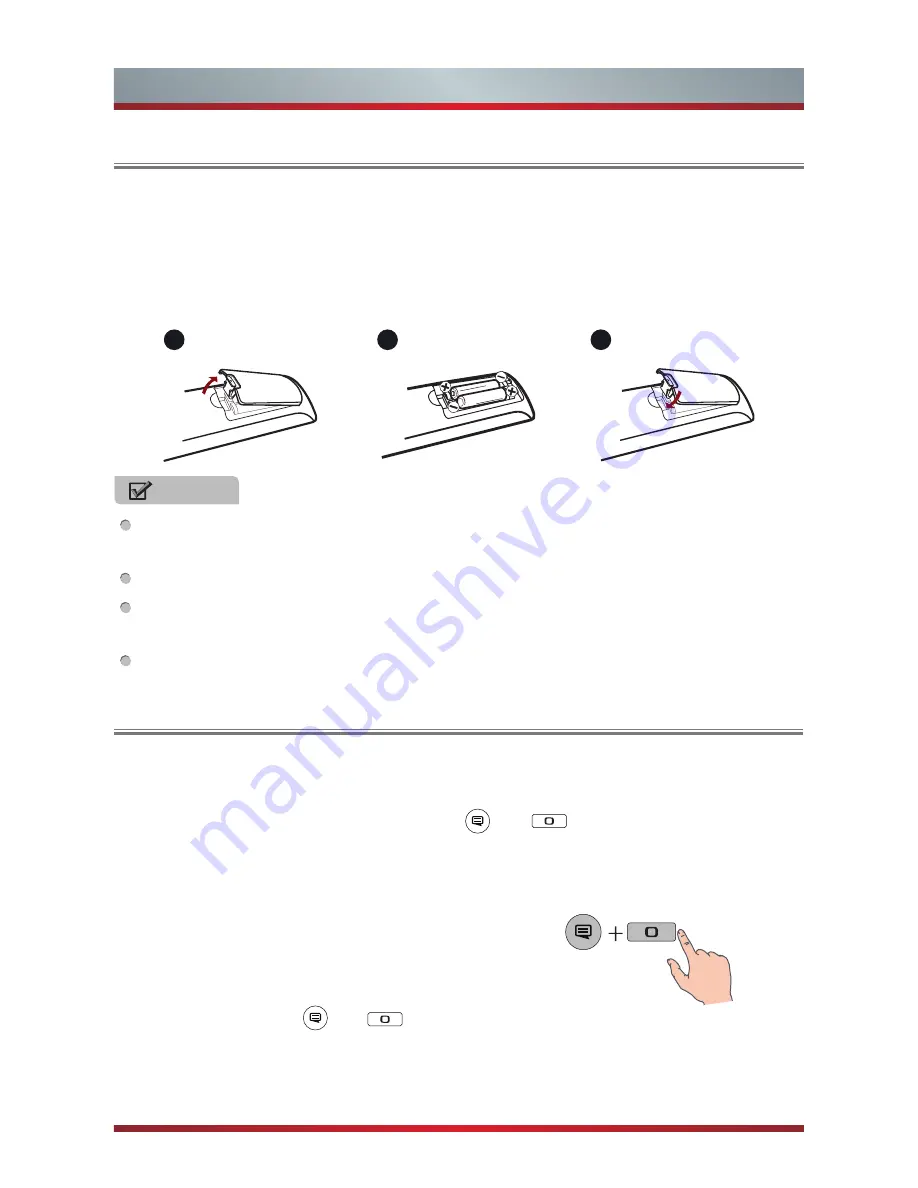
1. Press and lift the back cover to open the battery compartment of the remote 

control.  

2. Insert two AA size batteries. Make sure to match the (+) and ( - ) ends of the 

batteries with the (+) and ( - ) ends indicated in the battery compartment.

3. Close the battery compartment with the cover. 

Installing Batteries in the Remote Control

NOTES

Dispose of your batteries in a designated disposal area. Do not throw the batteries 
into a fire.
Do not mix battery types or combine used batteries with new ones.
Remove depleted batteries immediately to prevent battery acid from leaking into 
the battery compartment.
If you do not intend to use the remote control for a long time, remove the batteries.

1

2

3


The First Method

The Setup Wizard menu appears the first time you turn on the TV. Step of the 
remote pairing, press and hold down the 

 and 

 buttons simultaneously until 

the red LED turns on. 
When the red LED lights, release the buttons and wait for the TV to pair with the 
remote. The blue LED on the remote control will flash three times when the pairing 
is successfully completed.                                             

The Second Method

1.Enter Settings > Bluetooth to turn on Bluetooth.
2.Press and hold the 

 and 

 buttons for three seconds simultaneously.

3.Select Find nearby devices to search the remote control, and the remote control   

will appear in available devices, then press the [▲/▼] buttons to select the Remote 
Control and press the [OK] button to pair.

Pairing the Remote Control 

Summary of Contents for 65T810UAD

Page 1: ...nd 1 TV Rear 3 Making Connections 3 Remote Control 6 Specifications 8 Contents QUICK SETUP GUIDE Before using the TV please read this guide thoroughly and retain it for future reference For more detailed instructions please see the User Manual ES A150720 1 ...

Page 2: ...son Carefully remove TV and top cushion from the carton box Put the TV with top cushion on the cushion with its back upwards and the LCD downwards To install the base stand Secure the base stand to the TV with the 4 provided screws CAUTION Carefully place your TV facedown on a soft flat surface to prevent damage to the TV or scratching to the screen M5 30 BASE Top Cushion NOTES Product image is on...

Page 3: ...stalling the Stand WALL MOUNT BRACKET not provided 9 11 5 mm Wall Mount Bracket Screw not provided Spacer not provided The TV s rear cover Wall Mount hole pattern VESA mm Wall Mount screw size mm 400 400 M6 ...

Page 4: ...T LAN NOTES Image for reference only Please subject to the actual TV Check the jacks for position and type before making any connections Loose connections can result in image or color problems Make sure that all connections are tight and secure HDMI 4 DIGITAL AUDIO OUT LAN HDMI 3 HDMI 2 HDMI 1 PC IN VGA PC AUDIO IN USB DC 5V 0 5A MAX USB USB DC 5V 0 5A MAX ANT HEADPHONE VOL Power OK VOL CH CH VIDE...

Page 5: ...Setting Wi Fi or Ethernet for more information Google Account Log in or register a new Google Account Select use mode Select the TV s usage mode Home Mode Retail Mode Help Make Google TV better Select sending report to Google or not Chanel installation Search and store available TV channels according to the input signal HDMI COMPONET AV BEST HDMI Video Effect BETTER COMP GOOD AV Video Camera Set t...

Page 6: ...PHONE Headphone DIGITAL AUDIO OUT Speaker Connect a VGA cable and an audio cable from the PC VGA AUDIO PC PC Connect a USB device port for browsing photos listening music and playing movies To select the VGA Press the button to display the Setting menu and select Video Input and then select the source VGA to connect from the list USB Portable Storage Device PC IN VGA PC AUDIO IN ...

Page 7: ...ess the cute key to see the available options anywhere Select a channel or input numbers Dispaly subtitles in the Live TV Display the Settings menu Display the Electronic Programming Guide in DTV mode Enter the Live TV screen Display the applications recently Confirm button Display the on screen keyboard Fast access to the all applications Run Voice Search To speak a voice command press and hold t...

Page 8: ...ot intend to use the remote control for a long time remove the batteries 1 2 3 The First Method The Setup Wizard menu appears the first time you turn on the TV Step of the remote pairing press and hold down the and buttons simultaneously until the red LED turns on When the red LED lights release the buttons and wait for the TV to pair with the remote The blue LED on the remote control will flash t...

Page 9: ...levision System PAL B G SECAM D K DVB T Environmental conditions Temperature 5 C 45 C Humidity 20 80 RH Atmospheric pressure 86 kPa 106 kPa Component mode 480I 60Hz 480P 60Hz 576I 50Hz 576P 50Hz 720P 50Hz 720P 60Hz 1080I 50Hz 1080I 60Hz 1080P 50Hz 1080P 60Hz VGA mode 640 480 800 600 1024 768 1280 1024 60Hz HDMI mode 480I 60Hz 480P 60Hz 576I 50Hz 576P 50Hz 720P 50Hz 720P 60Hz 1080I 50Hz 1080I 60Hz ...

Reviews: