background image

4

Making Connections

Turning the TV On for the First Time

The Installation Guide Menu appears the first time you turn on the TV. The wizard will 
guide you step-by-step through the initial setup and configuration of your television.

• Press [POWER] to turn on your TV, it will go straight into Setup Wizard menu.
• Press [▲/▼/◄/►] buttons to navigate the menu and change the settings. Press [OK] 

  button to confirm.

Language Setting - 

Select your desired language to be displayed on the menu.

Select region - 

 Select the country where you will operate the TV.

Remote pairing -

 Pair the remote control with the TV via Bluetooth.

Legal notice - 

View the legal information, you can send report to Hisense or not. 

Connect to the internet - 

Connect your TV to access the network via Ethernet 

cable or WiFi. Please refer to the user manual (Setting > Wi-Fi or Ethernet) for more 
information. 

Google Account -

 Log in or register a new Google Account.

Select use mode - 

Select the TV's usage mode: Home Mode / Retail Mode.

Help Make Google TV better -

 Select sending report to Google or not.

Chanel installation -

 Search and store available TV channels according to the input 

signal.

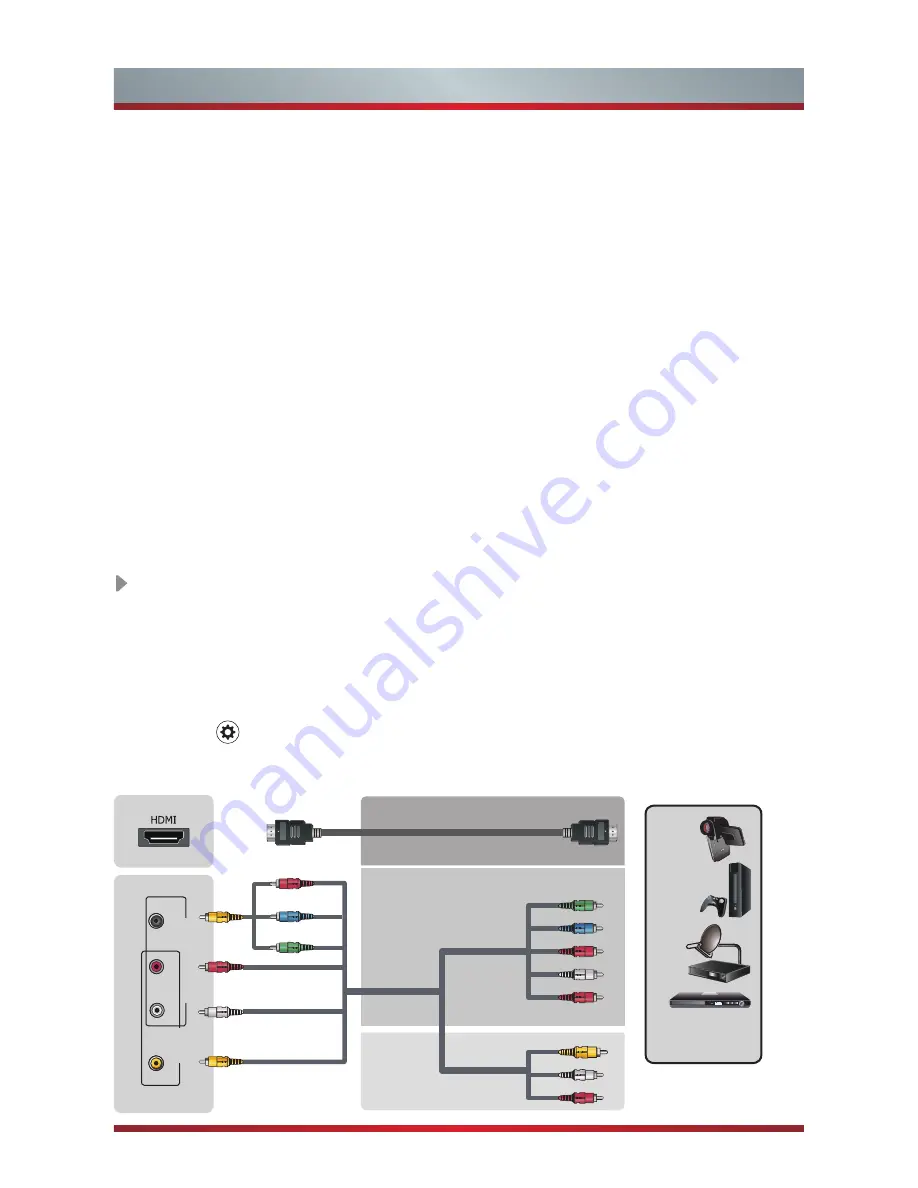
HDMI / COMPONET / AV

BEST(HDMI)

Video Effect:

BETTER

(COMP)

GOOD

(AV)

Video Camera/

Set-top Box/

Satellite Receiver

Connect an HDMI cable or COMPONET/AV Adapter from an external A/V equipment. 
No sound connection is needed for HDMI to HDMI connection. If the device signal 
resolution does not match the specification table you need to change the setting of 
device according to the table. Please consult your device user manual for instruction.   

• To select the HDMI / Component / AV 

  Press the   button to diaplay the Setting menu and select Video input, and then 

select the source [HDMI] / [Component] / [AV] to connect from the list

AV

Y
P

b

P

r

Component

L
R

Video

L
R

VIDEO

L

R

AV IN

COMPONENT

 IN

Y/P

/P

B

R

Summary of Contents for 65T810UAD

Page 1: ...nd 1 TV Rear 3 Making Connections 3 Remote Control 6 Specifications 8 Contents QUICK SETUP GUIDE Before using the TV please read this guide thoroughly and retain it for future reference For more detailed instructions please see the User Manual ES A150720 1 ...

Page 2: ...son Carefully remove TV and top cushion from the carton box Put the TV with top cushion on the cushion with its back upwards and the LCD downwards To install the base stand Secure the base stand to the TV with the 4 provided screws CAUTION Carefully place your TV facedown on a soft flat surface to prevent damage to the TV or scratching to the screen M5 30 BASE Top Cushion NOTES Product image is on...

Page 3: ...stalling the Stand WALL MOUNT BRACKET not provided 9 11 5 mm Wall Mount Bracket Screw not provided Spacer not provided The TV s rear cover Wall Mount hole pattern VESA mm Wall Mount screw size mm 400 400 M6 ...

Page 4: ...T LAN NOTES Image for reference only Please subject to the actual TV Check the jacks for position and type before making any connections Loose connections can result in image or color problems Make sure that all connections are tight and secure HDMI 4 DIGITAL AUDIO OUT LAN HDMI 3 HDMI 2 HDMI 1 PC IN VGA PC AUDIO IN USB DC 5V 0 5A MAX USB USB DC 5V 0 5A MAX ANT HEADPHONE VOL Power OK VOL CH CH VIDE...

Page 5: ...Setting Wi Fi or Ethernet for more information Google Account Log in or register a new Google Account Select use mode Select the TV s usage mode Home Mode Retail Mode Help Make Google TV better Select sending report to Google or not Chanel installation Search and store available TV channels according to the input signal HDMI COMPONET AV BEST HDMI Video Effect BETTER COMP GOOD AV Video Camera Set t...

Page 6: ...PHONE Headphone DIGITAL AUDIO OUT Speaker Connect a VGA cable and an audio cable from the PC VGA AUDIO PC PC Connect a USB device port for browsing photos listening music and playing movies To select the VGA Press the button to display the Setting menu and select Video Input and then select the source VGA to connect from the list USB Portable Storage Device PC IN VGA PC AUDIO IN ...

Page 7: ...ess the cute key to see the available options anywhere Select a channel or input numbers Dispaly subtitles in the Live TV Display the Settings menu Display the Electronic Programming Guide in DTV mode Enter the Live TV screen Display the applications recently Confirm button Display the on screen keyboard Fast access to the all applications Run Voice Search To speak a voice command press and hold t...

Page 8: ...ot intend to use the remote control for a long time remove the batteries 1 2 3 The First Method The Setup Wizard menu appears the first time you turn on the TV Step of the remote pairing press and hold down the and buttons simultaneously until the red LED turns on When the red LED lights release the buttons and wait for the TV to pair with the remote The blue LED on the remote control will flash t...

Page 9: ...levision System PAL B G SECAM D K DVB T Environmental conditions Temperature 5 C 45 C Humidity 20 80 RH Atmospheric pressure 86 kPa 106 kPa Component mode 480I 60Hz 480P 60Hz 576I 50Hz 576P 50Hz 720P 50Hz 720P 60Hz 1080I 50Hz 1080I 60Hz 1080P 50Hz 1080P 60Hz VGA mode 640 480 800 600 1024 768 1280 1024 60Hz HDMI mode 480I 60Hz 480P 60Hz 576I 50Hz 576P 50Hz 720P 50Hz 720P 60Hz 1080I 50Hz 1080I 60Hz ...

Reviews: