background image

Video Settings

20 


ML23.8 User Manual, 99182A, April 2022

Color Menu

Description

Color balance

Provides several color adjustment modes, including preset 

color temperatures and a User color mode that allows individual 

adjustment of Red, Green, and Blue.  The factory default setting 

for this product is Normal�

•  User color

 allows individual adjustment of Red, Green, and 

Blue�

•  Warm

 adds red to the screen for warmer white and richer 

red�

•  Normal

 is the factory default setting.

•  Cold

 adds blue to the screen image for cooler white.

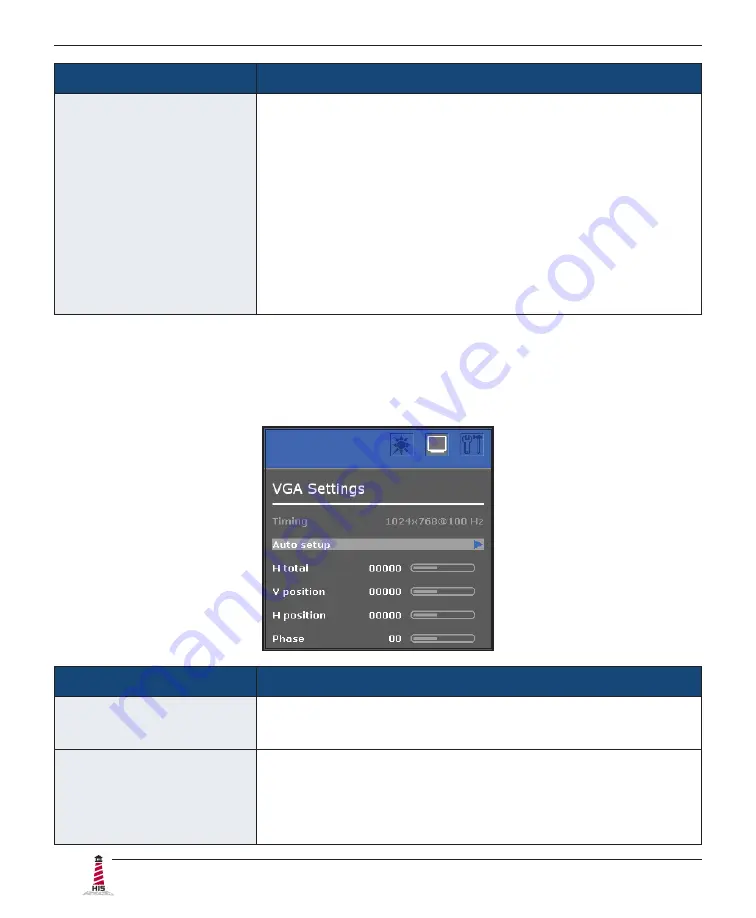
VGA Settings Menu

The VGA Settings menu includes the Timing, Auto setup, H total, V position, H position, and 

Phase functions�

VGA Settings Menu

Description

Timing

Displays the timing mode (video signal input) coming from the 

graphics card in the computer.

Auto setup

• 

Automatically sizes, centers, and fine tunes the video signal 

to eliminate waviness and distortion�

• 

This feature may also be accessed by pressing the Select


[ SEL ] button outside of the OSD menu.

Summary of Contents for HIS-ML23.8 A Series

Page 1: ...23 8 PANEL MOUNT INDUSTRIAL MONITOR USER MANUAL Model No HIS ML23 8 _ _ _ A REVISION A ...

Page 2: ...2 Bench test Configuration 8 Connect Video and Power Cables 8 Connect and Set Up Touch Screen 10 Step 3 Install into Panel 13 Video Settings 15 Setting the Timing Mode 15 Control Panel Buttons 16 On Screen Display OSD Menus 18 Picture Menu 18 VGA Settings Menu 20 Setup Menu 21 Cleaning Instructions 24 Troubleshooting 25 Video Troubleshooting 25 Touch Screen Troubleshooting 27 Specifications 29 Dis...

Page 3: ...e socket outlet shall be installed near the equipment and shall be easily accessible When using DC power input The HIS ML23 8 subject unit is to be powered by a Listed Power Supply suitable for the application with outputs at SELV LPS or Class 2 levels rated 10 8 26 4VDC 2 3 A max The equipment is not intended to connect directly to a DC Mains source FCC Notice This equipment has been tested and f...

Page 4: ... Class I Division 2 Groups A B C and D Class II Division 2 Groups F and G Class III or non hazardous locations only Device is open type and is to be installed in an enclosure suitable for the environment that is only accessible with the use of a tool FR Cet équipement peut être utilisé dans la Classe I Division 2 Groupes A B C et D Classe II Division 2 Groupes F et G et Classe III endroits hasarde...

Page 5: ...l Drawings Front View Bottom View 376 6 mm 14 83 596 8 mm 23 50 528 6 mm 20 81 298 0 mm 11 73 596 8 mm 23 50 8 9 mm 0 35 542 6 mm 21 37 46 1 mm 1 81 Design to maximum depth of 63 5 mm to ensure future compatibility with later revisions and replacement units 55 0 mm 2 16 ...

Page 6: ...Drawings 6 ML23 8 User Manual 99182A April 2022 Rear View Side View 271 3 mm 10 68 50 0 mm 1 97 100 mm VESA Mounting Pattern M4 screws provided 16 mm maximum depth of screw 312 6 mm 12 31 8 9 mm 0 35 46 1 mm 1 81 ...

Page 7: ... C 122 F f Remember that heat rises the temperature at the top of the cabinet will be much hotter than at the bottom if air inside the enclosure is not actively circulating Even in a sealed enclosure use of a circulation fan can greatly reduce temperature f Also remember that even though this product is designed to operate at 50 C the life span of any electronic device is shortened when it is cons...

Page 8: ...ll monitors are shipped with a VGA to DVI video cable a VGA to DVI adapter and a power mains cable The cable ports are located on the rear of the monitor Video Connection DisplayPort connections are supported natively with the integrated DisplayPort connector Optional adapters are available for Mini DisplayPort An integrated DVI I connector is used to support both digital DVI HDMI and analog VGA R...

Page 9: ...onitor AC power input accepts 100 to 240 VAC 0 6 0 3 A 60 50 Hz Loosen the retaining clip for the power cable on the rear of the monitor Connect the AC power cable to the power input port on the monitor then retighten the retaining clip Connect the other end into a nearby outlet HAZ LOC NOTE If the retaining clip screw is not tightened the product will not comply with Class I II III Division 2 Haz...

Page 10: ... Relief An integrated cable retention bracket is installed on the monitor s USB port and secures the connection Insert the USB cable connector through the retention bracket and into the monitor Connect the other end to the USB port on the host computer Multi Touch PCAP Touch Screen Models HIS ML23 8 FPVA and HIS ML23 8 FSVA Multi Touch PCAP models are also precalibrated at the factory and do not r...

Page 11: ...en both ports are available on the computer USB is preferred Installing the Driver USB Connections 1 Do not plug the USB connection into the computer until the driver installation is complete If the USB connection has already been made disconnect at this point 2 Download the appropriate driver for your operating system from the address listed above Click to Run the software when prompted 3 Follow ...

Page 12: ...ith Class I II III Division 2 Hazardous Location requirements 2 Download the appropriate driver for your operating system from the address listed above Click to Run the software when prompted Follow the on screen prompts to complete the driver installation 3 Proceed with Calibration below Calibrate the Touch Screen Single Touch Resistive Models Only Once the driver has finished installing you are ...

Page 13: ...the panel Allow 25 4 mm 1 0 extra space behind and on each side for air ventilation Step 3 Install into Panel Once you have completed the full bench test configuration and confirmed that all components are working properly you are ready to install the monitor into its panel cutout WARNING Hope Industrial Systems will not assume liability for damage to internal electronics due to improper installat...

Page 14: ...nsert the unit into the front of the panel and re attach the collar NOTE Contact Hope Industrial Systems if for any reason your application does not allow for installation of the collar 8 Tighten all 10 nuts to a torque of 1 13 1 7 N m 10 15 inch pounds to ensure a watertight seal between the bezel gasket on the monitor and the equipment panel Go around all nuts twice to ensure an even compression...

Page 15: ...e use the On Screen Display OSD controls to adjust the screen image TIP For the best picture quality set your computer graphics adapter timing mode to VESA 1920 x 1080 60 Hz Please refer to the computer graphics adapter manufacturer s manual for instructions on setting the resolution and timing mode In Microsoft Windows these settings may be found at the following location f 2000 XP Control Panel ...

Page 16: ...tomatically after 60 seconds This is adjustable through the OSD Time out setting in the Setup menu 2 To navigate through the main OSD menu press the left or right button 3 To select a control to adjust press the Select SEL button to navigate down through the menu 4 To adjust a selected control press the left or right button or press the right button to open the submenu for a selected control 5 To ...

Page 17: ...displayed Shortcut to adjust Brightness When the OSD menu IS displayed Navigates left in the main OSD menu Decreases adjustments for the selected control Right Up When the OSD menu IS displayed Navigates right in the main OSD menu Displays the submenu for the selected control Increases adjustments for the selected control Power Indicator Light LED lit green power is ON LED not lit or lit red power...

Page 18: ... Inputs OSD Info Reset to factory defaults Source scan and Advanced Setup functions Picture Menu The Picture menu includes the Contrast Brightness Sharpness and Color functions Picture Menu Description Contrast Adjusts the difference between the image background black level and the foreground white level Brightness Adjusts the background black level of the screen image This feature may also be acc...

Page 19: ...tent white red blue green Please contact our support team for further details NOTE The Auto color function is only available when using the analog VGA connector Theme mode Allows the user to select from three image modes for different usage as well as the default Off setting Multimedia optimizes the screen for multimedia applications such as video playback Desktop optimizes the screen for desktop ...

Page 20: ... the screen for warmer white and richer red Normal is the factory default setting Cold adds blue to the screen image for cooler white VGA Settings Menu The VGA Settings menu includes the Timing Auto setup H total V position H position and Phase functions VGA Settings Menu Description Timing Displays the timing mode video signal input coming from the graphics card in the computer Auto setup Automat...

Page 21: ...n Vertical Position Moves the screen image up and down H position Horizontal Position Moves the screen image left and right Phase Adjusts the focus of the screen image Allows the user to remove any horizontal noise and sharpen the image of characters Setup Menu The Setup menu includes the Inputs OSD Info Reset to factory defaults Source scan and Advanced Setup functions Setup Menu Description Inpu...

Page 22: ...uage used in the menus and control screens Rotation allows the user to rotate the OSD by 0 90 180 or 270 A Mirrored setting is also available which is a horizontal reflection of the OSD OSD Position allows the user to move the OSD by its x Position or y Position Show Logo allows the user to disable the power on splash screen Info Displays the monitor s Software Software Revision Timing mode and Mo...

Page 23: ... video board firmware Do not activate without assistance from Hope Industrial technical support CVT Mode set to On will force the display to only render VESA CVT standard signals When set to Off the default setting the display will use its entire internal lookup table when syncing to an incoming video signal CVT Mode should only be set to On as a troubleshooting step if the display is having troub...

Page 24: ...brasive or oily content Vinegar or ammonia will not hurt the screen The anti reflective coatings on glass window equipped displays are physically part of the surface of the glass and resist degradation DO NOT USE ABRASIVE MATERIALS SUCH AS PAPER TOWELS OR DIRTY SHOP RAGS ON THE DISPLAY AS IT WILL SCRATCH THE PROTECTIVE COATING ALWAYS USE A SOFT CLOTH PREFERABLY MADE OF COTTON ...

Page 25: ...input voltage is 10 8 to 26 4 VDC No image on the screen and control s Power Indicator light is lit solid red Monitor is not powered on Press the Power button on the monitor for 1 2 seconds to turn the monitor on and make sure the Power Indicator light is lit green No image on the screen and control s Power Indicator light is blinking orange or blinking green Video cable is not plugged in correctl...

Page 26: ...s menu This function may also be activated by pressing the Select SEL button outside of the OSD menu Fine tune the picture by manually adjusting the image using the settings in the OSD s VGA Settings menu Analog VGA signal is not a standard CVT signal this does not apply to digital signals Disable the CVT Mode function in the OSD s Setup Advanced Setup menu This allows the monitor to use the contr...

Page 27: ...nd PC USB cable length exceeds 5 meters USB cables have a 5 meter limitation Exceeding this length may cause connection issues without the use of a USB or KVM Extender device Please contact Hope Industrial support for extension options The screen responds to touch but does not follow my finger Touch screen calibration issue Hope Industrial PCAP and Multi Touch Resistive touch screens are calibrate...

Page 28: ...2 Connections above Serial connection in use but connection to computer is not using the same port for which the touch screen driver is installed The Serial cable must be connected to the computer s COM port prior to driver installation to allow touch screen detection and association with the correct COM port To fix uninstall the driver reboot the computer then follow instructions in section Insta...

Page 29: ...m Number of Colors 16 7 million Brightness white 350 nits cd m2 Viewing Angle Hori Vert 178 178 Contrast Ratio typical 1000 1 Backlight typical LED 40 000 hour brightness half life Environmental Operating Temperature 0 to 50 C 32 to 122 F Storage Temperature 20 to 60 C 4 to 140 F Humidity 20 to 90 non condensing Operating Shock 15 g 6 msec half sine Operating Vibration sine 1 0g swept sine 9 500 H...

Page 30: ...orizontal Scan 24 82 kHz Vertical Scan 50 75 Hz Common Supported Video Signal Formats not a complete list 1920 x 1080 50 60 Hz 1680 x 1050 60 70 Hz 1600 x 1200 50 60 65 70 75 Hz 1600 x 900 60 Hz 1400 x 1050 60 75 Hz 1440 x 900 60 75 Hz 1366 x 768 60 Hz 1360 x 768 50 60 Hz 1280 x 1024 60 67 72 75 Hz 1280 x 960 60 67 72 75 Hz 1280 x 800 50 60 75 Hz 1280 x 768 50 60 75 Hz 1280 x 720 50 60 Hz 1152 x 9...

Page 31: ...s W x H x D 596 8 mm x 376 6 mm x 8 9 mm 23 50 x 14 83 x 0 35 Cutout Dimensions W x H 566 7 mm x 342 4 mm 22 31 x 13 48 0 5 mm 0 020 Net Weight 7 71 kg 17 lbs Shipping Weight 13 61 kg 30 lbs Functional Control Panel Buttons Menu SEL Navigate Down Auto setup Left Down Brightness Right Up Power On Screen Display OSD Menus Contrast Brightness Sharpness Color Timing Auto setup H total V position H pos...

Page 32: ... CAN ICES 3A NMB 3A Issue 07 NOTE DC power must use shielded DC input cable CE NOTE DC power must use shielded DC input cable UKCA NOTE DC power must use shielded DC input cable NOM Registration No NOM 019 SCFI 1998 Environmental WEEE Registration No WEE DJ1859ZX for UK only Enclosure UL 50E File No E318630 Hazardous Location UL Rated for Hazardous Locations Industrial Control Equipment for Hazard...

Page 33: ... is needed we will give you a Return Material Authorization RMA number This RMA number must be conspicuously marked on the outside of the shipping box Hope Industrial Systems will not accept shipments not accompanied by the RMA number Except where otherwise noted you must ship or deliver the product to Hope Industrial Systems Freight prepaid What Does This Warranty Not Cover This warranty does not...

Page 34: ...34 ML23 8 User Manual 99182A April 2022 This page intentionally left blank ...

Page 35: ...ML23 8 User Manual 99182A April 2022 35 This page intentionally left blank ...

Page 36: ... 800 001 0486 HopeIndustrial de Italy Phone 39 80 0740414 HopeIndustrial it Spain Phone 34 91 1438229 HopeIndustrial es Mexico Phone 52 800 9531935 HopeIndustrial mx EU Authorized Representative Falcons Logistics B V Hoeksteen 26 F 2132 MS Hoofddorp Netherlands HopeIndustrial eu Phone 31 20 241 0853 Sales sales HopeIndustrial eu Support support HopeIndustrial eu Accounting accounting HopeIndustria...

Reviews: